Vue Essentials (Fundmentals)
Introduction
What is vue
vue เป็น framework สำหรับการสร้าง User Interface โดยมันสร้างมาจาก HTML, CSS, JavaScript
โดยจะเป็นการเขียนแบบ component-based programming model ที่จะช่วยสร้าง User Interface ได้ซับซ้อนขึ้น
ตัวอย่าง:
import { createApp, ref } from 'vue'

createApp({
  setup() {
    return {
      count: ref(0)
    }
  }
}).mount('#app')
<div id="app">
  <button @click="count++" >
    Count is: {{ count }}
  </button>
</div>
โค้ดด้านบนยกตัวอย่าง 2 features หลักของ Vue
Declarative Rendering: Vue จะมี template syntax ที่อนุญาตให้เราอธิบาย HTML output ออกมา ในรูปแบบของ JavaScript state
Reactivity: Vue จะติดตาม JavaScript state และ จะเปลี่ยน DOM เมื่อมีการเปลี่ยนแปลงของ state เกิดขึ้น
The Progressive Framework
Vue เป็น framework และ ecosystem ที่จะครอบคลุม features ส่วนใหญ่ที่ต้องใช้ในการเขียน Frontend แต่ website มีความหลากหลายอย่างมาก Vue ถูกออกแบบมาให้มีความหลากหลายและสามารถนำมาใช้ได้ ขึ้นอยู่กับการใช้งานของเรา. Vue สามารถใช้ได้หลายแบบมาก
- สร้าง static HTML
- การเขียน Web Component
- Single-Page Application (SPA)
- Fullstack / Server-Side Rendering (SSR)
- Jamstack / Static Site Generation (SSG)
- desktop, mobile, WebGL, หรือแม้แต่ terminal
ถ้าคุณกำลังจะใช้ concepts พวกนี้. ไม่ต้องห่วง เราจะสอนให้ใช้ ขอแค่มีความรู้พื้นฐาน HTML และ JavaScript และควรเรียนตามไปเรื่อย ๆ
Single-File Components
ในการเขียน Vue เราจะเขียนแบบ HTML-like file format หรือเรียกว่า Single-File Component (หรือที่รู้จักกันดีคือ *.vue files) โดยเราจะสามารถเขียน logic ของ Component (JavaScript), template (HTML), และ ตกแต่งได้ (CSS) ภายใน file เดียว
written in SFC format:
<script setup>
import { ref } from 'vue'
const count = ref(0)
</script>

<template>
  <button @click="count++">Count is: {{ count }}</button>
</template>

<style scoped>
button {
  font-weight: bold;
}
</style>
API Styles
Vue สามารถเขียนเป็น 2 API style ได้: Options API และ Composition API.
Options API
Option API เราสามารถประกาศ Logic โดยใช้ Object ตัวเลือกได้เช่น data, methods, และ mounted Properties โดยเราจะสามารถใช้ Properties พวกนี้ได้ ผ่านการใช้ this ภายใน function
<script>
export default {
  // Properties returned from data() become reactive state
  // and will be exposed on `this`.
  data() {
    return {
      count: 0
    }
  },

  // Methods are functions that mutate state and trigger updates.
  // They can be bound as event handlers in templates.
  methods: {
    increment() {
      this.count++
    }
  },

  // Lifecycle hooks are called at different stages
  // of a component's lifecycle.
  // This function will be called when the component is mounted.
  mounted() {
    console.log(`The initial count is ${this.count}.`)
  }
}
</script>

<template>
  <button @click="increment">Count is: {{ count }}</button>
</template>
Composition API
Composition API เราจะสามารถประกาศ component's logic โดยการ import API function เข้ามา
Composition API โดยปกติจะใช้กับ <script setup>
นี่คือ Component เดียวกัน และ template เดียวกัน แต่ต่างกันโดยใช้ Composition API
<script setup>
import { ref, onMounted } from 'vue'

// reactive state
const count = ref(0)

// functions that mutate state and trigger updates
function increment() {
  count.value++
}

// lifecycle hooks
onMounted(() => {
  console.log(`The initial count is ${count.value}.`)
})
</script>

<template>
  <button @click="increment">Count is: {{ count }}</button>
</template>
Which to Choose?
ทั้งสอง API styles มีความสามารถในการครอบคลุมการใช้งานทั่วไปได้อย่างครบถ้วน พวกมันเป็น Interface ที่แตกต่างกันแต่ขับเคลื่อนด้วยระบบพื้นฐานเดียวกัน. จริง ๆ แล้ว Options API ถูกสร้างขึ้นมาบน Composition API แนวคิดพื้นฐานและความรู้เกี่ยวกับ Vue นั้นใช้ร่วมกันได้ทั้งสอง Style
Options API มุ่งเน้นไปที่แนวคิดของ "component instance" (this ดังที่เห็นในตัวอย่าง) ซึ่งโดยทั่วไปแล้วสอดคล้องกับรูปแบบความคิดแบบ class-based สำหรับผู้ใช้ที่มาจากพื้นฐานภาษา OOP มันยังเป็นมิตรกับผู้เริ่มต้นมากกว่าโดยการซ่อนรายละเอียดของ reactivity และบังคับให้มีการจัดระเบียบโค้ดผ่านกลุ่มตัวเลือก
Composition API มุ่งเน้นไปที่การประกาศตัวแปรสถานะแบบ reactive โดยตรงในขอบเขตของฟังก์ชัน และการรวมสถานะจากหลายฟังก์ชันเข้าด้วยกันเพื่อจัดการกับความซับซ้อน มันมีรูปแบบที่อิสระมากกว่าและต้องการความเข้าใจเกี่ยวกับวิธีการทำงานของ reactivity ใน Vue เพื่อใช้งานอย่างมีประสิทธิภาพ แต่ในทางกลับกัน ความยืดหยุ่นของมันช่วยให้สามารถสร้างรูปแบบที่มีประสิทธิภาพมากขึ้นสำหรับการจัดระเบียบและนำลอจิกกลับมาใช้ใหม่
คุณสามารถเรียนรู้เพิ่มเติมเกี่ยวกับการเปรียบเทียบระหว่าง 2 Styles และประโยชน์ที่อาจเกิดขึ้นของ Composition API ได้ใน Composition API FAQ
หากคุณเป็นมือใหม่ใน Vue นี่คือคำแนะนำทั่วไปของเรา:
-
สำหรับการเรียนรู้:
ให้เลือก Style ที่ดูเข้าใจง่ายสำหรับคุณ อีกครั้ง แนวคิดหลักส่วนใหญ่นั้นใช้ร่วมกันได้ระหว่างสองสไตล์ คุณสามารถเรียนรู้อีกสไตล์หนึ่งได้ในภายหลัง
-
สำหรับการทำงานจริง:
- ใช้ Options API หากคุณไม่ได้ใช้เครื่องมือสร้าง หรือวางแผนที่จะใช้ Vue ในสถานการณ์ที่มีความซับซ้อนต่ำ เช่น การปรับปรุงแบบก้าวหน้า
- ใช้ Composition API + Single-File Components หากคุณวางแผนที่จะสร้างแอปพลิเคชันเต็มรูปแบบด้วย Vue
คุณไม่จำเป็นต้องยึดติดกับ Style เดียวในระหว่างการเรียนรู้ เอกสารที่เหลือจะให้ตัวอย่างโค้ดในทั้งสอง Style ตามความเหมาะสม และคุณสามารถสลับระหว่าง Style ได้ตลอดเวลาโดยใช้สวิตช์ API Preference ที่ด้านบนของแถบด้านซ้าย
Quick Start
Creating a Vue Application
ในบทนี้ เราจะมาพาสร้าง Vue บนเครื่องของคุณกัน โดยเราจะใช้ **Vite** ในการสร้าง
ทำให้มั่นใจว่า Node.js ของคุณ เป็น Version ล่าสุดแล้ว แล้วก็ทำงานอยู่บน directory ปัจจุบัน ที่คุณต้องการจะสร้างโปรเจค เขียนคำสั่งตามนี้
$ npm create vue@latest
โดยคำสั่งนี้จะติดตั้ง และ execute **create-vue** หลังจากนั้น Command promt จะขึ้นตัวเลือกขึ้นมาให้เราเลือกรูปแบบของการติดตั้ง
✔ Project name: … <your-project-name>
✔ Add TypeScript? … No / Yes
✔ Add JSX Support? … No / Yes
✔ Add Vue Router for Single Page Application development? … No / Yes
✔ Add Pinia for state management? … No / Yes
✔ Add Vitest for Unit testing? … No / Yes
✔ Add an End-to-End Testing Solution? … No / Cypress / Nightwatch / Playwright
✔ Add ESLint for code quality? … No / Yes
✔ Add Prettier for code formatting? … No / Yes
✔ Add Vue DevTools 7 extension for debugging? (experimental) … No / Yes

Scaffolding project in ./<your-project-name>...
Done.
ถ้าคุณไม่มั่นใจเกี่ยวกับตัวเลือก ให้เลือก No ไปก่อน. เมื่อ Project ถูกสร้างแล้ว ให้เขียนคำสั่งนี้ เพื่อที่จะโหลด modules ต่าง ๆ และเริ่มรันโปรแกรม
$ cd <your-project-name>
$ npm install
$ npm run dev
ตอนนี้คุณควรที่จะมี Vue project รันอยู่ และจำไว้ว่าตัวอย่างนี้ จะใช้ Composition API
- การ Setup IDE ที่แนะนำ เราจะใช้ Visual Studio Code + Vue - Official extension.
- อุปกรณ์อื่น ๆ ร่วมถึง backend framework ถูกอธิบายไว้ใน Tooling Guide.
- ถ้าอยากเรียรู้ Vite เพื่อ สามารถเรียนรู้เพิ่มเติมได้จาก Vite docs.
- ถ้าคุณเลิก TypeScript สามารถเรียนรู้เพิ่มเติมได้จาก TypeScript Usage Guide.
และเมื่อคุณต้องการที่จะขึ้น production ก็สามารถเขียนคำสั่งได้ตานี้
$ npm run build
Creating a Vue Application
The application instance
Vue application ทุกตัวจะเริ่มจาก **createApp** function
import { createApp } from 'vue'

const app = createApp({
  /* root component options */
})
The Root Component
ออบเจ็กต์ที่เราส่งเข้าไปใน createApp นั้นจริง ๆ แล้วคือ Component. ทุก Application ต้องมี "Root Component" ที่สามารถบรรจุ Component อื่น ๆ เป็น children ของมันได้
import { createApp } from 'vue'
// import the root component App from a single-file component.
import App from './App.vue'

const app = createApp(App)
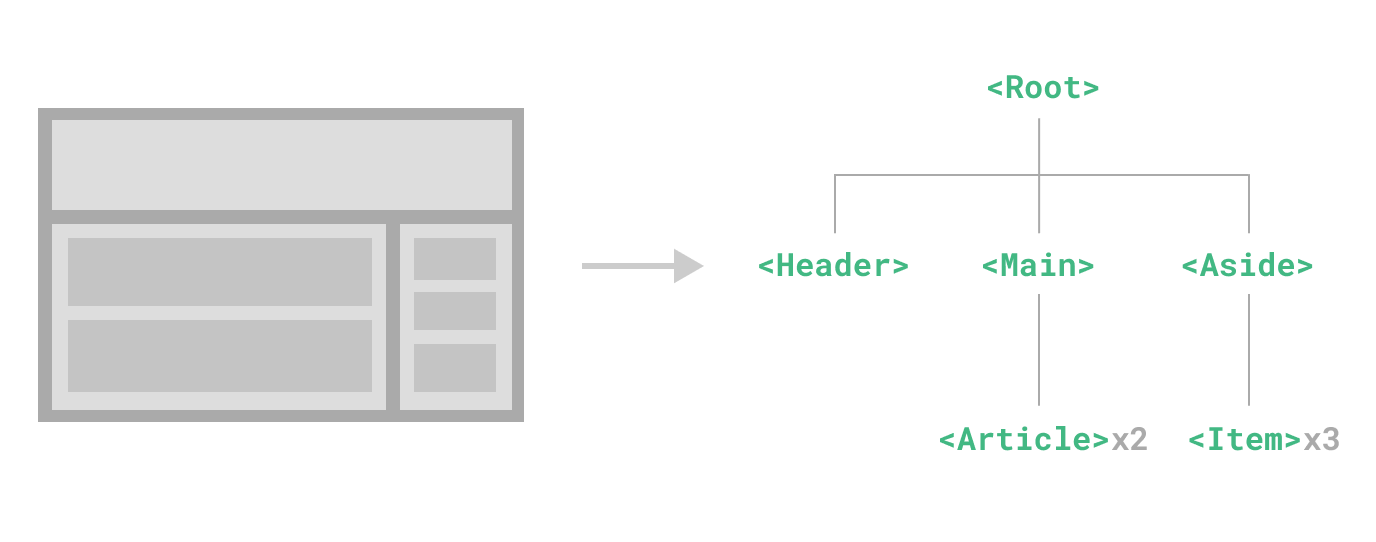
examples หลาย ๆ ตัวต้องการแค่ single component. application ส่วนใหญ่จะถูกอธิบายในรูปแบบของ Tree
และ reuseable Component ตัวอย่างเช่น Todo Application component tree อาจจะมีรูปแบบตามนี้
App (root component)
├─ TodoList
│  └─ TodoItem
│     ├─ TodoDeleteButton
│     └─ TodoEditButton
└─ TodoFooter
   ├─ TodoClearButton
   └─ TodoStatistics
ในบทต่อ ๆ ไป เราจะพูดถึง เราจะพูดถึงวิธีการกำหนดและประกอบ components หลาย ๆ ตัวเข้าด้วยกัน
แต่ก่อนไปถึงขนาดนั้น เราจะสนใจแค่ Component เดี่ยว ๆ ก่อน
Mounting the App
application ของเราจะไม่ถูก render จนกว่า .mount() จะถูกเรียกใช้งาน และจะใส่ argument ที่เป็น container โดยสามารถเป็น DOM หรือ selector string:
<div id="app"></div>
app.mount('#app')
เนื้อหาของ root component ของแอปจะถูก render ภายใน container element. ตัว container element เองไม่ถือว่าเป็นส่วนหนึ่งของ Application
Method .mount() ควรถูกเรียกใช้ หลังจากการกำหนดค่า Application และจัดการทรัพยากรณ์เสร็จสิ้นแล้ว
In-DOM Root Component Template
template สำหรับ root component โดยปกติจะเป็นส่วนหนึ่งของตัว component เอง แต่ก็เป็นไปได้ที่จะกำหนด template แยกต่างหากโดยเขียนมันลงไปโดยตรงในตัว mount container:
<div id="app">
  <button @click="count++">{{ count }}</button>
</div>
import { createApp } from 'vue'

const app = createApp({
  data() {
    return {
      count: 0
    }
  }
})

app.mount('#app')
Vue จะใช้ innerHTML เป็น Container โดยอัติโนมัต ถ้ามันไม่มี template
In-DOM templates มักจะถูกใช้ใน Applications ที่ using Vue without a build step นอกจากนี้ยังสามารถใช้ร่วมกับ server-side frameworks ได้ ซึ่ง root template อาจถูกสร้างขึ้นจาก Server
App Configurations
application จะมี .config Object ที่จะอนุญาตให้เรากำหนด app-level options บางอย่างได้ เช่น error handler ที่จะตรววจจับ error จากทุก ๆ Component
app.config.errorHandler = (err) => {
  /* handle error */
}
อีกตัวอย่างหนึ่งในการเข้าถึง Component
app.component('TodoDeleteButton', TodoDeleteButton)
นี่จะทำให้ TodoDeleteButton สามารถใช้ได้จากทุกที่ใน Application
เราสามารถเรียนรู้ API เพิ่มเติมได้จาก API reference.
Multiple application instances
เราสามารถสร้าง Application ได้มากกว่า 1 ตัว ใน 1 หน้า. createApp อนุญาตให้เราสร้าง Vue application ได้หลายตัวได้ โดยจะแสดงขึ้นมาที่หน้าเดียวกัน โดยแต่ละตัว ก็จะใช้ทรัพยากรณ์ตามที่มันต้องการ
const app1 = createApp({
  /* ... */
})
app1.mount('#container-1')

const app2 = createApp({
  /* ... */
})
app2.mount('#container-2')
หากคุณกำลังใช้ Vue ที่ render จาก Server ในการควบคุม Page ขนาดใหญ่. ควรระวังการใช้ 1 application ในการควบคุมทั้งหมด เราควรแบ่งเป็น Application เล็ก ๆ และค่อยรวมกันเป็นอันเดียว
Template Syntax
Vue template ใช้ HTML เป็น syntax ที่จะอนุญาตให้ DOM แสดงผลข้อมูลของ Component เราได้ โดยการใช้ bind
ภายใต้ Vue จะคอมไพล์ template ไปเป็นโค้ด JavaScript ที่มีประสิทธิภาพสูง เมื่อรวมกับระบบ reactivity แล้ว Vue จะสามารถคำนวณได้อย่างชาญฉลาดว่าต้อง re-render component ใดบ้างในจำนวนน้อยที่สุด และใช้การจัดการ DOM ในปริมาณน้อยที่สุดเมื่อสถานะของแอปเปลี่ยนแปลง
ถ้าคุณคุ้นชินกับการใช้งาน Virtual DOM และต้องการรีดประสิทธิภาพของ JavaScript คุณสามารถเรียนรู้การใช้งาน directly write render functions แทนการใช้ template ได้ โดยมีการใช้งานร่วมกับ JSX
Text Interpolation
สิ่งที่พื้นฐานที่สุดของการแสดงข้อมูล คือ text interpolation โดยการใช้ “Mustache” syntax (ปีกกาสองตัว):
<span>Message: {{ msg }}</span>
mustache จะแทนที่ค่าจากตัวแปรที่อยู่ใน Component และจะ update ตลอดเมื่อ msg property เปลี่ยนแปลง
Raw HTML
จากตัวอย่างด้านบน ปีกกาสองตัวจะโชว์ข้อความเปล่า ไม่ใช่ HTML และถ้าเราต้องการจะที่แสดง HTML ออกไป
เราต้องใช้ v-html directive:
<p>Using text interpolation: {{ rawHtml }}</p>
<p>Using v-html directive: <span v-html="rawHtml"></span></p>
Using text interpolation: <span style="color: red">This should be red.</span>

Using v-html directive: This should be red.
เราได้เรียนรู้สิ่งใหม่แล้ว. v-html ที่เราเห็นเรียกว่า directive. Directives คือ Attribute ที่มีตัวนำหน้า v- ในการเกล่าถึงว่าพวกมันเป็น attributes พิเศษจาก Vue โดยมันจะทำให้ HTML element update อยู่เสมอ
span จะถูกแทนที่โดย rawHtml property และจะถูกแปลงเป็น HTML
Attribute Bindings
Mustaches จะไม่สามารถใช้กับ Attribute ได้ ดังนั้นเรจะใช้ **v-bind directive** แทน
<div v-bind:id="dynamicId"></div>
โดย id Attribute จะถูกเชื่อมเข้ากับ ตัวแปรที่เรากำหนดลงไป และถ้าค่าของมันเป็น undefined หรือ null
Attribute จะถูกลบออก
Shorthand
เพราะว่า v-bind ถูกใช้งานบ่อย เลยมี Shorthand ออกมา
<div :id="dynamicId"></div>
Same-name Shorthand
- Only supported in 3.4+
ถ้า Attribute มีชื่อเดียวกันกับตัวแปร เราสามารถเขียนแบบนี้ได้
<!-- same as :id="id" -->
<div :id></div>

<!-- this also works -->
<div v-bind:id></div>
นี่เหมือนกับการเขียน v-bind ปกติ แต่ว่าจะซัพพอร์ตตั้งแต่ version 3.4 ขึ้นไป
Boolean Attributes
**Boolean attributes** เป็น Attirbute ที่สามารถระบุค่า true / false ได้ ตัวอย่างเช่น disabled เป็น Attribute ที่รับค่า true / false เข้ามา
<button :disabled="isButtonDisabled">Button</button>
disabled จะถูกแสดงออกมาถ้า isButtonDisabled เป็นค่า true และมันจะถูกแสดง ถ้าค่านั้นเป็น String เปล่า <button disabled=""> สำหรับค่าอื่นที่เป็น false, element จะไม่ถูกแสดงผล
Dynamically Binding Multiple Attributes
ถ้าคุณมี JavaScript Object ที่แสดงถึง multiple attributes ที่เป็นแบบนี้
const objectOfAttrs = {
  id: 'container',
  class: 'wrapper',
  style: 'background-color:green'
}
เราสามารถ bind พวกมันโดยใช้แค่ v-bind ตัวเดียวได้
<div v-bind="objectOfAttrs"></div>
Using JavaScript Expressions
ผ่านมาตั้งนาน เราเห็นแค่การใช้ property ปกติใน template ของเรา แต่เอาจริง ๆ Vue สนับสนุน JavaScript expressions ทั้งหมดภายใน binding
{{ number + 1 }}

{{ ok ? 'YES' : 'NO' }}

{{ message.split('').reverse().join('') }}

<div :id="`list-${id}`"></div>
expressions เหล่านี้ จะถูกเขียนในภาษา JavaScript
โดยเราสามารถใช้ expresstions ได้ในตำแหน่งเหล่านี้
- interpolations (mustaches)
- attributes ที่เริ่มต้นด้วย
v-
Expressions Only
binding แต่ละตัว สามารถมี expression ได้แค่ตัวเดียว. expression เป็นโค้ดที่มีค่าออกมา และสามารถ return ออกมาได้
แต่ Code ต่อไปนี้ จะไม่สามารถทำงานได้
<!-- this is a statement, not an expression: -->
{{ var a = 1 }}

<!-- flow control won't work either, use ternary expressions -->
{{ if (ok) { return message } }}
Calling Functions
เราสามารถเรียกใช้ function ภายใน binding ได้
<time :title="toTitleDate(date)" :datetime="date">
  {{ formatDate(date) }}
</time>
Restricted Globals Access
Template expressions เป็น sandboxed และสามารถเข้าถึงได้แค่ restricted list of globals. เช่น Math และ Date. โดยเราไม่สามารถจะเข้าถึง window ได้ อย่างไรก็ตาม เราสามารถเข้าถึงได้โดยการ
Directives
Directives เป็น attributes พิเศษที่มี v- นำหน้า เพื่อให้ Vue รู้ว่านี่เป็น Attribute ของ Vue โดยสามารถดูได้จาก built-in directives, รวมถึง v-html และv-bind ที่เราได้อธิบายไปด้านบน
ค่าของ Directive attribute จะเป็น expressions ของ JavaScript เพียงตัวเดียว (โดยยกเว้น v-for, v-on และv-slot ที่เราจะพูดถึงทีหลังในบทต่อ ๆ ไป) หน้าที่ของ directive คือการ update DOM ตามค่าที่เปลี่ยนแปลงไปของตัวแปร
<p v-if="seen">Now you see me</p>
v-if จะทำการแสดงหรือไม่แสดง <p> ตามค่าตัวแปรของ seen
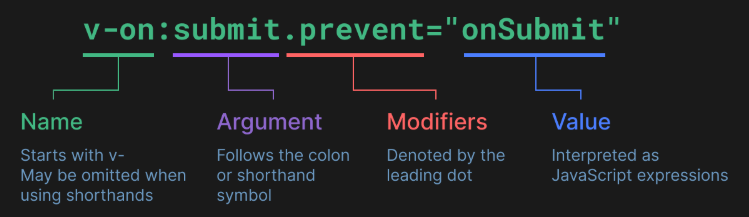
Arguments
directives บางตัวสามารถรับ Argument ได้ โดย Argument จะถูกกำหนดหลังจาก : ตัวอย่างเช่น คำสั่ง v-bind ใช้เพื่อ update attribute HTML
<a v-bind:href="url"> ... </a>

<!-- shorthand -->
<a :href="url"> ... </a>
href เป็น Argument ที่บอกว่า v-bind จะกำหนดค่า(bind) ของ element , href attribute จะมีค่าตัวแปรจาก url.
ทุกอย่างก่อน Argument (v-bind:) จะถูกย่อเป็นตัวตัวเดียว เช่น v-bind: เป็น :
ตัวอย่างอีกตัว v-on ที่ไว้ใช้รับ DOM events
<a v-on:click="doSomething"> ... </a>

<!-- shorthand -->
<a @click="doSomething"> ... </a>
argument เป็น ชื่อ event ที่จะรอรับ event Click. โดย v-on จะมี shorthand ที่เป็นตัว @ เดี๋ยวเราจะพูดถึงเรื่อง event อีกทีนึง
Dynamic Arguments
เราสามารถใช้ JavaScript expression กับ argument ได้ โดยการใช้ ปีกกาสี่เหลี่ยม […]
<!--
Note that there are some constraints to the argument expression,
as explained in the "Dynamic Argument Value Constraints" and "Dynamic Argument Syntax Constraints" sections below.
-->
<a v-bind:[attributeName]="url"> ... </a>

<!-- shorthand -->
<a :[attributeName]="url"> ... </a>
Argument จะเปลี่ยนตาม attributeName ตัวอย่างเช่น component ของเรามีตัวแปร attributeName ทีมีค่า "href" ดังนั้น ค่าของ Argument จะเป็น v-bind:href.
<a v-on:[eventName]="doSomething"> ... </a>

<!-- shorthand -->
<a @[eventName]="doSomething"> ... </a>
ในตัวอย่างด้านบน ค่าของ eventName คือ focus , v-on:[eventName] จะเป็น v-on:focus.
Dynamic Argument Value Constraints
Dynamic arguments จะรับค่าที่เป็น String แต่ถ้าค่าของมันเป็น null มันจะสามารถใช้ลบ Attribute ออกได้
Dynamic Argument Syntax Constraints
Dynamic Argument มีข้อจำกัดของมันอยู่ เช่นถ้า มี space หรือ quote มันจะ invalid ใน HTML
เช่นตัวอย่างต่อไปนี้
<!-- This will trigger a compiler warning. -->
<a :['foo' + bar]="value"> ... </a>
ถ้าคุณต้องการจะส่งค่า Argument ที่ซับซ้อนกว่านี้ เราสามารถใช้ computed property, ที่ครอบคลุมมากกว่าได้
เมื่อเราใช้ DOM-template เราควรระวังการตั้งชื่อ โดยใช้ uppercase เพราะ Browser จะเปลี่ยนเป็น lowercase
<a :[someAttr]="value"> ... </a>
ในตัวอย่างด้านบน จะเปลี่ยนเป็น :[someattr] ใน DOM-template ถ้าใน Component ของเรามี someAttr แทนที่จะเป็น someattr โค้ดของเราจะไม่สามารถใช้งานได้
Modifiers
Modifiers เป็นตัวพิเศษที่ตามหลัง Argument โดยกำหนดจากจุด . , โดยจะระบุ directive ให้ทำงานแตกต่างไปจากเดิม ตัวอย่างเช่น .prevent modifier จะใช้บอกเราว่า ให้เรียก event.preventDefault() เมื่อมี Trigger event
<form @submit.prevent="onSubmit">...</form>
เราจะดูตัวอย่างของ modifiers ได้อีกจาก for v-on และ for v-model, โดยเราจะมาพูดถึงทีหลัง
สุดท้าย นี่คือ syntax โดยสรุป
Declaring Reactive State
ref()
ใน Composition API เราแนะนำให้ใช้ **ref()** function ในการประกาศ reactive state (คล้าย ๆ ตัวแปร)
import { ref } from 'vue'

const count = ref(0)
ref() จะรับ Argument เข้ามาและจะ return ค่า Object ที่มี value Property อยู่ด้านใน
const count = ref(0)

console.log(count) // { value: 0 }
console.log(count.value) // 0

count.value++
console.log(count.value) // 1
ในการเข้าถึง refs ใน component's template, จะประกาศ และ return ค่าจาก setup() function:
import { ref } from 'vue'

export default {
  // `setup` is a special hook dedicated for the Composition API.
  setup() {
    const count = ref(0)

    // expose the ref to the template
    return {
      count
    }
  }
}
<div>{{ count }}</div>
สังเกตได้ว่า เราไม่จำเป็นต้องใช้ .value เมื่อเราใช้ ref ใน template, เพื่อความสะดวกสบาย, ref จะสามารถใช้งานได้เลยโดยไม่ต้องเข้าถึง .value
<button @click="count++">
  {{ count }}
</button>
สำหรับ logic ที่ซับซ้อนขึ้น เราสามารถประกาศ function ที่สามารถทำงานกับ ref ได้มากขึ้น
import { ref } from 'vue'

export default {
  setup() {
    const count = ref(0)

    function increment() {
      // .value is needed in JavaScript
      count.value++
    }

    // don't forget to expose the function as well.
    return {
      count,
      increment
    }
  }
}
สำหรับการใช้งาน
<button @click="increment">
  {{ count }}
</button>
<script setup>
การประกาศ state และ method ทาง setup() อาจสร้างความไม่ปลอดภัยได้. โชคดี เราสามารถใช้ <script setup> ในการทำงานได้และเพิ่มความปลอดภัยมากขึ้น
<script setup>
import { ref } from 'vue'

const count = ref(0)

function increment() {
  count.value++
}
</script>

<template>
  <button @click="increment">
    {{ count }}
  </button>
</template>
การประกาศ ตัวแปร หรือ function ไว้ใน <script setup> จะสามารถใช้งานได้โดยอัติโนมัตภายใน Component เดียวกัน ดังนั้น มันจะสามารถเข้าถึงทุกอย่างใน Component ได้เลย
Why Refs?
คุณอาจสงสัยว่า ทำไมเราต้องใช้ .value แทนที่จะเป็นการประกาศตัวแปรธรรมดา ในการอธิบายสิ่งนั้น เราต้องทำความเข้าใจถึงการทำงานของ Vue reactivity system
เมื่อคุณใช้ ref ใน template และเปลี่ยนค่าของ ref , Vue จะตรวจจับการเปลี่ยนแปลงของ ref และ update DOM โดยทันที. เมื่อ component กำลัง render ในครั้งแรก, Vue จะติดตาม ref ทุกตัวที่ใช้งานใน DOM และเมื่อมีการเปลี่ยนค่าของ ref มันจะส่งสัญญาณไป re-render Component
ใน JavaScript ปกติ จะไม่มีการติดตามแบบนี้กับการประกาศตัวแปรแบบปกติ
.value property จะให้ Vue ติดตามเมื่อมีการเข้าถึง หรือ เปลี่ยนค่าของ ref. การทำงานเบื้องหลังแล้ว Vue จะติดตามค่าจาก getter function และจะ trigger ใน setter function
การคอนเซ็ปต์แล้ว หน้าตาของ function จะหน้าตาประมาณนี้
const myRef = {
  _value: 0,
  get value() {
    track()
    return this._value
  },
  set value(newValue) {
    this._value = newValue
    trigger()
  }
}
Deep Reactivity
Refs รองรับชนิดตัวแปรได้ทุกตัว รวมถึง nested objects, arrays, หรือ โครงสร้างข้อมูลของ JavaScript built-in เช่น Map.
ref จะเปลี่ยนค่าที่อยู่ลึกได้ หมายความว่า การติดตามค่าของตัวแปร จะเกิดขึ้นเสมอ แม้จะเป็น nested objects หรือ arrays
import { ref } from 'vue'

const obj = ref({
  nested: { count: 0 },
  arr: ['foo', 'bar']
})

function mutateDeeply() {
  // these will work as expected.
  obj.value.nested.count++
  obj.value.arr.push('baz')
}
DOM Update Timing
เมื่อคุณเปลี่ยนค่าของ reactive state, DOM จะเปลี่ยนค่าโดยอัตโนมัติ อย่างไรก็ตาม มันจะไม่รวมกับ synchronously แต่มันจะรอจนกว่าการ update จะ update หมดทุก Component
ในการรอ DOM update หลังจากเราเปลี่ยน state เราสามารถใช้ **nextTick()** ได้
import { nextTick } from 'vue'

async function increment() {
  count.value++
  await nextTick()
  // Now the DOM is updated
}
reactive()
มีอีก 1 วิธีในการประกาศ reactive state ด้วยการใช้ reactive() จะไม่เหมือนการใช้ ref ที่จะถูกคลุมไว้ใน Object พิเศษ, reactive() จะทำให้ตัวมันเอง reactive
import { reactive } from 'vue'

const state = reactive({ count: 0 })
การใช้งาน
<button @click="state.count++">
  {{ state.count }}
</button>
Reactive objects เป็น **JavaScript Proxies** และจะทำตัวเหมือน Object ธรรมดา ข้อแตกต่างคือ เมื่อมีการเข้าถึงหรือเปลี่ยนค่า มันจะติดตามและส่งสัญญาณไปที่ต่าง ๆ
Reactive Proxy vs. Original
จำไว้ว่า การคืนค่าจาก reactive() เป็น Proxy ของ Object ธรรมดา ที่จะไม่ได้มีค่าเท่ากับตัว Object ปกติ
const raw = {}
const proxy = reactive(raw)

// proxy is NOT equal to the original.
console.log(proxy === raw) // false
แค่ตัวที่เป็น Proxy เท่านั้นที่จะ reactive - object ธรรมดาจะไม่ trigger update. การเขียน Vue ที่ดี คือใช้ proxied version ของ state
การทำให้มั่นใจว่าเรากำลังใช้ proxy อยู่ คือการเรียก reactive() บน Object ตัวเดียวกันที่จะคืนค่า Proxy คืนมา และการเรียกใช้ reactive() บน proxy ก็จะคืนค่า proxy ตัวเดิมกลับมา
// calling reactive() on the same object returns the same proxy
console.log(reactive(raw) === proxy) // true

// calling reactive() on a proxy returns itself
console.log(reactive(proxy) === proxy) // true
กฏนี้ ก็สามารถใช้ได้กับ nested objects เหมือนกัน. โดย Object ที่ลึกลงไปก็เป็น proxies เหมือนกัน
const proxy = reactive({})

const raw = {}
proxy.nested = raw

console.log(proxy.nested === raw) // false
Limitations of reactive()
reactive() มีข้อจำกัดบางอย่างอยู่
-
Limited value types: สามารถใช้งานได้แค่กับ object types (objects, arrays, และ collection types เช่น
MapและSet). โดยจะไม่สามารถใช้งานกับ Primitive Type ได้ -
Cannot replace entire object: Vue's reactivity tracking จะทำงานเมื่อมีการเข้าถึงค่าภายใน Object ดังนั้น เราควรจะอ้างอิงไปถึง Object ตัวเดิมเสมอ เพราะถ้าไม่ การเชื่อมต่อกันของ Object ตัวแรกจะหายไป
let state = reactive({ count: 0 })

// the above reference ({ count: 0 }) is no longer being tracked
// (reactivity connection is lost!)
state = reactive({ count: 1 }) -
Not destructure-friendly: เมื่อเราทำการ destructure ตัวของ property ภายใน Object และส่งค่าเข้าไปใน function เราจะเสียการเชื่อมต่อของ reactivity
const state = reactive({ count: 0 })

// count is disconnected from state.count when destructured.
let { count } = state
// does not affect original state
count++

// the function receives a plain number and
// won't be able to track changes to state.count
// we have to pass the entire object in to retain reactivity
callSomeFunction(state.count)
จากข้อจำกัดแล้ว เราแนะนำให้ใช้ ref() มากกว่า
Additional Ref Unwrapping Details
As Reactive Object Property
ref จะสามารถใช้ค่าได้เลย เมื่อมีการเรียกใช้งาน อีกนัยหนึ่ง คือมันจะทำงานเหมือน property ธรรมดา
const count = ref(0)
const state = reactive({
  count
})

console.log(state.count) // 0

state.count = 1
console.log(count.value) // 1
ถ้า ref ตัวใหม่ถูกกำหนดให้เป็น property ของ ref ตัวอื่น มันจะแทนที่ ref ตัวเก่า
const otherCount = ref(2)

state.count = otherCount
console.log(state.count) // 2
// original ref is now disconnected from state.count
console.log(count.value) // 1
Caveat in Arrays and Collections
ไม่เหมือนกับ reactive objects, มันจะไม่สามารถใช้งานได้เลย เมื่อ ref มีการถูกเข้าถึง เช่นการใช้งานกับ Map
const books = reactive([ref('Vue 3 Guide')])
// need .value here
console.log(books[0].value)

const map = reactive(new Map([['count', ref(0)]]))
// need .value here
console.log(map.get('count').value)
Caveat when Unwrapping in Templates
Ref จะสามารถใช้งานได้เลยภายใน template ถ้ามันเป็น Top-level property (ตัวที่อยู่นอกสุด)
ตัวอย่างด้านล่างจะแสดงถึง count และ object เป็น Top-level property แต่ object.id ไม่ใช่:
const count = ref(0)
const object = { id: ref(1) }
ตัวแรกสามารถทำงานได้ปกติ
{{ count + 1 }}
ในขณะที่อีก 1 ตัวไม่สามารถทำงานได้ปกติ
{{ object.id + 1 }}
เพราะว่าผลลัพธ์ของมันจะเป็น [object Object]1 เพราะ object.id ยังไม่ถูกถอดตัวที่คลุมอยู่ออกมา
ในการแก้ไขปัญหานี้ เราสามารถ destructure ออกมาให้เป็น top-level property ได้
const { id } = object
{{ id + 1 }}
ตอนนี้ มันจะแสดงเลข 2 ออกมาแล้ว
Computed Properties
Basic Example
expressions ทำให้งานเราสะดวกสบายขึ้นมามาก แต่มันสำหรับการปฏิบัติการแบบง่าย ๆ ไม่ซับซ้อน ถ้าเราใส่ Logic มากเกินไปมันอาจจะทำให้โค้ดของเรายุ่งยากและยากในการทำงานต่อได้ ตัวอย่างเช่น ถ้าเรามี Object ที่มี Array อยู่ภายใน
const author = reactive({
  name: 'John Doe',
  books: [
    'Vue 2 - Advanced Guide',
    'Vue 3 - Basic Guide',
    'Vue 4 - The Mystery'
  ]
})
และเราต้องการที่จะแสดงผล ตาม author ที่มีหนังสือแล้ว
<p>Has published books:</p>
<span>{{ author.books.length > 0 ? 'Yes' : 'No' }}</span>
ในจุดนี้ โค้ดของเราเริ่มรกแล้ว เราต้องอ่านโค้ดซักพักแล้วจึงค่อยรู้การทำงานว่ามันจำแสดงผลเมื่อมี author.books . สิ่งที่สำคัญกว่านี้ เราต้องเขียนแบบนี้ซ้ำ ๆ ใน template ของเรา
นั่นคือเหตุผลสำหรับ logic ที่ซับซ้อนขึ้นที่มี reactive data เราแนะนำให้ใช้ computed property.
นี่คือตัวอย่างการใช้งาน
<script setup>
import { reactive, computed } from 'vue'

const author = reactive({
  name: 'John Doe',
  books: [
    'Vue 2 - Advanced Guide',
    'Vue 3 - Basic Guide',
    'Vue 4 - The Mystery'
  ]
})

// a computed ref
const publishedBooksMessage = computed(() => {
  return author.books.length > 0 ? 'Yes' : 'No'
})
</script>

<template>
  <p>Has published books:</p>
  <span>{{ publishedBooksMessage }}</span>
</template>
Computed Caching vs. Methods
คุณอาจรู้ว่า เราอาจจะได้ผลลัพธ์เดียวจากการใช้ Method
<p>{{ calculateBooksMessage() }}</p>
// in component
function calculateBooksMessage() {
  return author.books.length > 0 ? 'Yes' : 'No'
}
แทนที่จะใช้ computed property. เราสามารถกำหนด function เดียวกันเป็น method ได้ ผลลัพธ์สุดท้ายของทั้งสองวิธีจะเหมือนกันทุกประการ อย่างไรก็ตาม ความแตกต่างคือ computed property จะถูก cached ไว้ตามการพึ่งพาที่เป็น reactive ของมัน. computed property จะเปลี่ยนค่าใหม่ก็ต่อเมื่อมีการเปลี่ยนแปลงในสิ่งที่มันอ้างอิงถึงเท่านั้น ซึ่งหมายความว่า ตราบใดที่ author.books ไม่มีการเปลี่ยนแปลง การเข้าถึง publishedBooksMessage หลายครั้งจะคืนค่าที่คำนวณไว้ก่อนหน้านี้ทันที โดยไม่ต้องเรียกใช้ฟังก์ชัน getter ซ้ำอีกครั้ง
นั่นก็หมายความว่า computed property จะไม่ update เพราะว่า Date.now() เพราะว่ามันจะไม่เปลี่ยนค่า
const now = computed(() => Date.now())
ในการเปรียบเทียนแล้ว method จะรันทุกครั้งที่มีการ re-render
ทำไมเราต้องการ caching? จินตนาการว่าเรามี list ตัวหนึ่ง ที่ต้อง loop ทุกครั้งเมื่อ re-render โดยไม่จำเป็น คิดดูว่าเราจะต้องเสีย performance ไปมากแค่ไหน
Writable Computed
Computed properties โดยปกติแล้วเป็น getter-only. ถ้าเราต้องการที่จะกำหนดค่าใหม่ลงไปใน computed property, ในกรณีนี้คุณจะได้รับ runtime warning. ถ้าเราต้องการ “writable” computed property. เราสามารถกำหนด getter และ setter function ได้เลย
<script setup>
import { ref, computed } from 'vue'

const firstName = ref('John')
const lastName = ref('Doe')

const fullName = computed({
  // getter
  get() {
    return firstName.value + ' ' + lastName.value
  },
  // setter
  set(newValue) {
    // Note: we are using destructuring assignment syntax here.
    [firstName.value, lastName.value] = newValue.split(' ')
  }
})
</script>
และถ้าเรารัน fullName.value = 'John Doe', setter function จะถูกเรียกใช้ และ firstName และ lastName จะถูก update โดยทันที
Getting the Previous Value
- Only supported in 3.4+
ในกรณีที่คุณต้องการมัน, คุณสามารถรับค่าก่อนหน้าของมันมาได้ โดย ให้ computed property เข้าถึง argument ตัวแรกของ getter
<script setup>
import { ref, computed } from 'vue'

const count = ref(2)

// This computed will return the value of count when it's less or equal to 3.
// When count is >=4, the last value that fulfilled our condition will be returned
// instead until count is less or equal to 3
const alwaysSmall = computed((previous) => {
  if (count.value <= 3) {
    return count.value;
  }

  return previous;
})
</script>
ในการใช้งานจริง
<script setup>
import { ref, computed } from 'vue'

const count = ref(2)

const alwaysSmall = computed({
  get(previous) {
    if (count.value <= 3) {
      return count.value;
    }

    return previous;
  },
  set(newValue) {
    count.value = newValue * 2;
  }
})
</script>
Class and Style Bindings
data binding คือการที่เราควบคุม element's class และ inline styles.
เมื่อ class และ style เป็น Attribute เราสามารถใช้ v-bind ในการกำหนดค่าของมันได้อย่างอิสระ อย่างไรก็ตาม ในการสร้าง String พวกนั้นโดยการ concatenation สามารถทำให้เกิด Error ขึ้นได้ เนื่องจากเหตุนี้ Vue ได้ปรับปรุงเมื่อ v-bind ใช้งานร่วมกับ class และ style โดยที่ expressions สามารถเป็น Object หรือ Array ก็ได้
Binding HTML Classes
Binding to Objects
เราสามารถส่งค่า Object เข้าไปใน :class ได้ (มาจาก v-bind:class) เพื่อที่จะเปลี่ยน Class ได้อย่างอิสระ
<div :class="{ active: isActive }"></div>
syntax ด้านบน หมายถึง active class จะขึ้นอยู่กับ ตัวแปร isActive
คุณสามารถสลับใช้งานหลายคลาสได้โดยเพิ่มพื้นที่เพิ่มเติมใน Object. นอกจากนี้ คำสั่ง :class ยังสามารถใช้งานร่วมกับ Attribute class แบบธรรมดาได้อีกด้วย:
const isActive = ref(true)
const hasError = ref(false)
template
<div
  class="static"
  :class="{ active: isActive, 'text-danger': hasError }"
></div>
โดยมันจะแสดงผลดังนี้
<div class="static active"></div>
เราสามารถใช้งานร่วมกับ computed property ได้อีกด้วยนะ
const isActive = ref(true)
const error = ref(null)

const classObject = computed(() => ({
  active: isActive.value && !error.value,
  'text-danger': error.value && error.value.type === 'fatal'
}))
<div :class="classObject"></div>
Binding to Arrays
เราสามารถ bind :class โดยใช้ Array ได้
const activeClass = ref('active')
const errorClass = ref('text-danger')
<div :class="[activeClass, errorClass]"></div>
มันจะ render อย่างนี้
<div class="active text-danger"></div>
ถ้าเราต้องการจะสลับชื่อ Class เราสามารถใช้ Ternary ได้
<div :class="[isActive ? activeClass : '', errorClass]"></div>
errorClass จะถูกแสดงเสมอ แต่ว่า activeClass จะขึ้นอยู่กับ isActive
อย่างไรก็ตาม ถ้าเรามีเงื่อนไขแค่เล็กน้อย เราสามารถย่อได้ โดยการใช้ object syntax ได้
<div :class="[{ [activeClass]: isActive }, errorClass]"></div>
With Components
เมื่อเราใช้ class Attribute กับ Component โดยที่มี root element ตัวเดียว, Class นั้นจะถูกเพิ่มเข้าไปใน Element ภายใน
ตัวอย่างเช่น เรามี Component ชื่อ MyComponent
ภายใน Component:
<!-- child component template -->
<p class="foo bar">Hi!</p>
หลังจากนั้น เราเพิ่ม Class เข้าไปที่ Component
<!-- when using the component -->
<MyComponent class="baz boo" />
HTML จะ render ออกมาแบบนี้
<p class="foo bar baz boo">Hi!</p>
เหมือนกัน ถ้าเราใช้ binding
<MyComponent :class="{ active: isActive }" />
เมื่อ isActive เป็น true HTML จะ render แบบนี้
<p class="foo bar active">Hi!</p>
ถ้า component มี root element หลายตัว เราต้องระบุว่า element ไหน จะรับชื่อ Class ไป
<!-- MyComponent template using $attrs -->
<p :class="$attrs.class">Hi!</p>
<span>This is a child component</span>
<MyComponent class="baz" />
rendered
<p class="baz">Hi!</p>
<span>This is a child component</span>
Binding Inline Styles
Binding to Objects
:style ซัพพอร์ตการทำ binding กับ Object ของ JavaScript
const activeColor = ref('red')
const fontSize = ref(30)
<div :style="{ color: activeColor, fontSize: fontSize + 'px' }"></div>
แม้ว่าเราจะแนะนำ camelCase keys :style ก็ซัพพอร์ต kebab-cased เหมือนกัน
ตัวอย่างเช่น
<div :style="{ 'font-size': fontSize + 'px' }"></div>
ในการ bind โดยใช้ Object ก็จะทำให้ template ของเรา Clear มากขึ้น
const styleObject = reactive({
  color: 'red',
  fontSize: '30px'
})
<div :style="styleObject"></div>
Binding to Arrays
เราสามารถ bind :style เป็น Array ของ Object หลาย ๆ ตัวได้ โดยพวกมันจะรวมเข้าด้วยกันและใช้งานบน element ตัวเดียวกัน
<div :style="[baseStyles, overridingStyles]"></div>
Auto-prefixing
เมื่อคุณใช้ CSS property ที่ต้องการ vendor prefix ใน :style Vue จะเพิ่มคำนำหน้าที่เหมาะสมให้อัตโนมัติ โดย Vue จะตรวจสอบในขณะรันไทม์ว่าเบราว์เซอร์ปัจจุบันรองรับ style properties ใด หากเบราว์เซอร์ไม่รองรับคุณสมบัตินั้น Vue จะทดสอบรูปแบบที่มีคำนำหน้าต่าง ๆ เพื่อหาว่ารูปแบบใดที่เบราว์เซอร์รองรับ
Multiple Values
เราสามารถใช้ Array ในการกำหนดค่าของ style property ได้ ตัวอย่างเช่น
<div :style="{ display: ['-webkit-box', '-ms-flexbox', 'flex'] }"></div>
นี่จะ render ออกมาแค่ค่าตัวสุดท้าย display: flex เพราะว่า Browser รองรับแค่ตัวสุดท้าย
Conditional Rendering
v-if
คำสั่ง v-if จะใช้ render element ที่ต้องการจะแสดงตามเงื่อนไข. element จะ render ถ้าคำสั่งนั้น มีค่าเป็น true
<h1 v-if="awesome">Vue is awesome!</h1>
v-else
เราสามารถใช้ v-else เพื่อระบุ “else element” ได้ เพื่อใช้คู่กับ v-if
<button @click="awesome = !awesome">Toggle</button>

<h1 v-if="awesome">Vue is awesome!</h1>
<h1 v-else>Oh no 😢</h1>
v-else จะใช้คู่กับ v-if หรือ v-else-if เท่านั้น หรือถ้าไม่ได้ใช้คู่กับ 2 ตัวนี้ มันจะไม่สามารถใช้งานได้
v-else-if
v-else-if ตามชื่อมันเลย จะใช้ในกรณีที่เป็น "else if element”. มันสามารถต่อกันไปเรื่อย ๆ ได้
 <div v-if="type === 'A'">
  A
</div>
<div v-else-if="type === 'B'">
  B
</div>
<div v-else-if="type === 'C'">
  C
</div>
<div v-else>
  Not A/B/C
</div>
เหมือนกับ v-else, v-else-if element ต้องใช้กับ v-if หรือ v-else-if element
v-if on <template>
v-if เป็นคำสั่ง มันควรจะใช้งานกับ element ตัวเดียว แต่ถ้าเราต้องการที่จะใช้กับหลาย ๆ element ได้หรือไม่
ในกรณีนี้เราสามารถใช้ได้ โดยใช้ v-if บน <template> element. สุดท้ายนี้ ผลลัพธ์ของการ render จะไม่รวมกับ <template> element
<template v-if="ok">
  <h1>Title</h1>
  <p>Paragraph 1</p>
  <p>Paragraph 2</p>
</template>
v-else และ v-else-ifก็สามารถใช้ได้กับ <template>.
v-show
อีกทางเลือกนึง ในการแสดงผล element คือการใช้ v-show
<h1 v-show="ok">Hello!</h1>
ข้อแตกต่างคือ v-show จะ render และ ไม่ได้ลบ DOM ออกไป. v-show จะแค่สลับค่าของ display CSS property ของ element เฉย ๆ
v-show ไม่สนับสนุนการใช้งานกับ <template> element. และไม่สามารถใช้งานกับ v-else ได้
v-if vs. v-show
v-if จะทำงานโดยการ ลบ element นั้น และสร้างขึ้นมาใหม่ระหว่างการสลับเงื่อนไข
v-show จะใช้ CSS property ในการสลับกันระหว่าง แสดงกับไม่แสดง
โดยทั่วไป v-if จะใช้ Performance ในการสลับแสดงผลสูงกว่า ในขณะที่ v-show จะใช้ Performance ในการ render สูงกว่า.
ดังนั้นควรใช้ v-show หากคุณต้องการสลับการแสดงผลบ่อย ๆ และควรใช้ v-if หากเงื่อนไขมีแนวโน้มที่จะไม่เปลี่ยนแปลงในขณะรันไทม์
v-if with v-for
เมื่อ v-if และ v-for ถูกใช้งานพร้อมกัน บน element ตัวเดียวกัน v-if จะถูกประมวลผลก่อน
สามารถดูรายละเอียดเพิ่มเติมได้ที่ list rendering guide
List Rendering
v-for
เราสามารถใช้ v-for เพื่อแสดง item ใน list ที่เป็น Array ได้. คำสั่ง v-for ต้องการการเขียนที่เป็น syntax พิเศษ item in items โดยที่ items จะเป็น Array และ item จะเป็นสมาชิกของ Array
const items = ref([{ message: 'Foo' }, { message: 'Bar' }])
<li v-for="item in items">
  {{ item.message }}
</li>
ภายใน v-for , เราสามารถเอาตัวแปแรอื่น ๆ มาใช้ได้ด้วยเหมือนกัน, v-for ก็ยังสนับสนุนการใช้ index ด้วย
const parentMessage = ref('Parent')
const items = ref([{ message: 'Foo' }, { message: 'Bar' }])
<li v-for="(item, index) in items">
  {{ parentMessage }} - {{ index }} - {{ item.message }}
</li>
การใช้ v-for เหมือนกับการเขียน JavaScript แบบนี้
const parentMessage = 'Parent'
const items = [
  /* ... */
]

items.forEach((item, index) => {
  // has access to outer scope `parentMessage`
  // but `item` and `index` are only available in here
  console.log(parentMessage, item.message, index)
})
จริง ๆ แล้ว เราสามารถใช้การ destructuring กับ v-for ได้เหมือนกับการ destructuring argument ของ function
<li v-for="{ message } in items">
  {{ message }}
</li>

<!-- with index alias -->
<li v-for="({ message }, index) in items">
  {{ message }} {{ index }}
</li>
สำหรับ v-for ที่ซ้อนกันลงไป (nested) เราก็สามารถทำได้เหมือนกัน
<li v-for="item in items">
  <span v-for="childItem in item.children">
    {{ item.message }} {{ childItem }}
  </span>
</li>
เราสามารถใช้ of แทนการใช้ in ได้เหมือนกัน, ซึ่งนั่นจะเหมือนกับการใช้ syntax ของ JavaScript ในการจัดการกับ iterators
<div v-for="item of items"></div>
v-for with an Object
เราสามารถใช้ v-for ในการ loop properties ของ Object ได้. การเรียงลำดับ จะแสดงผลเหมือนการเรียกใช้ Object.values() กับ Object
const myObject = reactive({
  title: 'How to do lists in Vue',
  author: 'Jane Doe',
  publishedAt: '2016-04-10'
})
<ul>
  <li v-for="value in myObject">
    {{ value }}
  </li>
</ul>
เราสามารถเรียกใช้ตัวแปร ตัวที่ 2 ได้ โดยค่าของมันจะเป็น key
<li v-for="(value, key) in myObject">
  {{ key }}: {{ value }}
</li>
และตัวแปรอีกตัว ที่ใช้กับ index
<li v-for="(value, key, index) in myObject">
  {{ index }}. {{ key }}: {{ value }}
</li>
v-for with a Range
v-for สามารถใช้งานร่วมกับตัวเลขได้ ในกรณีนี้ มันจะ loop element ออกมาตามจำนวนครั้งที่เราใส่ลงไป โดยจะเริ่มจาก 1 ไปถึง n
<span v-for="n in 10">{{ n }}</span>
โปรดจำไว้ว่า มันจะเริ่มจาก 1 ไม่ใช้ 0
v-for on <template>
เราสามารถใช้ v-for กับ template ได้
<ul>
  <template v-for="item in items">
    <li>{{ item.msg }}</li>
    <li class="divider" role="presentation"></li>
  </template>
</ul>
v-for with v-if
เมื่อเราใช้ v-if กับ v-for บน element ตัวเดียวกัน, v-if จะมีความสำคัญมาเป็นอันดับแรก
หมายความว่า เราถ้าต้องการเช็คเงื่อนไข ที่มาจาก property ใน v-for มันจะไม่สามารถเช็คได้ เพราะว่า v-if จะทำงานก่อน
<!--
This will throw an error because property "todo"
is not defined on instance.
-->
<li v-for="todo in todos" v-if="!todo.isComplete">
  {{ todo.name }}
</li>
นี่สามารถแก้ไขได้โดย นำ v-for ไปหุ้มตัว v-if ไว้
<template v-for="todo in todos">
  <li v-if="!todo.isComplete">
    {{ todo.name }}
  </li>
</template>
Maintaining State with key
เมื่อ Vue update list ของ element ที่ render ด้วย v-for, โดยปกติมันใช้ "in-place patch” หรือการ update อยู่กับที่ หมายความว่า ถ้าการเรียงลำดับของ item ใน list เปลี่ยนแปลงไป แทนที่มันจะเปลี่ยนตำแหน่งของ DOM. Vue จะเปลี่ยนข้อมูลโดยให้ element อยู่กับที่
วิธีนี้มีประสิทธิภาพ แต่จะใช้ได้ดีเฉพาะเมื่อ มันไม่ได้ขึ้นอยู่กับ Component State หรือ temporary DOM state (i.e. form input values)
ในการให้คำใบ้กับ Vue ว่าจะให้ track node ตัวไหน เราต้องให้ unique key กับมัน
<div v-for="item in items" :key="item.id">
  <!-- content -->
</div>
เมื่อเราใช้งาน <template v-for> , key ควรจะถูกวางอยู่บน <template>
<template v-for="todo in todos" :key="todo.name">
  <li>{{ todo.name }}</li>
</template>
เราแนะนำให้ใช้ key เสมอ เมื่อเราใช้งาน v-for
v-for with a Component
เราสามารถใช้ v-for เหมือนกับ element ธรรมดาได้ (อย่าลืมใส่ key ด้วยละ)
<MyComponent v-for="item in items" :key="item.id" />
อย่างไรก็ตาม ข้อมูลจะไม่ถูกส่งเข้าไปใน Component เพราะว่า Component จะรับค่าเฉพาะตัวที่มันจะรับเท่านั้น ในการส่งข้อมูลเข้าไปใน Component เราควรใช้ props
<MyComponent
  v-for="(item, index) in items"
  :item="item"
  :index="index"
  :key="item.id"
/>
Array Change Detection
Mutation Methods
Vue จะติดตามเมื่อ array method ถูกเรียกใช้งานและจะ trigger เมื่อมีการ update.
method ที่ Vue จะติดตาม
push()pop()shift()unshift()splice()sort()reverse()
Replacing an Array
Mutation methods เป็น method ที่จะใช้เปลี่ยนโครงสร้างของ Array ของ Array ตัวเดิม แต่ว่า จะมี method อีกประเภทหนึ่งที่เป็น non-mutating methods เช่น filter(), concat() และ slice(), ที่จะไม่เปลี่ยนค่า Array ตัวเดิม แต่จะ return Array ตัวใหม่ออกมา. ดังนั้น เมื่อเราใช้ non-mutating methods เราต้องแทนที่มันกับ Array ตัวเก่า
// `items` is a ref with array value
items.value = items.value.filter((item) => item.message.match(/Foo/))
คุณอาจคิดว่า Vue จะลบ list ทั้งหมดและ re-render list ออกมาใหม่
โชคดีว่า Vue ไม่ได้ทำงานอย่างนั้น เพราะว่า Vue จะใช้วิธีที่ฉลาดกว่านั้น ในการแทนที่ DOM ตัวเดิม โดยเป็นวิธีที่มีประสิทธิภาพมากกว่า
Displaying Filtered/Sorted Results
บางครั้งเราต้องการที่จะแสดงผล array ที่ถูก sort หรือ filter โดยที่ไม่ทับค่า array ตัวเก่า หรือเปลี่ยนค่า array ตัวเดิม ในกรณีนี้ เราสามารถใช้ computed property ที่จะคืนค่า filter หรือ sort Array ออกมา
ตัวอย่าง
const numbers = ref([1, 2, 3, 4, 5])

const evenNumbers = computed(() => {
  return numbers.value.filter((n) => n % 2 === 0)
})
<li v-for="n in evenNumbers">{{ n }}</li>
ในกรณีนี้ ที่เราไม่สามารถใช้ computed properties ได้ เราสามารถใช้ method
const sets = ref([
  [1, 2, 3, 4, 5],
  [6, 7, 8, 9, 10]
])

function even(numbers) {
  return numbers.filter((number) => number % 2 === 0)
}
<ul v-for="numbers in sets">
  <li v-for="n in even(numbers)">{{ n }}</li>
</ul>
ระวังการใช้ reverse() และ sort() เพราะว่า properties สองตัวนี้ จะไปเปลี่ยนค่าของ Array ตัวเดิม ดังนั้นเราควรสร้าง Array ที่คัดลอกข้อมูลมาจากตัวเดิมก่อน แล้วค่อยเรียกใช้ method นี้
Event Handling
Listening to Events
เราสามารถใช้ v-on ที่ย่อด้วย @ ในการรับ event ต่าง ๆ ได้
วิธีการใช้งานคือ v-on:click="handler" หรือเขียนให้สั้นลงโดย @click="handler".
handler จะมีด้วยกัน 2 รูปแบบ
- Inline handlers: รูปแบบนี้จะถูก executed เมื่อมี Event เข้ามา
- Method handlers: เป็นการเรียกใช้ method โดยจะเรียกใช้เมื่อมี Event เข้ามา
Inline Handlers
โดยปกติแล้ว Inline handlers จะใช้เมื่อมีการทำงานไม่ซับซ้อน
const count = ref(0)
<button @click="count++">Add 1</button>
<p>Count is: {{ count }}</p>
Method Handlers
Method handler ควรจะใช้งานเมื่อเราต้องการจะประมวลผลที่ซับซ้อนขึ้น
const name = ref('Vue.js')

function greet(event) {
  alert(`Hello ${name.value}!`)
  // `event` is the native DOM event
  if (event) {
    alert(event.target.tagName)
  }
}
<!-- `greet` is the name of the method defined above -->
<button @click="greet">Greet</button>
method handler จะรับ DOM event ที่มันถูก trigger เข้ามาได้ เช่น ในตัวอย่างด้านบน เราสามารถเข้าถึง Event ที่ถูกส่งเข้ามาได้ทาง event.target.
Calling Methods in Inline Handlers
แทนที่เราจะ binding ไปที่ชื่อ method โดยตรงเลย เราสามารถเรียกใช้ function ภายใน inline handler ได้เลย และมันจะทำให้เราสามารถใส่ argument ลงไปได้ด้วย
function say(message) {
  alert(message)
}
<button @click="say('hello')">Say hello</button>
<button @click="say('bye')">Say bye</button>
Accessing Event Argument in Inline Handlers
บางครั้ง เราต้องการที่จะเข้าถึง DOM event ของมันภายใน inline เลย. เราสามารถใช้ $event เพื่อส่งเข้าไปใน method ได้เลย หรือว่า เราก็สามารถใช้ Arrow function ใน inline ได้เหมือนกัน
<!-- using $event special variable -->
<button @click="warn('Form cannot be submitted yet.', $event)">
  Submit
</button>

<!-- using inline arrow function -->
<button @click="(event) => warn('Form cannot be submitted yet.', event)">
  Submit
</button>
function warn(message, event) {
  // now we have access to the native event
  if (event) {
    event.preventDefault()
  }
  alert(message)
}
Event Modifiers
Event Modifiers
มันเป็นเรื่องปกติ ที่เราจะเรียกใช้ event.preventDefault() หรือ event.stopPropagation() ภายใน event handlers แม้ว่า เราสามารถทำได้ภายใน method แต่มันคงจะดีกว่า ถ้าภายใน method เรา มีแค่กระบวนการทาง logic และไม่มีเรื่อง event มากวนใจ
ปัญหานี้ Vue มี event modifiers สำหรับ v-on โดยในการเรียกใช้ modifiers จะมีตัว จุด (.) นำหน้า
.stop.prevent.self.capture.once.passive
<!-- click event's propagation จะถูกหยุด -->
<a @click.stop="doThis"></a>

<!-- submit event จะไม่ทำให้โหลดหน้า page -->
<form @submit.prevent="onSubmit"></form>

<!-- modifiers สามารถต่อกันไปเรื่อย ๆ ได้ -->
<a @click.stop.prevent="doThat"></a>

<!-- แค่ modifier -->
<form @submit.prevent></form>

<!-- จะ trigger ก็ต่อเมื่อ event.target เป็น element ตัวมันเอง -->
<!-- ตัวอย่าง ไม่ได้มาจาก children element -->
<div @click.self="doThat">...</div>
.capture, .once, และ .passive จะเหมือนกับ addEventListener method:
<!-- use capture mode when adding the event listener     -->
<!-- i.e. an event targeting an inner element is handled -->
<!-- here before being handled by that element           -->
<div @click.capture="doThis">...</div>

<!-- the click event will be triggered at most once -->
<a @click.once="doThis"></a>

<!-- the scroll event's default behavior (scrolling) will happen -->
<!-- immediately, instead of waiting for `onScroll` to complete  -->
<!-- in case it contains `event.preventDefault()`                -->
<div @scroll.passive="onScroll">...</div>
โดยปกติ .passive จะใช้กับอุปกรณ์ที่เป็นโทรศัพท์มือถือ
Key Modifiers
เมื่อเปลี่ยนมาเป็นการรับ Event จาก Keyboard. ส่วนใหญ่เราจะใช้ การตรวจสอบแค่ตัวอักษรใดตัวอักษรหนึ่ง
Vue มี key modifiers สำหรับ v-on หรือ @ สำหรับการรับ Event จาก keyboard
<!-- only call `submit` when the `key` is `Enter` -->
<input @keyup.enter="submit" />
เราสามารถใช้ชื่อ key จาก **KeyboardEvent.key** แปลงให้เป็น modifiers ได้ โดยแปลงมันเป็น kebab-case
<input @keyup.page-down="onPageDown" />
ใสตัวอย่างด้านบน มันจะเรียกใช้ functino เมื่อ $event.key เป็น pageDown
Key Aliases
Vue ให้ชื่อเล่นของ key ที่ถูกใช้บ่อย ๆ
.enter.tab.delete(captures both "Delete" and "Backspace" keys).esc.space.up.down.left.right
System Modifier Keys
เราสามารถใช้ modifiers เหล่านี้ ในการ trigger mouse หรือ keyboard Event รอรับ Event ก็แค่ต่อเมื่อ key นี้ถูกกด
.ctrl.alt.shift.meta
ตัวอย่างเช่น
<!-- Alt + Enter -->
<input @keyup.alt.enter="clear" />

<!-- Ctrl + Click -->
<div @click.ctrl="doSomething">Do something</div>
.exact Modifier
.exact modifiers ทำให้เราควบคุมการกดปุ่มแค่ที่เราต้องการได้ เช่น
<!-- ถ้ามีปุ่มอื่นกดอยู่ มันก็สามารถ trigger ได้ -->
<button @click.ctrl="onClick">A</button>

<!-- จะ trigger ก็ต่อเมื่อมีแค่ Ctrl และ คลิ้กพร้อมกัน โดยไม่มีปุ่มอื่นกดอยู่ -->
<button @click.ctrl.exact="onCtrlClick">A</button>

<!-- จะ trigger ก็ต่อเมื่อ คลิ้ก และไม่มีปุ่มอื่นกดอยู่ -->
<button @click.exact="onClick">A</button>
Mouse Button Modifiers
.left.right.middle
modifiers พวกนี้จะจำกัดการกดคลิ้ก mouse ว่าจะให้กดคลิ้กที่ฝั่งไหน
อย่างไรก็ตาม .left , .right และ .middle modifier ตั้งชื่อตาม lay-out ของ mouse
Form Input Bindings
เมื่อเราต้องรับมือกับ forms, เราจะต้องเชื่อม state กับ form input elements เพื่อให้มันสามารถทำงานต่อได้ มันค่อนข้างจะยุ่งยาก ถ้าเราต้องมาเชื่อมเข้ากับตัวแปร และเปลี่ยนค่าของตัวแปรเองทั้งหมด
<input
  :value="text"
  @input="event => text = event.target.value">
v-model จะเข้ามาช่วยทำให้เราทำงานได้ง่ายขึ้น
<input v-model="text">
v-model ยังสามารถใช้กับ <textarea>, และ <select> elements.
<input>ที่เป็น String และ and<textarea>elements ใช้valueproperty และinputevent;<input type="checkbox">และ<input type="radio">ใช้checkedproperty และchangeevent;<select>ใช้valueเป็น property และchangeเป็น event.
Basic Usage
Text
<p>Message is: {{ message }}</p>
<input v-model="message" placeholder="edit me" />
Multiline text
<span>Multiline message is:</span>
<p style="white-space: pre-line;">{{ message }}</p>
<textarea v-model="message" placeholder="add multiple lines"></textarea>
จำไว้ว่า ถ้ามีบางสิ่งอยู่ใน <textarea> มันจะไม่สามารถทำงานได้ ใช้ v-model แทน
<!-- bad -->
<textarea>{{ text }}</textarea>

<!-- good -->
<textarea v-model="text"></textarea>
Checkbox
checkbox จะมีค่าเป็น Boolean
<input type="checkbox" id="checkbox" v-model="checked" />
<label for="checkbox">{{ checked }}</label>
เราสามารถ bind checkboxes หลาย ๆ ตัว ให้ไปอยู่ใน Array ตัวเดียวกันได้
const checkedNames = ref([])
<div>Checked names: {{ checkedNames }}</div>

<input type="checkbox" id="jack" value="Jack" v-model="checkedNames" />
<label for="jack">Jack</label>

<input type="checkbox" id="john" value="John" v-model="checkedNames" />
<label for="john">John</label>

<input type="checkbox" id="mike" value="Mike" v-model="checkedNames" />
<label for="mike">Mike</label>
Radio
<div>Picked: {{ picked }}</div>

<input type="radio" id="one" value="One" v-model="picked" />
<label for="one">One</label>

<input type="radio" id="two" value="Two" v-model="picked" />
<label for="two">Two</label>
Select
<div>Selected: {{ selected }}</div>

<select v-model="selected">
  <option disabled value="">Please select one</option>
  <option>A</option>
  <option>B</option>
  <option>C</option>
</select>
เราสามารถเลือกหลาย ๆ ตัว ให้เข้าไปอยู่ใน Array เดียวกันได้
<div>Selected: {{ selected }}</div>

<select v-model="selected" multiple>
  <option>A</option>
  <option>B</option>
  <option>C</option>
</select>
เราสามารถใช้งานร่วมกับ v-for ได้
const selected = ref('A')

const options = ref([
  { text: 'One', value: 'A' },
  { text: 'Two', value: 'B' },
  { text: 'Three', value: 'C' }
])
<select v-model="selected">
  <option v-for="option in options" :value="option.value">
    {{ option.text }}
  </option>
</select>

<div>Selected: {{ selected }}</div>
Value Bindings
สำหรับ radio, checkbox และ select, ค่าของ v-model จะเป็น String (หรืออาจเป็น booleans สำหรับ checkbox)
<!-- `picked` is a string "a" when checked -->
<input type="radio" v-model="picked" value="a" />

<!-- `toggle` is either true or false -->
<input type="checkbox" v-model="toggle" />

<!-- `selected` is a string "abc" when the first option is selected -->
<select v-model="selected">
  <option value="abc">ABC</option>
</select>
แต่บางที เราต้องการที่จะใช้ค่าที่ไม่เป็นแค่ String. เราสามารถใช้ v-bind ในการทำแบบนั้นได้ ในการใช้ v-bind เราสามารถทำให้ไม่เป็นค่า String ได้
Checkbox
<input
  type="checkbox"
  v-model="toggle"
  true-value="yes"
  false-value="no" />
true-value และ false-value เป็น Attribute พิเศษของ Vue ที่จะสามารถทำงานได้แค่กับ v-model
โดยในตัวอย่างด้านบน toggle จะถูกตั้งเป็น "yes" เมื่อ box ถูกเช็ค และ เป็น “no” เมื่อไม่ได้เช็ค เราสามารถ bind ให้เป็น ค่าแบบ dynamic โดยใช้ v-bind:
<input
  type="checkbox"
  v-model="toggle"
  :true-value="dynamicTrueValue"
  :false-value="dynamicFalseValue" />
Radio
<input type="radio" v-model="pick" :value="first" />
<input type="radio" v-model="pick" :value="second" />
pick จะถูกกำหนดค่าให้เป็น first เมื่อ raido อันแรกถูกเช็ค และ จะถูกกำหนดให้เป็น second เมื่อตัวที่สูงถูกเช็ค
Select Options
<select v-model="selected">
  <!-- inline object literal -->
  <option :value="{ number: 123 }">123</option>
</select>
v-model ก็สนับสนุนค่าที่ไม่เป็น String ด้วยเหมือนกัน ในตัวอย่างด้านบน เมื่อ option ถูกเลือก selected จะมีค่าเป็น Object { number: 123 }.
Modifiers
.lazy
โดยปกติ v-model จะเชื่อม input กับ ข้อมูลหลังจาก input event. คุณสามารถเพิ่ม lazy modifier เพื่อจะเปลี่ยนค่าหลังจาก Change event เกิดขึ้น
<!-- synced after "change" instead of "input" -->
<input v-model.lazy="msg" />
.number
ถ้าเราต้องการให้ user ใส่ค่าได้แค่ตัวเลข เราสามารถใส่ number modifier ไปที่ v-model ได้
<input v-model.number="age" />
แต่ถ้าค่าเริ่มมาแล้วเป็น string ดังนั้น ค่าที่ใช้จะเป็น string แทน ถ้า input เป็นค่าเปล่า ดังนั้นค่า string เปล่าจะถูกส่งค่าไป
แต่ถ้าต้องการให้เป็น number ทั้งหมด โดยที่ไม่สามารถใส่ string ได้ เราก็สามารถใช้ type="number".
.trim
ถ้าคุณไม่ต้องการให้มี whitespace รอบ ๆ string เราสามารถใช้ trim modifier กับ v-model ได้ด้วย
<input v-model.trim="msg" />
v-model with Components
HTML’s built-in input type อาจไม่ตอบสนองความต้องการของคุณเสมอไป โชคดีที่ Component ของ Vue ช่วยให้คุณสร้าง Input ที่สามารถนำกลับมาใช้ซ้ำได้ และ Input พวกนี้ สามารถใช้กับ v-model ได้เหมือนกัน
สามารถเรียนรู้เพิ่มได้ที่ Usage with v-model
Lifecycle Hooks
แต่ละ Component ของ Vue จะผ่านกระบวนการเริ่มต้นหลายขั้นตอนเมื่อถูกสร้างขึ้น เช่น การตั้งค่าการสังเกตข้อมูล (data observation), การ Compile template , การ Mount component เข้ากับ DOM, และการอัปเดต DOM เมื่อข้อมูลเปลี่ยนแปลง
ในระหว่างกระบวนการนี้ Vue จะเรียกใช้ function ที่เรียกว่า lifecycle hooks ซึ่งเปิดโอกาสให้ผู้ใช้สามารถเพิ่มโค้ดของตัวเองในขั้นตอนเฉพาะเหล่านี้ได้
Registering Lifecycle Hooks
ตัวอย่างเช่น onMounted hook สามารถใช้หลังจาก Component ได้ทำการ render และสร้าง DOM เสร็จแล้ว
<script setup>
import { onMounted } from 'vue'

onMounted(() => {
  console.log(`the component is now mounted.`)
})
</script>
และจะมี hooks อื่น ๆ ที่จะใช้กันเป็นส่วนใหญ่ เช่น onMounted, onUpdated, and onUnmounted
เมื่อเราเรียกใช้ onMounted Vue จะเรียกใช้ Callback function และจะทำงานพร้อมกัน ในขณะที่กำลัง setup Component อยู่ เช่นตัวอย่างนี้ ไม่ควรทำตาม
setTimeout(() => {
  onMounted(() => {
    // this won't work.
  })
}, 100)
โปรดทราบไว้ว่า การใช้งาน hooks ต่าง ๆ ไม่จำเป็นต้องอยู่ใน setup() หรือ <script setup> โดยตรง แต่สามารถเรียกใช้ onMounted() หรือ hooks อื่น ๆ ในฟังก์ชันภายนอกได้
ตราบใดที่การเรียกใช้งานเกิดขึ้นแบบ synchronous และเริ่มต้นจากภายใน setup()
Lifecycle Diagram
ด้านล่างนี้ จะเป็น Diagram ของการทำงานของ Component เราไม่จำเป็นต้องเข้าใจทั้งหมดก็ได้ แต่ถ้าเราเรียนรู้ไปเรื่อย ๆ นี้ก็เป็นประโยชน์ที่จะใช้อ้างอิง
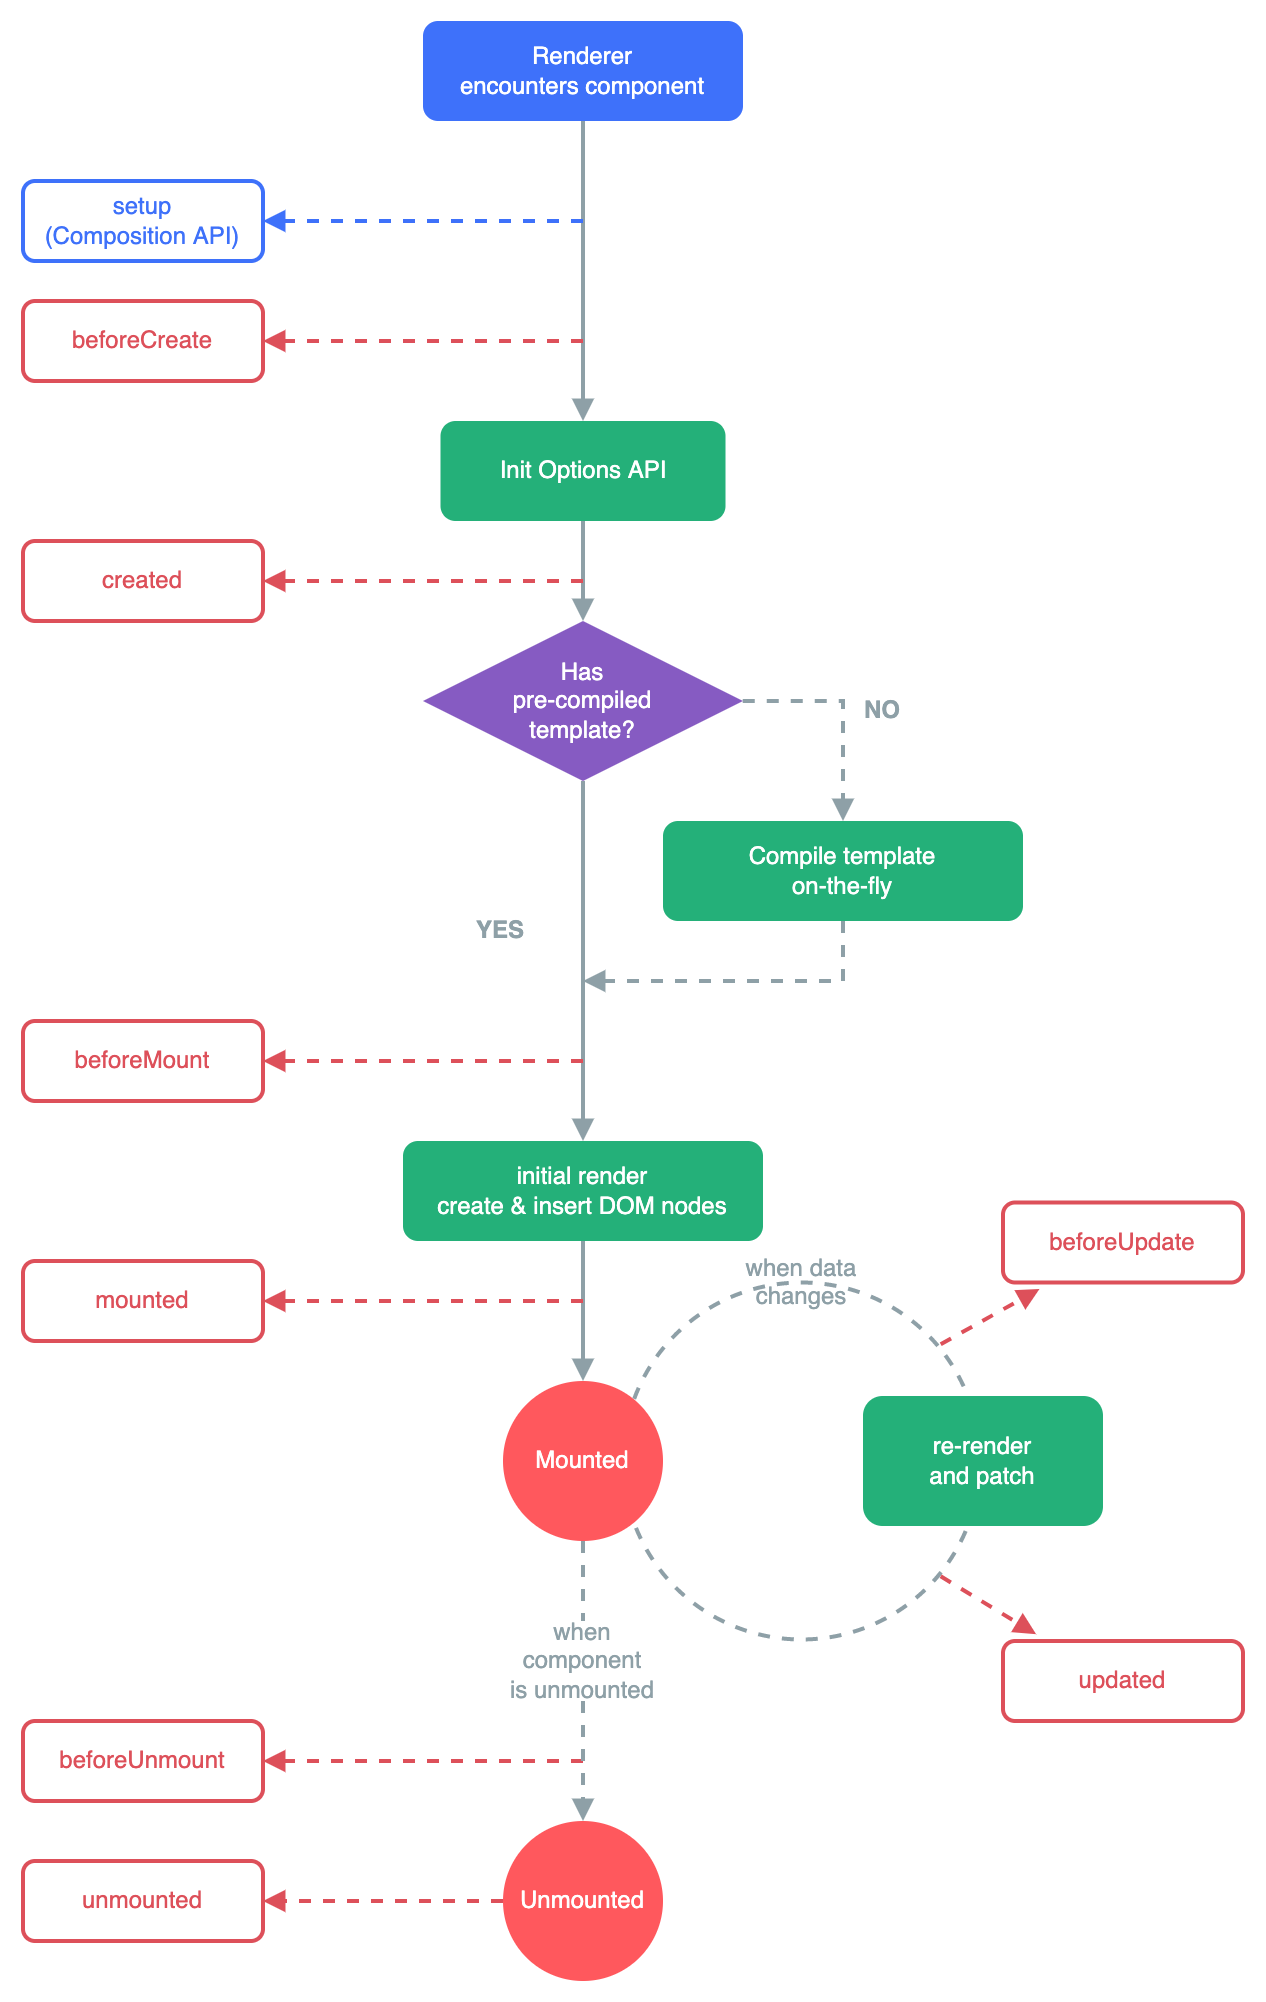
โปรดดูที่ Lifecycle Hooks API reference สำหรับรายละเอียดเพิ่มเติม สำหรับ hooks ต่าง ๆ ใน lifecycle และ การใช้ hooks อย่างเหมาะสมในแต่ละกรณี
Watchers
Basic Example
Computed properties ช่วยให้เราคำนวณค่าตัวแปรต่าง ๆ ได้ อย่างไรก็ตาม บางกรณีเราต้องการ "side effects” เมื่อตัวแปร หรือ state มีการเปลี่ยนแปลง เพื่อทำงานบางอย่างหลังจากค่าของตัวแปรเปลี่ยน
และด้วย Composition API เราสามารถใช้ **watch function** ในการ trigger function เมื่อมีการเปลี่ยนค่าของตัวแปร
<script setup>
import { ref, watch } from 'vue'

const question = ref('')
const answer = ref('Questions usually contain a question mark. ;-)')
const loading = ref(false)

// watch works directly on a ref
watch(question, async (newQuestion, oldQuestion) => {
  if (newQuestion.includes('?')) {
    loading.value = true
    answer.value = 'Thinking...'
    try {
      const res = await fetch('https://yesno.wtf/api')
      answer.value = (await res.json()).answer
    } catch (error) {
      answer.value = 'Error! Could not reach the API. ' + error
    } finally {
      loading.value = false
    }
  }
})
</script>

<template>
  <p>
    Ask a yes/no question:
    <input v-model="question" :disabled="loading" />
  </p>
  <p>{{ answer }}</p>
</template>
argument ตัวแรกของ watch จะเป็นตัวแปรที่เปลี่ยนค่าอยู่บ่อยครั้ง และ สามารถเป็นได้หลายประเภท โดยมันสามารถเป็น ref, reactive object, getter function, หรือ array
const x = ref(0)
const y = ref(0)

// single ref
watch(x, (newX) => {
  console.log(`x is ${newX}`)
})

// getter
watch(
  () => x.value + y.value,
  (sum) => {
    console.log(`sum of x + y is: ${sum}`)
  }
)

// array of multiple sources
watch([x, () => y.value], ([newX, newY]) => {
  console.log(`x is ${newX} and y is ${newY}`)
})
โปรดจำไว้ว่า เราไม่สามารถใช้ wacth กับ reactive object ตรง ๆ ได้
const obj = reactive({ count: 0 })

// this won't work because we are passing a number to watch()
watch(obj.count, (count) => {
  console.log(`Count is: ${count}`)
})
ดังนั้น เราจะใช้ getter function แทน
// instead, use a getter:
watch(
  () => obj.count,
  (count) => {
    console.log(`Count is: ${count}`)
  }
)
Deep Watchers
เมื่อเราเรียกใช้ watch() โดยตรงกับ reactive Object มันจะสร้าง Deep Watcher ขึ้นมา เพราะว่าเมื่อมีการเปลี่ยนแปลงของ Object ที่ซ้อนลงไป wacth ก็จะทำงานเหมือนเดิม
const obj = reactive({ count: 0 })

watch(obj, (newValue, oldValue) => {
  // fires on nested property mutations
  // Note: `newValue` will be equal to `oldValue` here
  // because they both point to the same object!
})

obj.count++
ซึ่งจะต่างกับการแค่เจาะจงไปที่ค่าเดียวใน Object เพราะว่า ถ้าส่วนอื่นเปลี่ยน function จะไม่ทำงาน
watch(
  () => state.someObject,
  () => {
    // fires only when state.someObject is replaced
  }
)
อย่างไรก็ตาม ถ้าเราต้องการทำให้มันเป็น Deep Wacther จริง ๆ เราก็สามารถใส่ deep Option ได้
watch(
  () => state.someObject,
  (newValue, oldValue) => {
    // Note: `newValue` will be equal to `oldValue` here
    // *unless* state.someObject has been replaced
  },
  { deep: true }
)
Eager Watchers
เอาจริง ๆ แล้ว watch ค่อยข้างจะขี้เกียจ. function จะไม่ถูกเรียกใช้งาน จนกว่าตัวแปรนั้น จะเปลี่ยนค่า. แต่ในบางกรณีเราต้องการที่จะ fecth ข้อมูลมาก่อน แล้ว fecth อีกรอบ เมื่อค่าของตัวแปรเปลี่ยน
เราสามารถทำแบบนั้นได้ โดยใส่ immediate: true option:
watch(
  source,
  (newValue, oldValue) => {
    // executed immediately, then again when `source` changes
  },
  { immediate: true }
)
Once Watchers
Watcher จะเรียกใช้ function ทุกครั้งเมื่อค่าของตัวแปรเปลี่ยนแปลง แต่ถ้าเราต้องการที่จะทำงานแค่ครั้งเดียว หลังจากค่าตัวแปรเปลี่ยน เราสามารถใช้ once: true option ได้
watch(
  source,
  (newValue, oldValue) => {
    // when `source` changes, triggers only once
  },
  { once: true }
)
watchEffect()
มันเป็นเรื่องธรรมดาเมื่อ watcher callback จะใช้ตัวแปรตัวเดียวกันกับ argument ตัวแรกของ wacth
พิจารณาโค้ดต่อไปนี้ เพื่อดูว่า เราเรียกใช้ todoId กี่ครั้ง
const todoId = ref(1)
const data = ref(null)

watch(
  todoId,
  async () => {
    const response = await fetch(
      `https://jsonplaceholder.typicode.com/todos/${todoId.value}`
    )
    data.value = await response.json()
  },
  { immediate: true }
)
ในทางปฏิบัติแล้ว watcher ใน todoId สองครั้ง ครั้งแรกตรงที่ argument ตัวแรกของ wacth ครั้งที่สอง คืออยู่ใน function
นี่สามารถแก้ไขได้ โดย watchEffect(). watchEffect() อนุญาตให้เราทำงานโดยไม่ต้องเรียกใช้ตัวแปรหลายครั้งได้
watchEffect(async () => {
  const response = await fetch(
    `https://jsonplaceholder.typicode.com/todos/${todoId.value}`
  )
  data.value = await response.json()
})
จากตัวอย่าง callback จะรันโดยทันที โดยเราไม่จำเป็นต้องใส่ immediate: true. ระหว่างในการ execute มันจะติดตาม todoId.value . เมื่อไหร่ที่ todoId.value เปลี่ยนค่า callBack จะถูกรันอีกรอบ. watchEffect(), ไม่จำเป็นต้องใส่ todoId เข้าไปก็ได้
watch vs. watchEffect
watch และ watchEffect ทั้งคู่ทำหน้าที่เป็น side Effect แต่ที่แตกต่างกันหลัก ๆ คือ
watchจะติดตามแค่ตัวแปร Source และจะไม่ติดตามอะไรทั้งสิ้นภายใน callBack และจะทำงานก็ต่อเมื่อ ตัวแปรเปลี่ยนแปลงค่าไปwatchEffect, มันจะติดตาม และ ทำงาน side Effect รวมเป็นครั้งเดียวกัน. มันจะติดตามตัวแปรทุกตัวในขณะที่มันกำลัง execution อยู่
Side Effect Cleanup
บางครั้งเราต้องการที่จะใช้งาน side effects เช่น การยิง request ภายใน wacther
watch(id, (newId) => {
  fetch(`/api/${newId}`).then(() => {
    // callback logic
  })
})
แต่จะเกิดขึ้น เมื่อ id เปลี่ยน ในขณะที่มันกำลัง fetch อยู่ล่ะ. เมื่อ request ก่อนหน้าเสร็จสิ้นแล้ว มันจะส่งอีก request ไปทันที โดยที่เรามีค่า id แล้ว. ถ้าเราต้องการที่จะยกเลิกการทำงานของ request ที่จะส่งไปใหม่ เราสามารถใช้ onWatcherCleanup() เพื่อยกเลิกการทำงาน ที่จะทำใหม่ได้
import { watch, onWatcherCleanup } from 'vue'

watch(id, (newId) => {
  const controller = new AbortController()

  fetch(`/api/${newId}`, { signal: controller.signal }).then(() => {
    // callback logic
  })

  onWatcherCleanup(() => {
    // abort stale request
    controller.abort()
  })
})
จำไว้ว่า onWatcherCleanup ซัพพอร์ตแค่ version 3.5+ ขึ้นไป และต้องถูกเรียกเมื่อ synchronous execution ของ watchEffect หรือ watch
เราไม่สามารถเรียกใช้ร่วมกับ await ได้ เพราะมันเป็น async function
ในอีกทางหนึ่ง เราสามารถเรียกใช้ onCleanup จาก argument ตัวที่ 3 ของ wacth ได้
watch(id, (newId, oldId, onCleanup) => {
  // ...
  onCleanup(() => {
    // cleanup logic
  })
})

watchEffect((onCleanup) => {
  // ...
  onCleanup(() => {
    // cleanup logic
  })
})
Callback Flush Timing
เมื่อค่ามีการเปลี่ยนแปลง มันอาจจะ trigger Vue component updates และ watcher ที่เราสร้างเอง
เช่นเดียวกับ Component update, เราสร้าง batched เพื่อป้องกันการ update หลาย ๆ ครั้ง ตัวอย่างเช่น เราอาจไม่ต้องการให้ watcher เรียกใช้ function เป็นพัน ๆ ครั้ง ถ้าเราใส่ item เข้าไปใน Array เป็นพัน ๆ ตัว
โดยปกติ watcher จะเรียกใช้งานเมื่อ parent component updates (ถ้ามี), และหลังจากที่ DOM ของ Component ของตัวมันเอง update หมายความว่า หาก callback ของ watcher พยายามเข้าถึง DOM ของ Compoent ตัวเอง (owner component) ข้อมูลที่เข้าถึงจะยังคงเป็น สถานะก่อนอัปเดต (pre-update state)
Post Watchers
ถ้าเราต้องการที่จะเข้าถึง DOM component ของตัวเอง ภายใน wacther หลังจาก Vue update แล้ว เราจำเป็นต้องใส่ flush: 'post' option เข้าไป
watch(source, callback, {
  flush: 'post'
})

watchEffect(callback, {
  flush: 'post'
})
watchEffect() ก็มี function แยกอีกตัว สำหรับหน้าที่นี้ watchPostEffect():
import { watchPostEffect } from 'vue'

watchPostEffect(() => {
  /* executed after Vue updates */
})
Sync Watchers
เราสามารถสร้าง wacther ที่ทำงานก่อนที่ Vue จะ update ได้
watch(source, callback, {
  flush: 'sync'
})

watchEffect(callback, {
  flush: 'sync'
})
function แยก ของ wacthEffect , watchSyncEffect() :
import { watchSyncEffect } from 'vue'

watchSyncEffect(() => {
  /* executed synchronously upon reactive data change */
})
Stopping a Watcher
Watchers ที่ถูกสร้างแบบ synchronously ใน setup() or <script setup> มันจะผูกพันกับ Component ของมัน และเมื่อ Component ของมันถูก unmounted ในกรณีส่วนใหญ่ เราไม่จำเป็นต้องกังวลว่าเราจะต้องมาหยุด watcher ด้วยตัวคุณเอง
สำคัญคือ watcher ต้องถูกสร้างอย่าง synchronously: ถ้ามันถูกสร้างเป็น async มันจะไม่ผูกพันกับ Component ของมันเอง เราจะต้องมาหยุดมันเองเพื่อป้องกัน memory leaks. ตัวอย่างเช่น
<script setup>
import { watchEffect } from 'vue'

// this one will be automatically stopped
watchEffect(() => {})

// ...this one will not!
setTimeout(() => {
  watchEffect(() => {})
}, 100)
</script>
ในการหยุด wacther เราต้องเรียกใช้ unwatch() ในการหยุด. สามารถใช้ได้ทั้ง watch และ watchEffect:
const unwatch = watchEffect(() => {})

// ...later, when no longer needed
unwatch()
จำไว้ว่า เราควรใช้เมื่อจำเป็นจริง ๆ เมื่อเราต้องสร้าง async function และ synchronous ควรจะใช้เมื่อต้องการจริง ๆ หรือถ้าเราต้องรอข้อมูล เราควรสร้างเงื่อนไขให้มัน
// data to be loaded asynchronously
const data = ref(null)

watchEffect(() => {
  if (data.value) {
    // do something when data is loaded
  }
})
Template Refs
แม้ว่า Vue เมื่อมีการ render มันจะช่วยจัดการ DOM ให้เราโดยอัตโนมัติ บางครั้งเราต้องการที่จะเข้าถึง DOM element ตัวนั้น โดยตรง เราจะสามารถใช้ ref attribute ได้
<input ref="input">
ref เป็น Attribute พิเศษ ที่คล้ายกับ key ใน v-for . โดยมันจะอนุญาตให้เราเข้าถึง Element ตัวนั้น ได้อย่างไม่ยุ่งยาก นี่อาจจะมีประโยชน์ ตัวอย่างเช่น เมื่อมีการ focus ไปที่ element แล้วเราต้องการที่จะจัดการกับ element ตัวนั้นอย่างไร
Accessing the Refs
ในการเข้าถึง element ref เราสามารถใช้ useTemplateRef() ได้
<script setup>
import { useTemplateRef, onMounted } from 'vue'

// the first argument must match the ref value in the template
const input = useTemplateRef('my-input')

onMounted(() => {
  input.value.focus()
})
</script>

<template>
  <input ref="my-input" />
</template>
โปรดจำไว้ว่า เราจะสามารถใช้งานได้หลังจาก Component mounted แล้ว. ถ้าเราพยายามเข้าถึง input ก่อนที่มันจะ render มันจะเป็น null เพราะว่า element ยังไม่ถูกสร้าง
และถ้าเราต้องการที่จะ ตรวจสอบว่า ref มีค่าแล้วหรือยัง เราสามารถใช้งานร่วมกับ watch ได้ แบบนี้
watchEffect(() => {
  if (input.value) {
    input.value.focus()
  } else {
    // not mounted yet, or the element was unmounted (e.g. by v-if)
  }
})
Refs inside v-for
เมื่อเราใช้ ref ใน v-for . ref ตัวนั้น จะมีค่าเป็น Array
<script setup>
import { ref, useTemplateRef, onMounted } from 'vue'

const list = ref([
  /* ... */
])

const itemRefs = useTemplateRef('items')

onMounted(() => console.log(itemRefs.value))
</script>

<template>
  <ul>
    <li v-for="item in list" ref="items">
      {{ item }}
    </li>
  </ul>
</template>
ควรจะจำไว้ว่า ref ที่เป็น Array อาจจะไม่ได้เรียงลำดับตาม Array ตัวเดิม
Function Refs
แทนที่จะเป็น String ธรรมดา. ref ก็สามารถเป็น function ได้ ที่จะถูกเรียกใช้งานเมื่อ Component มีการ update และจะให้ element reference มาให้. ในการรับ element reference เราสามารถรับได้โดยการเรียกใช้ parameter ตัวแรกของ function
<input :ref="(el) => { /* assign el to a property or ref */ }">
จำไว้ว่า เราจะใช้ :ref เพราะว่าเราสามารถส่ง function เข้าไปใน ref ได้ และเมื่อ element unmounted ค่าของ Attribute จะเป็น null
Ref on Component
ref สามารถใช้กับ child component ได้เหมือนกัน ในกรณีที่เราต้องการที่จะอ้างอิงไปถึง Component
<script setup>
import { useTemplateRef, onMounted } from 'vue'
import Child from './Child.vue'

const childRef = useTemplateRef('child')

onMounted(() => {
  // childRef.value will hold an instance of <Child />
})
</script>

<template>
  <Child ref="child" />
</template>
ถ้า Compoent ใช้ Option API หรือ ไม่ได้ใช้ <script setup>, ในการอ้างอิงไปถึง child component เราจะใช้ this , หมายความว่า เราจะสามารถเข้าถึง ตัวแปร หรือ method ภายใน child component ได้. ดังนั้น มันจะช่วยให้เราสามารถสร้างการเชื่อมโยงระหว่าง Child Component กับ Parent Component ได้ง่ายขึ้น แต่ในกรณีส่วนใหญ่ ถ้าเราต้องการจะเชื่อมต่อระหว่าง Child Component กับ Parent Component เราก็สามารถใช้ props กับ emit ได้เหมือนกัน
แต่ข้อยกเว้นคือ Child component ที่ใช้ <script setup> เป็น private โดยปกติอยู่แล้ว หมายความว่า Parent Component จะเข้าถึง Child Component ที่ใช้ <script setup> จะไม่สามารถเข้าถึงได้โดยปกติ แม้แต่ว่า Child Component เลือกที่จะส่งข้อมูลออกโดยใช้ defineExpose
<script setup>
import { ref } from 'vue'

const a = 1
const b = ref(2)

// Compiler macros, such as defineExpose, don't need to be imported
defineExpose({
  a,
  b
})
</script>
เมื่อเราให้ Parent Component เข้าถึง Child Component ค่าของ ref ที่ได้ หน้าตาจะเป็นประมาณนี้ { a: number, b: number }
Components Basics
Components จะทำให้เราแบ่ง UI ออกและสามารถใช้ซ้ำได้ และทำงานแยกส่วนกันในแต่ละ Component เป็นปกติที่ App ของเราจะแบ่งเป็น Tree ซ้อน ๆ ลงไป
นี่เหมือนกับ HTML element ที่ซ้อน ๆ กันลงไป แต่ Vue สามารถให้เราสร้าง Component ของตัวเองลงไปได้ เพื่อที่จะสร้าง Content และ logic ลงไปในแต่ละ Component ได้
Defining a Component
เมื่อเราใช้ build step โดยปกติเราจะใช้ .vue extension ในการสร้างไฟล์ของเรา
<script setup>
import { ref } from 'vue'

const count = ref(0)
</script>

<template>
  <button @click="count++">You clicked me {{ count }} times.</button>
</template>
แต่ถ้าเราไม่ได้ใช้ build step. Vue สามารถเขียนเป็น JavaScript ปกติได้เหมือกัน
import { ref } from 'vue'

export default {
  setup() {
    const count = ref(0)
    return { count }
  },
  template: `
    <button @click="count++">
      You clicked me {{ count }} times.
    </button>`
  // Can also target an in-DOM template:
  // template: '#my-template-element'
}
ในตัวอย่างด้านบน เราได้ export ออกไปแค่ไฟล์เดียว แต่ถ้าเราต้องการจะ export ออกไปหลาย ๆ ตัว เราสามารถใช้ name export เพื่อส่งออก Component หลาย ๆ ตัวออกไป ทางไฟล์เดียวได้
Using a Component
ในการใช้ Child Component เราต้อง import เข้ามาใน Parent Component สมมติเราจะวาง Component ButtonCounter.vue . component จะถูกแปลงเป็นเหมือนกับ file's default export:
<script setup>
import ButtonCounter from './ButtonCounter.vue'
</script>

<template>
  <h1>Here is a child component!</h1>
  <ButtonCounter />
</template>
ด้วย <script setup> . การ import Component เข้ามาจะสามารถใช้งานได้เลย
มันสามารถเป็นไปได้ในการ เข้าถึง Component ได้โดยที่ไม่ต้อง import มันมีทั้งข้อดีและข้อเสีย สามารถเข้าไปดูได้ที่ Component Registration
Components สามารถใช้งานซ้ำได้เรื่อย ๆ ตามที่เราต้องการ
<h1>Here are many child components!</h1>
<ButtonCounter />
<ButtonCounter />
<ButtonCounter />
จำไว้ว่า เมื่อเรากดคลิ้กไปที่ Component มันจะทำงานแยกกัน เพราะว่าแต่ละครั้งที่เราใช้ Component มันจะสร้างตัวใหม่ขึ้นมา
ในการตั้งชื่อ file Component เราแนะนำให้ตั้งเป็น PascalCase เพราะว่ามันอาจไปซ้ำกับ HTML elements ได้ แม้ว่า HTML tag names เป็น case-insensitive. Vue compile format ก็สามารถใช้ case-sensitive tag names ได้เหมือกัน. เราสามารถใช้ /> ในการปิด tag ได้ด้วย
ถ้าคุณต้องการที่จะใช้ Component ใน DOM. Component จะถูกปฏิบัติเหมือนกับ HTML tags ดังนั้น เราควรจะตั้งชื่อเป็น kebab-case และใช้ closing tags
<!-- if this template is written in the DOM -->
<button-counter></button-counter>
<button-counter></button-counter>
<button-counter></button-counter>
Passing Props
ถ้าเราสร้าง Blog post เราต้องการจะให้มี Blog แต่ layout เหมือนกัน แต่ Content ภายในเหมือนกัน ดังนั้น Component ของเรา จึงควรส่งค่าลงไปได้ เช่น title และ content ของ Post แต่ละ Post และนี่คือสาเหตุการเกิดของ Props
Props เป็น Attribute ที่ให้เราส่งค่าเข้าไปที่ Component ได้ โดยเราต้องประกาศ list ของ Props ภายใน Child Component ก่อน โดยใช้ **defineProps**
<!-- BlogPost.vue -->
<script setup>
defineProps(['title'])
</script>

<template>
  <h4>{{ title }}</h4>
</template>
defineProps จะสามารถใช้ได้แค่ใน <script setup> และไม่จำเป็นต้อง import เข้ามา. โดยจะประกาศตัวค่าตัวแปรที่ต้องการจะรับเข้ามา. defineProps ก็สามารถ return ค่าเป็น Object ได้ ในกรณีที่เราต้องการจะเอาข้อมูลมาเป็นก้อนเดียว
const props = defineProps(['title'])
console.log(props.title)
ถ้าคุณไม่ได้ใช้ <script setup> เราควรจะประกาศ props option และส่ง props เข้าไปใน setup() เป็น argument ตัวแรก
export default {
  props: ['title'],
  setup(props) {
    console.log(props.title)
  }
}
component สามารถมีหลาย ๆ Props ได้ และสามารถส่งค่าอะไรเข้าไปก็ได้
ในการส่งค่า Props เข้าไป เราสามารถส่งเข้าไปได้อย่างนี้
<BlogPost title="My journey with Vue" />
<BlogPost title="Blogging with Vue" />
<BlogPost title="Why Vue is so fun" />
ในกรณีที่เรามี Array ของ Post เราสามารถส่งค่าเข้าไปแบบนี้ได้
const posts = ref([
  { id: 1, title: 'My journey with Vue' },
  { id: 2, title: 'Blogging with Vue' },
  { id: 3, title: 'Why Vue is so fun' }
])
เราจะส่งค่าเข้าไปโดยใช้ v-for
<BlogPost
  v-for="post in posts"
  :key="post.id"
  :title="post.title"
 />
โดยเราจะใช้ v-bind syntax (:title="post.title") ในการส่งค่าที่เป็น Dynamic เข้าไปได้
Listening to Events
ในเมื่อเราเป็น Developer <BlogPost> component ของเรา อาจมีบางอย่าง ที่ต้องการจะส่งกลับไปที่ Parent ของมัน ตัวอย่างเช่น เราต้องการที่จะขยายขนาดข้อความเมื่อกำลังออกจาก Blog post
ใน parent เราจะประกาศตัวแปร postFontSize ref
const posts = ref([
  /* ... */
])

const postFontSize = ref(1)
ที่จะสามารถใช้ใน template เพื่อควบคุมขนาดข้อความใน Blog post ทั้งหมด
<div :style="{ fontSize: postFontSize + 'em' }">
  <BlogPost
    v-for="post in posts"
    :key="post.id"
    :title="post.title"
   />
</div>
เราลองมาเพิ่ม button เข้าไปใน <BlogPost> กัน
<!-- BlogPost.vue, omitting <script> -->
<template>
  <div class="blog-post">
    <h4>{{ title }}</h4>
    <button>Enlarge text</button>
  </div>
</template>
button ยังไม่ได้ทำงานอะไร เราสามารถกด button เพื่อให้มันติดต่อกลับไปที่ Parent เพื่อที่จะขยายขนาดของข้อความในทุกโพสต์ ในการแก้ปัญหานี้ Component จะสามารถใช้ custom events ได้ โดย Parent จะเลือกรับ Event จาก Child Component ตัวไหนก็ได้ โดยใช้ v-on or @ เพียงแค่เพิ่มเข้าไปที่ DOM
<BlogPost
  ...
  @enlarge-text="postFontSize += 0.1"
 />
และ Child Component จะเรียกใช้ $emit method, ในการส่งค่าออกไปจากตัวมันได้
<!-- BlogPost.vue, omitting <script> -->
<template>
  <div class="blog-post">
    <h4>{{ title }}</h4>
    <button @click="$emit('enlarge-text')">Enlarge text</button>
  </div>
</template>
@enlarge-text="postFontSize += 0.1" จะรับ Event และเพิ่มค่าตัวแปรของ postFontSize
เราสามารถประกาศ emitted event ได้โดยใช้ defineEmits ได้
<!-- BlogPost.vue -->
<script setup>
defineProps(['title'])
defineEmits(['enlarge-text'])
</script>
เหมือนกับ defineProps . defineEmits จะสามารถใช้ได้แค่ใน <script setup> และไม่จำเป็นต้อง import เข้ามา และเรายังสามารถใช้ emit events ภายใน <script setup> เมื่อเราไม่ต้องการใช้ $emit กับ element ตัวไหน
<script setup>
const emit = defineEmits(['enlarge-text'])

emit('enlarge-text')
</script>
ถ้าเราไม่ได้ใช้ใน <script setup> เราสามารถประกาศ emitted โดยใช้ emits options ได้ โดยเราสามารถใช้มันได้ โดยให้ emit function เป็น Property โดยส่งเข้าไปใน setup() เป็น Argument ตัวที่ 2
export default {
  emits: ['enlarge-text'],
  setup(props, ctx) {
    ctx.emit('enlarge-text')
  }
}
Content Distribution with Slots
เหมือนกับ HTML element. มันจะมีประโยชน์มาก ถ้าเราสามารถใส่ content เข้าไปใน Component ได้
<AlertBox>
  Something bad happened.
</AlertBox>
โดยหน้าตาจะเป็นประมาณนี้

เราสามารถทำได้โดยใช้ <slot> element:
<!-- AlertBox.vue -->
<template>
  <div class="alert-box">
    <strong>This is an Error for Demo Purposes</strong>
    <slot />
  </div>
</template>

<style scoped>
.alert-box {
  /* ... */
}
</style>
อย่างที่เห็น เราใช้ slot ในการบอกว่า เราต้องการให้ Content ของเราไปอยู่ส่วนไหนของโค้ด
Dynamic Components
มันจะดีมาก ถ้าเราสามารถสลับ Component ได้เหมือนกับการกด tab
Open example in the Playground
โดยเราสามารถทำได้โดยใช้ is Attribute
<!-- Component changes when currentTab changes -->
<component :is="tabs[currentTab]"></component>
โดยค่าของ :is จะสามารถเก็บค่าได้ ที่จะมีก็คือ
- ชื่อ string ของ Component
- component ที่ถูก import เข้ามา
เมื่อเราใช้ <component :is="...">, Component นั้น จะถูก ummounted และ mounted เราสามารถบังคับให้ Components ยังไม่ถูก Mouted ได้ โดยใช้ <KeepAlive>
in-DOM Template Parsing Caveats
เมื่อคุณเขียน template ของ Vue โดยตรงใน DOM (แทนที่จะกำหนดเทมเพลตในไฟล์ .vue หรือเป็นสตริงใน JavaScript), Vue จะต้องดึงข้อมูล template จาก DOM ก่อนที่จะนำมาใช้งาน นี่อาจนำไปสู่ ข้อควรระวัง บางประการเนื่องจากพฤติกรรมการแปลง HTML โดยธรรมชาติของเบราว์เซอร์
Case Insensitivity
HTML tags เป็น case-insensitive, Browser จะแปลงจาก uppercase เป็น lowercase ทั้งหมด PascalCase component, camelCased prop หรือ v-on event พวกนี้จะถูกแปลงเป็น kebab-cased
// camelCase in JavaScript
const BlogPost = {
  props: ['postTitle'],
  emits: ['updatePost'],
  template: `
    <h3>{{ postTitle }}</h3>
  `
}
<!-- kebab-case in HTML -->
<blog-post post-title="hello!" @update-post="onUpdatePost"></blog-post>
Self Closing Tags
เราเคยใช้ self-closing tags สำหรับ components ใน code sample ที่เราเคยให้ดูมา
<MyComponent />
เพราะว่า Vue's template จะแยก /> เป็นตัวจบของทุก tags โดยไม่คำนึงถึงประเภทของมัน
ใน in-DOM templates เราจะต้องใช้ tag ปิดแบบแยกอยู่เสมอ
<my-component></my-component>
นี่เป็นเพราะว่า HTML อนุญาตให้แค่ element บางตัว สามารถไม่มี tag ปิดแยกได้ เช่น <input> และ <img>.
แต่กับ element ตัวอื่น ๆ HTML จะคิดว่ามันเป็น tag เปิดอยู่
<my-component /> <!-- we intend to close the tag here... -->
<span>hello</span>
ต้องเปลี่ยนเป็น
<my-component>
  <span>hello</span>
</my-component>
Element Placement Restrictions
HTML elements บางตัว เช่น <ul>, <ol>, <table> และ <select> มีกฏของมันอยู่ ว่าสามารถมีอะไรอยู่ในตัวมันได้บ้าง เช่น element อย่าง <li>, <tr>, และ <option> จะสามารถปรากฏอยู่ภายในได้เท่านั้น
นี่ทำให้เกิดปัญหาขึ้นเมื่อ เราต้องใช้ Component ภายใน element ที่มีกฏ
ตัวอย่างเช่น
<table>
  <blog-post-row></blog-post-row>
</table>
<blog-post-row> จะถูกคิดเป็น invalid element และทำให้เกิด Error ขึ้นได้ระหว่าง render output โดยเราสามารถใช้l is attribute ในการกำหนดได้
<table>
  <tr is="vue:blog-post-row"></tr>
</table>
นี่คือสิ่งที่คุณควรเรียนรู้ใน phase แรกก่อน ยังมีอะไรที่เราต้องเรียนอยู่อีกสำหรับ Vue แต่แนะนำให้เราไปลองเล่นกับ Vue ก่อน หรือสามารถเรียนรู้จาก Examples ได้ ถ้ายังไม่พร้อมเล่นกับ Vue