Vue Components (Intermediate - Advanced)
Component Registration
ใน Vue, Component จะต้องได้รับการ "registered" เพื่อให้ Vue สามารถรู้ตำแหน่งของการนำ Component ไปใช้ได้ โดยการ register จะมีด้วยกัน 2 รูปแบบ: global และ local.
Global Registration
เราสามารถทำให้ components สามารถใช้งานได้จากทุกที่ด้วยการใช้ .component() method:
import { createApp } from 'vue'

const app = createApp({})

app.component(
  // the registered name
  'MyComponent',
  // the implementation
  {
    /* ... */
  }
)
ถ้าเราใช้ SFCs เราต้อง import files .vue เข้ามาก่อน จึงสามารถ register ได้
import MyComponent from './App.vue'

app.component('MyComponent', MyComponent)
.component() สามารถเชื่อมกันไปเรื่อย ๆ ได้
app
  .component('ComponentA', ComponentA)
  .component('ComponentB', ComponentB)
  .component('ComponentC', ComponentC)
Globally registered components จะทำให้เราสามารถใช้ Component จากที่ไหนก็ได้ภายใน application ของเรา
<!-- this will work in any component inside the app -->
<ComponentA/>
<ComponentB/>
<ComponentC/>
นี่สามารถใช้กับ Component ย่อย ๆ ลงไปอีกได้ด้วย นั่นหมายความว่า Component 3 ตัวนี้ จะสามารถใช้ได้ในแต่ละตัวของมันได้
Local Registration
แต่ว่าในความสะดวกสบายนั้น ก็ยังมีข้อเสียบางประการอยู่
- Tree-shaking คือกระบวนการที่ระบบ build จะลบโค้ดที่ไม่ได้ใช้งานออกจากไฟล์ Bundle สุดท้าย เพื่อให้ไฟล์มีขนาดเล็กที่สุด แต่ว่า ถ้าเราสร้าง globally register a component และไม่ได้ใช้ในส่วนไหนของ Application เลย มันจะยังรวมอยู่ใน ไฟล์ Bundle อยู่
- Global registration ทำให้เราติดตามความสัมพันธ์ระหว่าง Component ได้ยาก โดยมันสามารถทำให้การทำงานในระยะยาว ยุ่งยากซับซ้อนได้
Local registration จะทำให้เราสามารถจำกัดการใช้งานของ Component ให้สามารถใช้ได้แค่ใน Component ปัจจุบันเท่านั้น ช่วยให้เราสามารถทำความเข้าใจกับโค้ดได้ง่ายขึ้น และยังเป็นมิตรกับ tree-shaking อีกด้วย
เมื่อเราใช้กับ <script setup>, การ import Component เข้ามา จะทำให้มันเป็น local อยู่แล้วโดยที่ไม่ต้องไปทำการ register
<script setup>
import ComponentA from './ComponentA.vue'
</script>

<template>
  <ComponentA />
</template>
ถ้าเราไม่ใช้ <script setup> เราจะต้องใช้ components option:
import ComponentA from './ComponentA.js'

export default {
  components: {
    ComponentA
  },
  setup() {
    // ...
  }
}
สำหรับ property แต่ละตัวของ components Object, key ของ property นั้น จะเป็นชื่อของ Component, ในขณะที่ value จะเก็บตัว Component นั้นไว้
export default {
  components: {
    ComponentA: ComponentA
  }
  // ...
}
จำไว้ว่า locally registered components จะไม่สามารถใช้กับ Component ที่ซ้อนลงไปได้ ตัวอย่างเช่น ComponentA จะสามารถใช้งานได้แค่ใน Component ปัจจุบันเท่านั้น และจะไม่สามารถใช้กับ Child หรือ Component ที่ซ้อนลงไปลึก ๆ ได้
Component Name Casing
ตลอดทั้งการสอน เราใช้ PascalCase ในการตั้งชื่อ components เพราะว่า
- การตั้ง PascalCase เป็นการระบุ Component ที่ valid. มันจะทำให้เราสามารถ import เข้ามาได้ง่าย และ register components ใน JavaScript
<PascalCase />ทำให้แยกได้อย่างชัดเจนว่า อันไหนคือ Vue Component อันไหนคือ Native HTML
เราสามารถใช้งานมันได้ดี เมื่อเราทำงานกับ SFC หรือ string templates. อย่างไรก็ตาม ถ้าเราใช้กับ in-DOM template เราจะไม่สามารถใช้งานมันได้ โดยเราจะต้องใช้ kebab-case แทน
Props
Props Declaration
Vue Component จำเป็นต้องกำหนดว่า เราสามารถจะรับ Props ตัวไหนมาได้บ้าง เพื่อให้ Vue รู้ว่า Props ตัวไหน ควรจะถูกปฏิบัติอย่างไร
ถ้าเราใช้ <script setup>, props จะสามารถประกาศได้ โดยใช้ defineProps()
<script setup>
const props = defineProps(['foo'])

console.log(props.foo)
</script>
ถ้าเราไม่ได้ใช้ <script setup> ในการประกาศ Props เราจะใช้ props option
export default {
  props: ['foo'],
  setup(props) {
    // setup() receives props as the first argument.
    console.log(props.foo)
  }
}
Argument ที่ส่งเข้าไปใน defineProps() เป็นค่าเดียวกันกับ props options:
เพิ่มเติมในการประกาศ Props เราสามารถกำหนดประเภทของตัวแปรได้
// in <script setup>
defineProps({
  title: String,
  likes: Number
})
// in non-<script setup>
export default {
  props: {
    title: String,
    likes: Number
  }
}
สำหรับ Property แต่ละตัว key จะเป็นชื่อของ Prop และ value จะเป็นประเภทของตัวแปร ที่เราต้องการให้เป็น
ถ้าเราใช้ TypeScript เราก็สามารถทำได้เหมือนกัน
<script setup lang="ts">
defineProps<{
  title?: string
  likes?: number
}>()
</script>
Reactive Props Destructure
ระบบการติดตามของ Vue จะทำให้เหมือนว่า Props เป็นตัวแปรของ Component นั้น. เมื่อเราเข้าถึง props.foo ใน computed หรือ watcher. foo Props จะถูกติดตามเหมือนกับตัวแปรปกติ
const { foo } = defineProps(['foo'])

watchEffect(() => {
  // runs only once before 3.5
  // re-runs when the "foo" prop changes in 3.5+
  console.log(foo)
})
ใน version ที่ต่ำกว่า 3.4 foo จะมีค่าเป็น Constant และจะไม่เปลี่ยนค่า. ใน Version ที่สูง 3.5. Vue Compiler จะเพิ่ม props. นำหน้าโดยอัตโนมัติ เมื่อโค้ดใน <script setup> เข้าถึงตัวแปรที่ destructured จาก defineProps เพราะมันจะทำให้เราสามารถอ่านโค้ดได้ง่ายขึ้น
const props = defineProps(['foo'])

watchEffect(() => {
  // `foo` transformed to `props.foo` by the compiler
  console.log(props.foo)
})
เราสามารถใช้ default value syntax ในการตั้งค่าตัวแปรเริ่มต้นสำหรับ props ได้
const { foo = 'hello' } = defineProps<{ foo?: string }>()
Passing Destructured Props into Functions
เมื่อเราส่ง destructured prop เข้าไปใน function
const { foo } = defineProps(['foo'])

watch(foo, /* ... */)
มันจะไม่สามารถทำงานได้ เพราะว่า เท่ากับการ watch(props.foo, ...) - เราส่งค่าปกติเข้าไปแทนที่จะเป็น reactive data เข้าไปใน watch. โดยปกติ Vue จะตรวจจับและส่งเป็น warning ออกไป
เราสามารถแก้ได้โดยใช้ getter ในการหุ้มมันเอาไว้ watch(() => props.foo, ...)
watch(() => foo, /* ... */)
Prop Passing Details
Prop Name Casing
เราจะตั้งชื่อ Prop ที่มีชื่อยาวด้วย camelCase เพราะว่า เพื่อป้องกันการใช้ quotes เมื่อเราใช้มันเป็น property keys และ ให้เราสามารถอ้างอิงไปถึงมันได้อยากตรงไปตรงมา เพราะว่ามันเป็น valid JavaScript identifiers:
defineProps({
  greetingMessage: String
})
<span>{{ greetingMessage }}</span>
โดยปกติ เราสามารถใช้ camelCase เมื่อเราส่งค่าเข้าไปใน child component อย่างไรก็ตาม เราควรใช้ kebab-case เพื่อให้เราไม่สับสนกับ HTML attributes:
<MyComponent greeting-message="hello" />
เราควรจะใช้ **PascalCase for component tags** ทุกครั้ง เพราะว่ามันจะทำให้โค้ดเราอ่านง่ายขึ้น และทำให้มันแตกต่างจาก Native HTML. อย่างไรก็ตาม เราไม่ควรจะใช้ camelCase เมื่อเราส่งค่า Prop
Static vs. Dynamic Props
เราคงเคยเห็นการส่งค่า static value เข้าไปแบบนี้
<BlogPost title="My journey with Vue" />
เราสามารถส่งค่า dynamic props ไปได้ โดยการใช้ v-bind หรือ : shortcut,
<!-- Dynamically assign the value of a variable -->
<BlogPost :title="post.title" />

<!-- Dynamically assign the value of a complex expression -->
<BlogPost :title="post.title + ' by ' + post.author.name" />
Passing Different Value Types
ตามตัวอย่าง 2 ตัวอย่างด้านบน เราได้ส่งค่าเป็นแค่ String เข้าไป แต่ว่าจริง ๆ แล้ว มันสามารถเป็นค่าอะไรก็ได้
Number
<!-- Even though `42` is static, we need v-bind to tell Vue that -->
<!-- this is a JavaScript expression rather than a string.       -->
<BlogPost :likes="42" />

<!-- Dynamically assign to the value of a variable. -->
<BlogPost :likes="post.likes" />
Boolean
<!-- Including the prop with no value will imply `true`. -->
<BlogPost is-published />

<!-- Even though `false` is static, we need v-bind to tell Vue that -->
<!-- this is a JavaScript expression rather than a string.          -->
<BlogPost :is-published="false" />

<!-- Dynamically assign to the value of a variable. -->
<BlogPost :is-published="post.isPublished" />
Array
<!-- Even though the array is static, we need v-bind to tell Vue that -->
<!-- this is a JavaScript expression rather than a string.            -->
<BlogPost :comment-ids="[234, 266, 273]" />

<!-- Dynamically assign to the value of a variable. -->
<BlogPost :comment-ids="post.commentIds" />
Object
<!-- Even though the object is static, we need v-bind to tell Vue that -->
<!-- this is a JavaScript expression rather than a string.             -->
<BlogPost
  :author="{
    name: 'Veronica',
    company: 'Veridian Dynamics'
  }"
 />

<!-- Dynamically assign to the value of a variable. -->
<BlogPost :author="post.author" />
Binding Multiple Properties Using an Object
ถ้าเราต้องการที่จะส่ง properties ทั้งหมดของ Object เข้าไปเป็น Props. เราสามารถใช้ **v-bind without an argument** (v-bind instead of :prop-name).
const post = {
  id: 1,
  title: 'My Journey with Vue'
}
การใช้งาน
<BlogPost v-bind="post" />
โดยมันจะเท่ากับ
<BlogPost :id="post.id" :title="post.title" />
One-Way Data Flow
props ทุกตัว จะเป็น one-way-down binding ระหว่าง child กับ parent Component: เมื่อค่าของ Parent update ค่านั้นจะถูกส่งไปที่ Child โดยที่จะไม่มีวิธีอื่น และเมื่อใช้งานเยอะ ๆ จะทำให้โค้ดของเราอ่านยากมาก
เพิ่มเติม ทุกครั้งที่ Parent Component update. props ทุกตัวใน Child Component จะมีค่าเป็น ค่าที่ล่าสุด นั่นหมายความว่า เราไม่ควรจะไปแปลงค่าตัวแปรของ Props
const props = defineProps(['foo'])

// ❌ warning, props are readonly!
props.foo = 'bar'
โดยจะมี 2 วิธี ในการเปลี่ยนค่าของ Props
-
prop จะถูกส่งเป็น initial value. child Component ต้องสร้างตัวแปรมารับค่าของ Props ก่อน จึงจะสามารถเปลี่ยนค่าของตัวแปรได้
const props = defineProps(['initialCounter'])

// counter only uses props.initialCounter as the initial value;
// it is disconnected from future prop updates.
const counter = ref(props.initialCounter) -
prop ถูกส่งเป็นค่า raw ที่ต้องการจะ transformed ในกรณีนี้ เราต้องใช้ computed property ร่วมด้วย
const props = defineProps(['size'])

// computed property that auto-updates when the prop changes
const normalizedSize = computed(() => props.size.trim().toLowerCase())
Mutating Object / Array Props
เมื่อ objects และ arrays ถูกส่งเข้าไปเป็น Props มันจะสามารถดัดแปลงข้อมูลข้างในได้ ก็เพราะว่า Object และ Array นั้น จะส่งค่า reference เข้ามา และมันเป็นสิ่งที่ยากเกินไปที่ Vue จะป้องกันการดัดแปลงได้
ข้อเสียหลัก ๆ ของการดัดแปลงข้อมูลของ Props คือมันอาจส่งผลกระทบต่อ Parent Component ได้ ทำให้เราสามารถดูการไหลของข้อมูลได้ยากขึ้น. โดย best practice คุณควรระวังการเปลี่ยนข้อมูลของ Props และถ้าต้องการจะส่งข้อมูลกลับขึ้นไป เราควรจะใช้ emit an event
Prop Validation
Components สามารถกำหนดประเภทข้อมูลของ Props ได้ เหมือนที่เราได้เห็นตัวอย่างกันไป ถ้าไม่มี requirement . Vue จะเตือนคุณใน JavaScript console.
ในการทำ validations เราจะใช้ object ในการทำ validation ใน defineProps() ตัวอย่างเช่น
defineProps({
  // Basic type check
  //  (`null` and `undefined` values will allow any type)
  propA: Number,
  // Multiple possible types
  propB: [String, Number],
  // Required string
  propC: {
    type: String,
    required: true
  },
  // Required but nullable string
  propD: {
    type: [String, null],
    required: true
  },
  // Number with a default value
  propE: {
    type: Number,
    default: 100
  },
  // Object with a default value
  propF: {
    type: Object,
    // Object or array defaults must be returned from
    // a factory function. The function receives the raw
    // props received by the component as the argument.
    default(rawProps) {
      return { message: 'hello' }
    }
  },
  // Custom validator function
  // full props passed as 2nd argument in 3.4+
  propG: {
    validator(value, props) {
      // The value must match one of these strings
      return ['success', 'warning', 'danger'].includes(value)
    }
  },
  // Function with a default value
  propH: {
    type: Function,
    // Unlike object or array default, this is not a factory
    // function - this is a function to serve as a default value
    default() {
      return 'Default function'
    }
  }
})
รายละเอียดเพิ่มเติม
- props ทุกตัว จะเป็น optinal นอกจากว่า เราจะใส่
required: true - ถ้าเราไม่ได้กำหนดประเภทของ Props ค่าจะเป็น
undefined - Props แบบ Boolean จะถูกแปลงเป็น
falseหากไม่ส่งเข้ามา - ค่า Default จะถูกใช้เมื่อค่าเป็น
undefined
เมื่อ prop validation ไม่สำเร็จ มันจะเตือนขึ้นมาทาง Console (ถ้าเป็น development build)
ถ้าใช้ **Type-based props declarations.** Vue จะพยายามจะ Complie type annotations ไปให้เทียบเท่ากับ runtime ของ การประกาศ Props ตัวอย่างเช่น จาก defineProps<{ msg: string }> จะ Complie เป็น{ msg: { type: String, required: true }}.
Runtime Type Checks
type สามารถมีค่าได้เป็นตามนี้
StringNumberBooleanArrayObjectDateFunctionSymbolError
เพิ่มเติม type สามารถเป็น custom class หรือ constructor function ได้ ตัวอย่างเช่น
class Person {
  constructor(firstName, lastName) {
    this.firstName = firstName
    this.lastName = lastName
  }
}
เราสามารถใช้มันเป็นชนิดตัวแปรของ Props ได้
defineProps({
  author: Person
})
Vue จะใช้ instanceof Person เพื่อตรวจสอบว่าค่าของ prop author เป็นเหมือนกับคลาสของ Person จริงหรือไม่.
Nullable Type
ถ้าเรา required ตัวแปร แต่เราต้องการให้ตัวแปรของเราเป็น null ได้ เราก็สามารถใช้ Array ที่มี null อยู่ได้
defineProps({
  id: {
    type: [String, null],
    required: true
  }
})
จำไว้ว่า ถ้า type เป็น null โดยไม่ใช้ Array ค่าของตัวแปร จะเป็นประเภทไหนก็ได้
Boolean Casting
Props ที่เป็น Boolean จะมีกฏการแปลงค่า(casting rules) ที่จะเลียนแบบพฤติกรรมของ Attribute Boolean แบบ native ใน HTML ตัวอย่างเช่น สำหรับ <MyComponent> ที่มีการประกาศ prop ดังต่อไปนี้:
defineProps({
  disabled: Boolean
})
Component จะสามารถเขียนเป็นแบบนี้ได้
<!-- equivalent of passing :disabled="true" -->
<MyComponent disabled />

<!-- equivalent of passing :disabled="false" -->
<MyComponent />
เมื่อ prop ถูกประกาศเป็นตัวแปรหลาย ๆ ประเภท. casting rules ของ boolean ก็จะยังสามารถใช้ได้อยู่ อย่างไรก็ตาม จะมีกรณีพิเศษเมื่อทั้ง String และ Boolean ถูกอนุญาตใน prop เดียวกัน - Boolean casting จะสามารทำได้ ก็ต่อเมื่อ Boolean มาก่อน String
// disabled will be casted to true
defineProps({
  disabled: [Boolean, Number]
})

// disabled will be casted to true
defineProps({
  disabled: [Boolean, String]
})

// disabled will be casted to true
defineProps({
  disabled: [Number, Boolean]
})

// disabled will be parsed as an empty string (disabled="")
defineProps({
  disabled: [String, Boolean]
})
Component Events
Emitting and Listening to Events
component สามารถ emit custom event จาก template expressions ( v-on ) โดยใช้ $emit method:
<!-- MyComponent -->
<button @click="$emit('someEvent')">Click Me</button>
parent สามารถรับ event โดยใช้ v-on ได้:
<MyComponent @some-event="callback" />
.once modifier ก็สามารถใช้ได้เหมือนกัน
<MyComponent @some-event.once="callback" />
เหมือนกันกับ Component และ Props. ตอนที่เรา emit ค่าขึ้นไป เราควรใช้ camelCase แต่เมื่อเรารับค่าเข้ามา เราควรจะใช้ kebab-cased
Event Arguments
มันมีประโยชน์ในการ emit และส่งค่าบางอย่างตามไปด้วย ตัวอย่างเช่น เราต้องการให้ <BlogPost> component ส่งไปบอกขนาดว่าเราต้องการจะขยายขนาดข้อความเป็นเท่าไหร่ ในกรณีพวกนั้น เราสามารถใส่ argument อีกตัวลงไปใน emit ได้
<button @click="$emit('increaseBy', 1)">
  Increase by 1
</button>
หลังจากนั้น เมื่อเรารับ event เข้ามา เราสามารถใช้ inline Arrow function ในการรับตัวแปรได้
<MyButton @increase-by="(n) => count += n" />
หรือ ถ้า event handler ของเราเป็น method
<MyButton @increase-by="increaseCount" />
เราจะรับค่านั้น โดยให้มันเป็น argument ตัวแรกของ function
function increaseCount(n) {
  count.value += n
}
Declaring Emitted Events
component สามารถแบ่ง emit event ได้ โดยการใช้ defineEmits()
<script setup>
defineEmits(['inFocus', 'submit'])
</script>
$emit method ที่เราใช้ใน <template> จะไม่สามารถเข้าถึงได้จาก <script setup> แต่ defineEmits() จะให้ function ที่เราสามารถใช้งาน emit event มาให้เรา
<script setup>
const emit = defineEmits(['inFocus', 'submit'])

function buttonClick() {
  emit('submit')
}
</script>
defineEmits() ไม่สามารถใช้ใน function ได้. มันจะต้องถูกวางไว้กับ <script setup> ตามตัวอย่างด้านบน
ถ้าเราใช้ setup แทนที่จะเป็น <script setup>, event emit จะถูกประกาศใน emits option, และ emit จะถูกส่งค่าเข้าไปใน setup()
export default {
  emits: ['inFocus', 'submit'],
  setup(props, ctx) {
    ctx.emit('submit')
  }
}
emit สามารถใช้กับ destructured ได้:
export default {
  emits: ['inFocus', 'submit'],
  setup(props, { emit }) {
    emit('submit')
  }
}
emits option และ defineEmits() ซัพพอร์ต object syntax ถ้าเราใช้ TypeScript เราสามารถกำหนดประเภทตัวแปรได้. โดยที่มันจะทำให้เราสามารถตรวจสอบประเภทตัวแปรจอง payload ของ emit event ได้
<script setup lang="ts">
const emit = defineEmits({
  submit(payload: { email: string, password: string }) {
    // return `true` or `false` to indicate
    // validation pass / fail
  }
})
</script>
ถ้าเราใช้ TypeScript กับ <script setup>, เราสามารถที่จะประกาศ emitted events ได้เหมือนกัน
<script setup lang="ts">
const emit = defineEmits<{
  (e: 'change', id: number): void
  (e: 'update', value: string): void
}>()
</script>
รายละเอียดเพิ่มเติม: Typing Component Emits
แม้ว่ามันจะเป็นแค่ทางเลือกว่าจะทำหรือไม่ทำก็ได้ แต่เราควรที่จะประกาศ emit event เพื่อที่จะทำให้ทำความเข้าใจโค้ด ต่อเราและคนอื่น ๆ ที่จะมาทำงานต่อเราได้ง่ายขึ้น
Component v-model
Basic Usage
v-model สามารถใช้กับ Component เพื่อสร้างการผูกข้อมูลแบบสองทาง (two-way binding) ได้.
ตั้งแต่ Vue 3.4 เราแนะนำให้ใช้ **defineModel()** ในการทำงานแบบ two-way binding
<!-- Child.vue -->
<script setup>
const model = defineModel()

function update() {
  model.value++
}
</script>

<template>
  <div>Parent bound v-model is: {{ model }}</div>
  <button @click="update">Increment</button>
</template>
parent สามารถรับข้อมูลจาก v-model ได้
<!-- Parent.vue -->
<Child v-model="countModel" />
ค่าที่ได้จาก defineModel() เป็น ref. เราสามารถเข้าถึงค่าและเปลี่ยนค่าตัวแปรได้เหมือนกับ ref ตัวอื่น ๆ. เว้นแต่ว่า มันจะทำตัวเหมือน two-way binding ระหว่าง parent value และ ค่าของ local:
- ค่าของ
.valueจะซิงค์กับค่าของ parent ผ่านv-model; - เมื่อมีการเปลี่ยนค่าที่ child มันจะส่งผลให้เปลี่ยนค่าของ parent ด้วย
หมายความว่าคุณสามารถ bind ค่าของ ref เข้ากับ input element โดยใช้ v-model, ทำให้มันตรงไปตรงมาในการเชื่อม ref กับ input element โดยใช้ v-model
<script setup>
const model = defineModel()
</script>

<template>
  <input v-model="model" />
</template>
Under the Hood
defineModel เป็น function ที่สะดวกสบาย. compiler จะทำงานเช่นดังต่อไปนี้
- prop ที่ชื่อ
modelValue, ที่จะเชื่อม local ref - event named
update:modelValue, ที่จะ emit ค่าออกไป เมื่อค่าตัวแปรมีการเปลี่ยนแปลง
นี่เป็นวิธีการที่ v-model ทำงาน
<!-- Child.vue -->
<script setup>
const props = defineProps(['modelValue'])
const emit = defineEmits(['update:modelValue'])
</script>

<template>
  <input
    :value="props.modelValue"
    @input="emit('update:modelValue', $event.target.value)"
  />
</template>
และนี่เป็นวิธีการรับ event ของ Parent
<!-- Parent.vue -->
<Child
  :modelValue="foo"
  @update:modelValue="$event => (foo = $event)"
/>
อย่างที่เราเห็น มันจะมีรายละเอียดมากกว่า แต่นี่เป็นวิธีที่แสดงถึงการทำงานของ v-model
เพราะว่า defineModel ถูกประกาศเป็น props, ดังนั้นคุณสามารถกำหนดตัวเลือกของ prop ที่เกี่ยวข้องได้โดยส่งตัวเลือกเหล่านั้นไปยัง defineModel
// making the v-model required
const model = defineModel({ required: true })

// providing a default value
const model = defineModel({ default: 0 })
v-model arguments
v-model ที่ใช้กับ Component สามารถรับ Argument ได้
<MyComponent v-model:title="bookTitle" />
ใน Child component เราสามารถซัพพอร์ตการใช้ argument โดยส่งเข้าไปเป็น Argument ตัวแรกได้
<!-- MyComponent.vue -->
<script setup>
const title = defineModel('title')
</script>

<template>
  <input type="text" v-model="title" />
</template>
ถ้าเราต้องการส่ง Option เข้าไปด้วย เราสามารถส่งเข้าไปได้แบบนี้
const title = defineModel('title', { required: true })
Multiple v-model bindings
ปรโยชน์ของการใช้ prop และ event ที่เราเรียนไปเมื่อกี้ โดยการใช้ v-model arguments, ตอนนี้เราสามารถสร้าง v-model หลาย ๆ ตัว บน component เดียวได้แล้ว
<UserName
  v-model:first-name="first"
  v-model:last-name="last"
/>
<script setup>
const firstName = defineModel('firstName')
const lastName = defineModel('lastName')
</script>

<template>
  <input type="text" v-model="firstName" />
  <input type="text" v-model="lastName" />
</template>
Handling v-model modifiers
เมื่อเราเรียนเกี่ยวกับ input bindings. ที่เราเห็น v-model มี **built-in modifiers** - .trim , .number และ .lazy ในบางกรณี. เราอาจจะต้องการให้มีการใช้ custom modifiers.
เรามาสร้าง custom modifiers. capitalize จะเปลี่ยนตัวพิมพ์หน้าสุดเป็นตัวพิมพ์ใหญ่ โดยใช้ v-model
<MyComponent v-model.capitalize="myText" />
Modifiers ที่ถูกเพิ่มเข้ามาใน v-model เราสามารถเข้าถึงมันได้ด้วย destructuring. defineModel() จะรีเทิร์นค่านี้ออกมา
<script setup>
const [model, modifiers] = defineModel()

console.log(modifiers) // { capitalize: true }
</script>

<template>
  <input type="text" v-model="model" />
</template>
ในการสร้างเงื่อนไข เราสามารถเพิ่ม get และ set options เข้าไปที่ defineModel() . 2 options นี้ จะรับค่าเข้ามาละคืนค่าที่เราต้องการจะให้เป็นออกไป. นี่คือตัวอย่างการใช้ set กับ capitalize modifier:
<script setup>
const [model, modifiers] = defineModel({
  set(value) {
    if (modifiers.capitalize) {
      return value.charAt(0).toUpperCase() + value.slice(1)
    }
    return value
  }
})
</script>

<template>
  <input type="text" v-model="model" />
</template>
Modifiers for v-model with arguments
อีกตัวอย่างในการใช้ multiple v-model กับ modifier
<UserName
  v-model:first-name.capitalize="first"
  v-model:last-name.uppercase="last"
/>
<script setup>
const [firstName, firstNameModifiers] = defineModel('firstName')
const [lastName, lastNameModifiers] = defineModel('lastName')

console.log(firstNameModifiers) // { capitalize: true }
console.log(lastNameModifiers) // { uppercase: true }
</script>
Fallthrough Attributes
Attribute Inheritance
Attribute Inheritance เป็น attribute หรือ v-on event listener ที่จะส่งค่าเข้าไปที่ Component แต่ไม่ถูกประกาศอย่างชัดเจนใน Props หรือ emit ของ Component ที่ได้รับ ตัวอย่างเช่น class, style, และ id
เมื่อ Component ได้ renders root element ตัวเดียว. fallthrough attributes จะถูกเพิ่มเข้าไปที่ root element's attributes. ตัวอย่างเช่น <MyButton> component ด้านล่าง
<!-- template of <MyButton> -->
<button>Click Me</button>
และ parent ที่ใช้ component
<MyButton class="large" />
rendered DOM จะเป็นแบบนี้
<button class="large">Click Me</button>
<MyButton> ไม่ได้ประกาศ class เป็น Props ดังนั้น class จะถูกปฏิบัติเป็นเหมือน fallthrough attribute และ ถูกเพิ่มเข้าไปที่ <MyButton>
class and style Merging
ถ้า child component มี class หรือ style attributes อยู่แล้ว มันจะถูก merged รวมกับ class และ style
<!-- template of <MyButton> -->
<button class="btn">Click Me</button>
DOM จะถูก render แบบนี้
<button class="btn large">Click Me</button>
v-on Listener Inheritance
กฏเดียวกันนี้ จะถูกใช้กับ v-on เหมือนกัน
<MyButton @click="onClick" />
click listener จะถูกเพิ่มเข้าไปที่ <MyButton> ตัวอย่างเช่น <button> element เมื่อถูกคลิ้กแล้ว มันจะไป trigger method ของ Parent element แต่ถ้า <button> มี click listener แล้ว, listeners ทั้ง 2 ตัว จะถูก Trigger
Nested Component Inheritance
ถ้า Component ซ้อนกันลงไปเรื่อย ๆ ตัวอย่างเช่น <MyButton> มี <BaseButton> อยู่ภายใน
<!-- template of <MyButton/> that simply renders another component -->
<BaseButton />
ดังนั้น fallthrough attributes จะรับโดย <MyButton> และลงไปที่ <BaseButton> โดยอัตโนมัติ
จำไว้ว่า
- Forwarded attributes จะไม่รวม Attribute ใด ๆ ที่ถูกประกาศเป็น props หรือ v-on listeners ของ events ที่ถูกประกาศโดย
<MyButton>. กล่าวอีกนัยหนึ่งคือ props และ listeners ที่ประกาศไว้แล้วจะถูก "ใช้งาน" โดย<MyButton>ไปแล้ว - Forwarded attributes อาจถูกยอมรับเป็น props โดย
<BaseButton>หากมีการประกาศไว้ใน<BaseButton>
Disabling Attribute Inheritance
ถ้าคุณไม่ต้องการ component รับ Attribute โดยอัตโนมัติ คุณสามารถตั้ง inheritAttrs: false ใน component option ได้
<script setup>
defineOptions({
  inheritAttrs: false
})
// ...setup logic
</script>
เราสามารถควบคุม fallthrough attributes ได้ ว่าควรจะรับตัวไหนมาได้ย้าง
โดยเราสามารถควบคุมมันโดยใช้ $attrs ได้
<span>Fallthrough attributes: {{ $attrs }}</span>
$attrs จะรวม Attribute ทั้งหมด ที่ไม่ได้ถูกประกาศไว้ใน props หรือ emits options (ตัวอย่างเช่น class, style, v-on และอื่น ๆ)
จำไว้ว่า
- fallthrough attributes เราจะต้องเข้าถึงโดยใช้ JavaScript ปกติ เช่น attribute
foo-barเราต้องเข้าถึงโดย$attrs['foo-bar']. v-onevent listener เช่น@clickจะเข้าถึงโดย$attrs.onClick.
เราจะนำ <MyButton> Component จากตัวอย่างด้านบน มาใช้อีกรอบ - บางทีเราต้องที่จะหุ้ม <button> element ด้วย <div> เพื่อการทำงานบางอย่าง
<div class="btn-wrapper">
  <button class="btn">Click Me</button>
</div>
เราต้องการให้ attributes เช่น class และ v-on listeners ถูกรวมเข้ากับ <button> ไม่ใช่ <div> นอก เราสามารถใช้ inheritAttrs: false และ v-bind="$attrs":
Attribute Inheritance on Multiple Root Nodes
ไม่เหมือนกับ components ที่มี root node เดียว. components ที่มี root node หลาย ๆ ตัว, attribute fallthrough จะไม่ทำงาน ถ้า $attrs ไม่ถูกเขียนลงไป และ จะเกิด runtime warning
<CustomLayout id="custom-layout" @click="changeValue" />
ถ้า <CustomLayout> มี root node หลายตัว จะมี Error ที่ Vue ไม่สามารถตัดสินใจได้ว่า จะส่ง fallthrough attributes ไปที่ไหน
<header>...</header>
<main>...</main>
<footer>...</footer>
เราสามารถแก้ไขปัญหาได้โดยใช้ $attrs
<header>...</header>
<main v-bind="$attrs">...</main>
<footer>...</footer>
Accessing Fallthrough Attributes in JavaScript
ถ้าเราต้องการ fallthrough attributes ใน <script setup> เราสามารถใช้ useAttrs() API ได้
<script setup>
import { useAttrs } from 'vue'

const attrs = useAttrs()
</script>
ถ้าเราไม่ได้ใช้ <script setup>, เราจะสามารถรับ attrs ได้จาก setup() context:
export default {
  setup(props, ctx) {
    // fallthrough attributes are exposed as ctx.attrs
    console.log(ctx.attrs)
  }
}
เราไม่สามารถใช้ watchers กับ fallthrough attributes ได้ เพราะว่ามันจะเก็บค่าที่ได้มาล่าสุด แต่ถ้าเราต้องการจะให้มันใช้กับ wacther ได้ เราสามารถใช้ onUpdated() ได้ ที่จะตรวจจับการ update แต่ละครั้งของ Props
Slots
Slot Content and Outlet
เราได้เรียนรู้ว่า Component สามารถรับ props ซึ่งสามารถเป็นค่าของ JavaScript ได้ในทุกประเภท. แต่ถ้าเป็นเนื้อหาใน template ล่ะ? ในบางกรณี, เราอาจต้องการส่งส่วนหนึ่งของ template ไปยัง Child Component และให้ Child Component render ส่วน template นั้นภายใน template ของตัวเอง
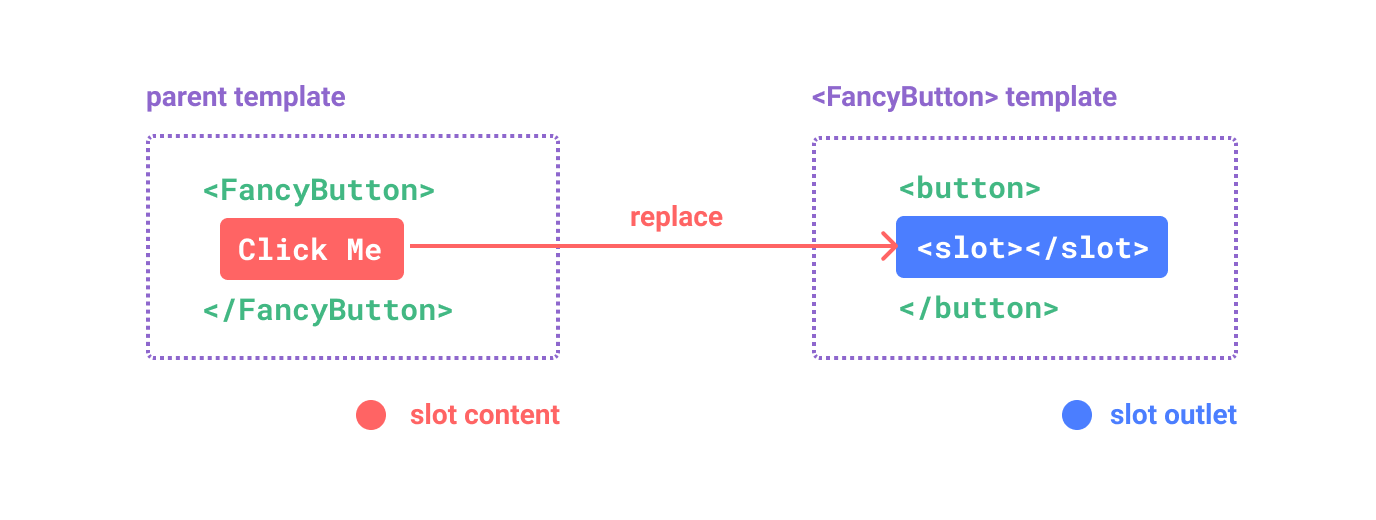
ตัวอย่างเช่น เราอาจจะมี <FancyButton> ที่สนับสนุนการทำงานแบบนี้
<FancyButton>
  Click me! <!-- slot content -->
</FancyButton>
template ของ <FancyButton> จะเป็นแบบนี้
<button class="fancy-btn">
  <slot></slot> <!-- slot outlet -->
</button>
<slot> element จะเป็นช่อง ที่สามารถให้ template ภายนอก เข้ามา render ภายใน Component ตัวมันเองได้
rendered DOM:
<button class="fancy-btn">Click me!</button>
slots จะทำให้ <FancyButton> จะทำหน้าที่ rendering <button> ภายนอก
อีกทางหนึ่ง ในการเข้าใจ slot เราสามารถเปรียบเทียบกับ JavaScript ได้แบบนี้
// parent component passing slot content
FancyButton('Click me!')

// FancyButton renders slot content in its own template
function FancyButton(slotContent) {
  return `<button class="fancy-btn">
      ${slotContent}
    </button>`
}
Slot ไม่ได้จำกัดว่าต้องเป็นแค่ข้อความเท่านั้น เราสามารถใส่ Component อื่น ๆ ลงไปอีกก็ได้ ตัวอย่างเช่น
<FancyButton>
  <span style="color:red">Click me!</span>
  <AwesomeIcon name="plus" />
</FancyButton>
การใช้ slots ทำให้ <FancyButton> ยืดหยุ่นในการใช้งานมากขึ้น
Render Scope
สามารถเข้าถึงข้อมูลของ Parent Component ได้ เพราะว่ามันถูกประกาศใน Parent
<span>{{ message }}</span>
<FancyButton>{{ message }}</FancyButton>
{{ message }} จะ render ข้อมูลที่เหมือนกันทั้งคู่
เนื้อหาของ Slot ไม่สามารถเข้าถึงข้อมูลภายใน Child component ได้ เนื่องจากขอบเขตุที่กำหนดไว้
Fallback Content
มีกรณีที่เราสามารถทำใช้ slot มีค่าเริ่มต้นได้ ที่จะ render เมื่อไม่มี content ไหน ที่เข้ามาภายใน slot
<button type="submit">
  <slot></slot>
</button>
เราอาจต้องการข้อความ Submit ในการ render ภายใน slot. โดยสิ่งที่อยู่ภายใน slot จะเรียกว่า fallback content. โดยเราจะใส่ข้อความไปใน <slot>
<button type="submit">
  <slot>
    Submit <!-- fallback content -->
  </slot>
</button>
ดังนั้น ตอนนี้ <SubmitButton> ใน Parent Component ที่ไม่มี Content ภายในจะต้องเขียนแบบนี้
<SubmitButton />
และมันจะ render fallback content
<button type="submit">Submit</button>
แต่ถ้ามันมี Content
<SubmitButton>Save</SubmitButton>
มันจะถูก render แบบนี้
<button type="submit">Save</button>
Named Slots
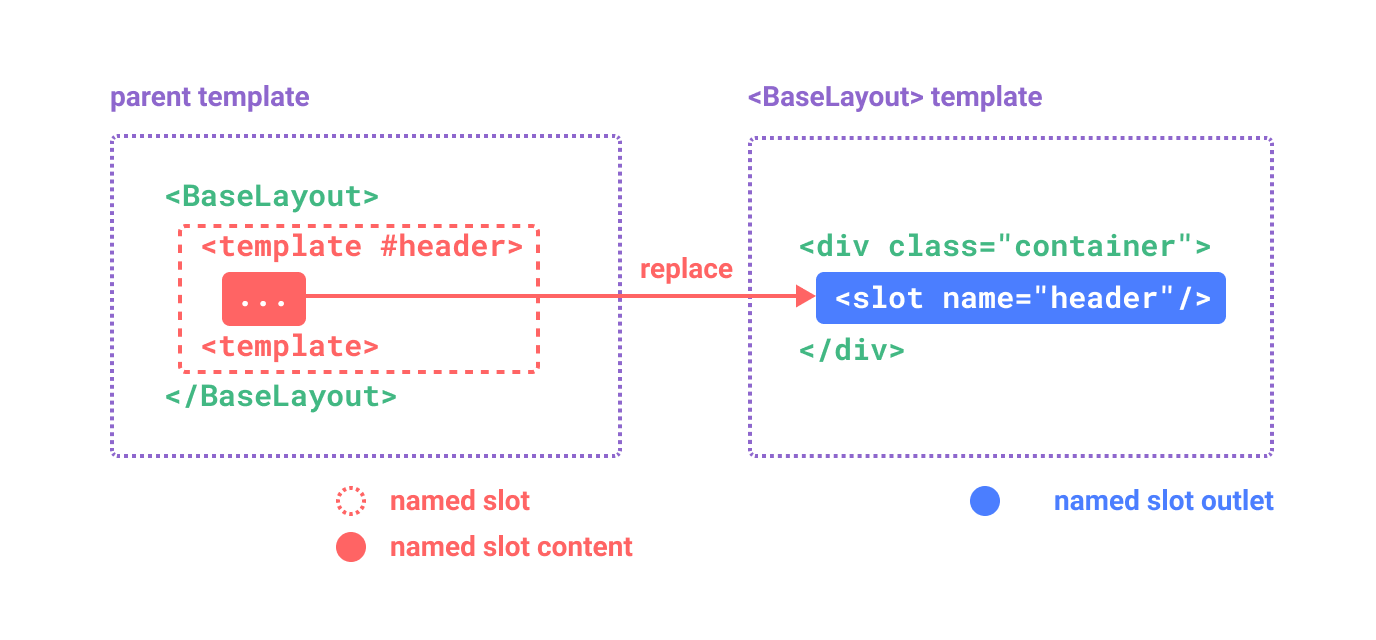
มีบางครั้งที่เราต้องการมีช่องสำหรับ slot หลายช่องใน Component เดียว ตัวอย่างเช่น ใน Component <BaseLayout> ที่มี template ดังต่อไปนี้:
<div class="container">
  <header>
    <!-- We want header content here -->
  </header>
  <main>
    <!-- We want main content here -->
  </main>
  <footer>
    <!-- We want footer content here -->
  </footer>
</div>
ในกรณีแบบนี้, <slot> element มี Attribute พิเศษคือ name , ที่จะสามารถใช้กำหนด unique ID ในการกำหนด slot แต่ละช่อง ว่าจะให้ Content อยู่ช่องไหนบ้าง
<div class="container">
  <header>
    <slot name="header"></slot>
  </header>
  <main>
    <slot></slot>
  </main>
  <footer>
    <slot name="footer"></slot>
  </footer>
</div>
<slot> ที่ไม่มี name จะเป็น name เป็น default
ใน Parent component ที่ใช้ <BaseLayout>, ที่เราต้องการที่จะส่ง content เข้าไป เราจะต้องกำหนด name ว่าให้ส่งเข้าไปที่ slot ตัวไหน
ในการส่งเข้าไปใน slot เราต้องใช้ <template> element กับ v-slot ในการกำหนดชื่อของ slot ที่จะส่งเข้าไป
<BaseLayout>
  <template v-slot:header>
    <!-- content for the header slot -->
  </template>
</BaseLayout>
v-slot มี shorthand #, ดังนั้น <template v-slot:header> สามารถเขียนให้สั้นลงได้โดยเขียนแบบนี้ <template #header>
โค้ดในการส่ง template แต่ละตัวเข้าไปใน <BaseLayout> จะเป็นดังนี้
<BaseLayout>
  <template #header>
    <h1>Here might be a page title</h1>
  </template>

  <template #default>
    <p>A paragraph for the main content.</p>
    <p>And another one.</p>
  </template>

  <template #footer>
    <p>Here's some contact info</p>
  </template>
</BaseLayout>
เมื่อ Component รับทั้ง default slot และ named slots ทุก Node ที่อยู่ระดับบนสุดซึ่งไม่ได้อยู่ใน <template> จะถูกพิจารณาโดยอัตโนมัติว่าเป็นเนื้อหาสำหรับ default slot ดังนั้นโค้ดด้านบนสามารถเขียนใหม่ได้เป็นดังนี้:
<BaseLayout>
  <template #header>
    <h1>Here might be a page title</h1>
  </template>

  <!-- implicit default slot -->
  <p>A paragraph for the main content.</p>
  <p>And another one.</p>

  <template #footer>
    <p>Here's some contact info</p>
  </template>
</BaseLayout>
ดังนั้น ทุกอย่างภายใน template จะถูกส่งเข้าไปใน slot ที่เกี่ยวข้องและ HTML จะ render แบบนี้
<div class="container">
  <header>
    <h1>Here might be a page title</h1>
  </header>
  <main>
    <p>A paragraph for the main content.</p>
    <p>And another one.</p>
  </main>
  <footer>
    <p>Here's some contact info</p>
  </footer>
</div>
อีกครั้ง ถ้าเราต้องการจะเปรียบเทียบการใช้ slot โดยใช้ JavaScript เราสามารถเขียนได้แบบนี้
// passing multiple slot fragments with different names
BaseLayout({
  header: `...`,
  default: `...`,
  footer: `...`
})

// <BaseLayout> renders them in different places
function BaseLayout(slots) {
  return `<div class="container">
      <header>${slots.header}</header>
      <main>${slots.default}</main>
      <footer>${slots.footer}</footer>
    </div>`
}
Conditional Slots
บางครั้ง คุณอาจต้องการ render บางสิ่งโดยขึ้นอยู่กับว่ามี slot อยู่หรือไม่
เราสามารถใช้ **$slots** ใน v-if ได้
ในตัวอย่างด้านล่าง เราได้กำหนด Component Card ที่มี slot แบบมีเงื่อนไข 3 ช่อง ได้แก่ header, footer, และ default เมื่อมี header / footer / default เราต้องการห่อพวกมันด้วยโครงสร้างเพิ่มเติมเพื่อเพิ่มสไตล์ให้:
<template>
  <div class="card">
    <div v-if="$slots.header" class="card-header">
      <slot name="header" />
    </div>

    <div v-if="$slots.default" class="card-content">
      <slot />
    </div>

    <div v-if="$slots.footer" class="card-footer">
      <slot name="footer" />
    </div>
  </div>
</template>
Dynamic Slot Names
**Dynamic directive arguments** ก็สามารถใช้งานกับ v-slot , อนุญาตให้เราสามารถกำหนดชื่อแแบบ dynamic ได้
<base-layout>
  <template v-slot:[dynamicSlotName]>
    ...
  </template>

  <!-- with shorthand -->
  <template #[dynamicSlotName]>
    ...
  </template>
</base-layout>
Scoped Slots
ที่เราพูดถึงในบทของ Render Scope slot content ไม่สามารถเข้าถึง state ใน Child Component ได้
อย่างไรก็ตาม มันอาจจะมีประโยชน์เมื่อเราสามารถเข้าถึงข้อมูลของ Child Component และ Parent Component ได้ ในการทำแบบนั้น เราต้องหาวิธีส่งข้อมูลเข้าไปใน Child เมื่อมันกำลัง render อยู่
ความเป็นจริงแล้ว เราสามารถส่ง attributes เข้าไปที่ slot ได้ โดยส่งเหมือนเป็น props
<!-- <MyComponent> template -->
<div>
  <slot :text="greetingMessage" :count="1"></slot>
</div>
ในการส่ง props เข้าไปที่ slot ที่มีตัวเดียว กับ slot ที่มีหลายตัว จะแตกต่างกันนิดหน่อย
เราจะแสดงการรับ props โดยใช้ slot ตัวเดียว โดยการใช้ v-slot กับ Child Component
<MyComponent v-slot="slotProps">
  {{ slotProps.text }} {{ slotProps.count }}
</MyComponent>
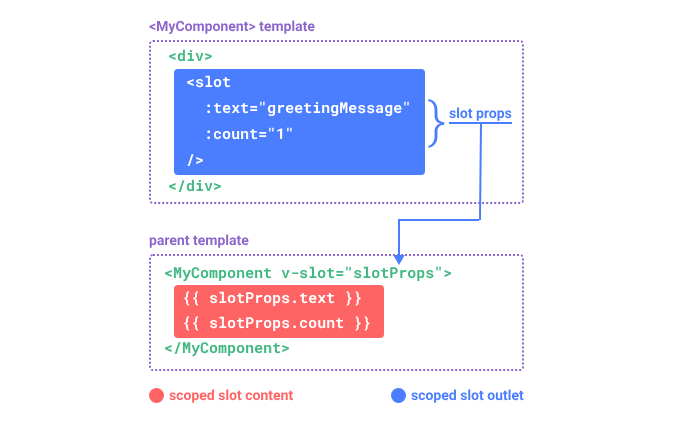
props ที่ถูกส่งไปยัง slot โดย Child Component จะสามารถเข้าถึงได้ โดยใช้ v-slot
คุณสามารถคิดว่า scoped slot เป็น function ที่ถูกส่งเข้าไปใน Child Component โดย Child Component จะเรียกมันและส่ง props เป็น Argument
MyComponent({
  // passing the default slot, but as a function
  default: (slotProps) => {
    return `${slotProps.text} ${slotProps.count}`
  }
})

function MyComponent(slots) {
  const greetingMessage = 'hello'
  return `<div>${
    // call the slot function with props!
    slots.default({ text: greetingMessage, count: 1 })
  }</div>`
}
เราสามารถ destructuring v-slot="slotProps" ได้
<MyComponent v-slot="{ text, count }">
  {{ text }} {{ count }}
</MyComponent>
Named Scoped Slots
Named scoped slots ทำงานคล้ายกัน - props ของ slot จะสามารถเข้าถึงได้ในฐานะค่าของคำสั่ง v-slot เช่น v-slot:name="slotProps" เมื่อใช้รูปแบบย่อ จะดูเหมือนดังนี้:
<MyComponent>
  <template #header="headerProps">
    {{ headerProps }}
  </template>

  <template #default="defaultProps">
    {{ defaultProps }}
  </template>

  <template #footer="footerProps">
    {{ footerProps }}
  </template>
</MyComponent>
การส่ง props เข้าไปใน slot
<slot name="header" message="hello"></slot>
โปรดจำไว้ว่า name ของ slot จะไม่ถูกรวมใน props เพราะว่ามันเป็น reserved word ดังนั้น ผลลัพธ์ของ headerProps จะเป็น { message: 'hello' }.
หากคุณกำลังผสมการใช้ named slots กับ default scoped slot คุณจะต้องใช้แท็ก <template> อย่างชัดเจนสำหรับ default slot การพยายามวางคำสั่ง v-slot โดยตรงบน Component จะทำให้เกิดข้อผิดพลาดในการ Compile นี่เป็นการหลีกเลี่ยงความไม่ชัดเจนเกี่ยวกับขอบเขตของ props ของ default slot ตัวอย่างเช่น:
<!-- <MyComponent> template -->
<div>
  <slot :message="hello"></slot>
  <slot name="footer" />
</div>
<!-- This template won't compile -->
<MyComponent v-slot="{ message }">
  <p>{{ message }}</p>
  <template #footer>
    <!-- message belongs to the default slot, and is not available here -->
    <p>{{ message }}</p>
  </template>
</MyComponent>
การใช้ <template> แยกสำหรับ default slot ช่วยให้เรา สามารถทำให้ชัดเจนว่า message prop ไม่สามารถใช้งานใน slot อื่นได้
<MyComponent>
  <!-- Use explicit default slot -->
  <template #default="{ message }">
    <p>{{ message }}</p>
  </template>

  <template #footer>
    <p>Here's some contact info</p>
  </template>
</MyComponent>
Fancy List Example
คุณอาจสงสัยว่า use case ที่ดีสำหรับ scoped slots คืออะไร นี่คือตัวอย่าง: ลองจินตนาการถึง Component <FancyList> ที่ render รายการของไอเทม - มันอาจจะรวม logic สำหรับการโหลดข้อมูล, การใช้ข้อมูลเพื่อแสดงรายการ, หรือแม้แต่ฟีเจอร์ขั้นสูง เช่น การแบ่งหน้า (pagination) หรือการเลื่อนแบบไม่สิ้นสุด (infinite scrolling) แต่เราต้องการให้มันยืดหยุ่นในเรื่องของการแสดงผลของแต่ละไอเทม และปล่อยให้ Parent Component ที่ใช้มันเป็นผู้กำหนด Style ของแต่ละไอเทม ดังนั้นการใช้งานที่ต้องการอาจดูเหมือนดังนี้
<FancyList :api-url="url" :per-page="10">
  <template #item="{ body, username, likes }">
    <div class="item">
      <p>{{ body }}</p>
      <p>by {{ username }} | {{ likes }} likes</p>
    </div>
  </template>
</FancyList>
ภายใน <FancyList> เราสามารถ render <slot> หลาย ๆ ครั้งได้ ด้วยข้อมูล item ที่ต่างกัน
<ul>
  <li v-for="item in items">
    <slot name="item" v-bind="item"></slot>
  </li>
</ul>
Renderless Components
use case ของ <FancyList> ที่เราได้พูดถึงในตัวอย่างด้านบน ทั้งคู่เป็น reusable logic (data fetching, pagination etc.) และ แสดงผลออกมา ซึ่งในขณะเดียวกันก็ได้มอบหมายส่วนหนึ่งของผลลัพธ์ทางภาพให้กับ Component ผ่าน scoped slots
ถ้าเราคิดไปอีกขั้นนึง เราสามารถมี Component ที่ทำหน้าที่เพียงแค่ห่อหุ้ม Logic และไม่ทำการ Render อะไรเลยได้ - ผลลัพธ์ทางภาพทั้งหมดจะถูกมอบหมายให้กับ consumer component ผ่าน scoped slots เราเรียก Component ประเภทนี้ว่า Renderless Component
ตัวอย่างของ renderless component อาจเป็น Component ที่ห่อหุ้ม Logic ในการติดตามตำแหน่งเมาส์ปัจจุบัน
<MouseTracker v-slot="{ x, y }">
  Mouse is at: {{ x }}, {{ y }}
</MouseTracker>
แม้ว่าจะเป็น pattern ที่น่าสนใจ แต่สิ่งที่สามารถทำได้ด้วย Renderless Components ส่วนใหญ่สามารถทำได้ในวิธีที่มีประสิทธิภาพมากขึ้นด้วย Composition API โดยไม่ต้องเพิ่มภาระของการซ้อนกันของ Component เพิ่มเติม ในภายหลังเราจะเห็นวิธีการที่เราสามารถนำ Function การติดตามเมาส์เดียวกันนี้ไปใช้ในรูปแบบ Composable ได้
กล่าวได้ว่า scoped slots ยังคงมีประโยชน์ในกรณีที่เราต้องการทั้งห่อหุ้ม logic และ ผลลัพธ์ทางภาพ เช่นในตัวอย่างของ <FancyList>
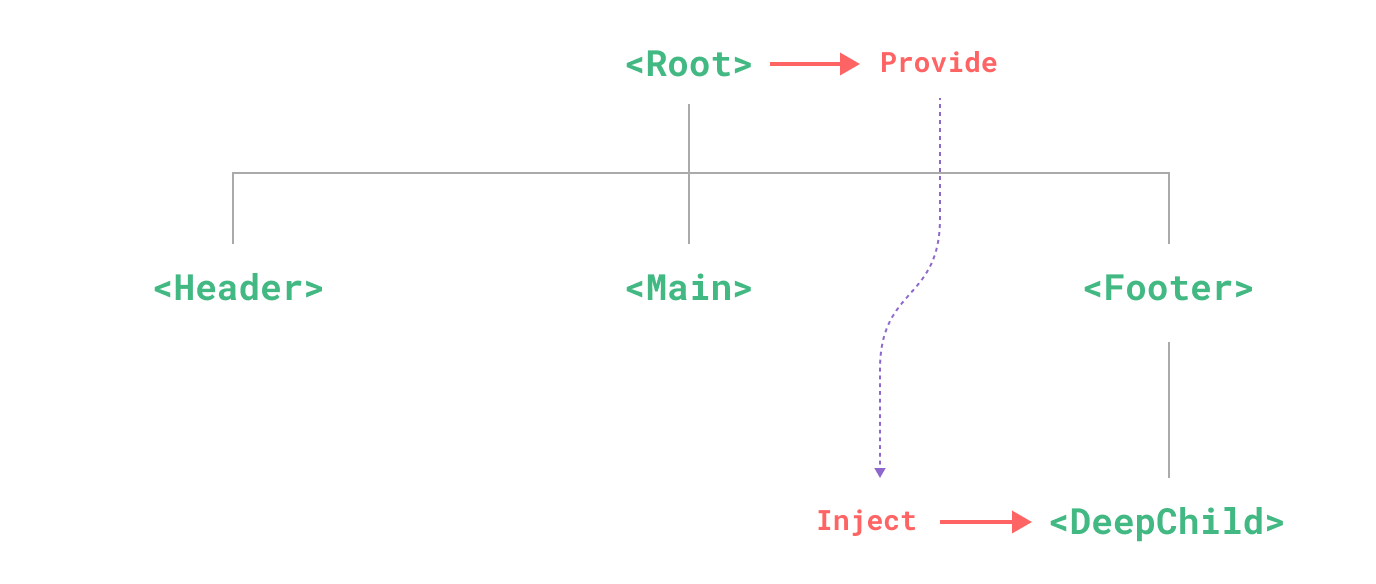
Provide / Inject
Prop Drilling
โดยปกติ เมื่อเราต้องการจะส่งข้อมูลจาก Parent ไป Child Component เราจะใช้ props. อย่างไรก็ตาม, จิตนาการว่าในกรณีที่เรามี Component ใหญ่ ๆ และ ภายใใน Component ที่ซ้อน ๆ กันอยู่. การใช้แค่ props, เราจะต้องส่ง prop ตัวเดิมลงไปเรื่อย ๆ จนถึงตัวที่เราต้องการจะรับ
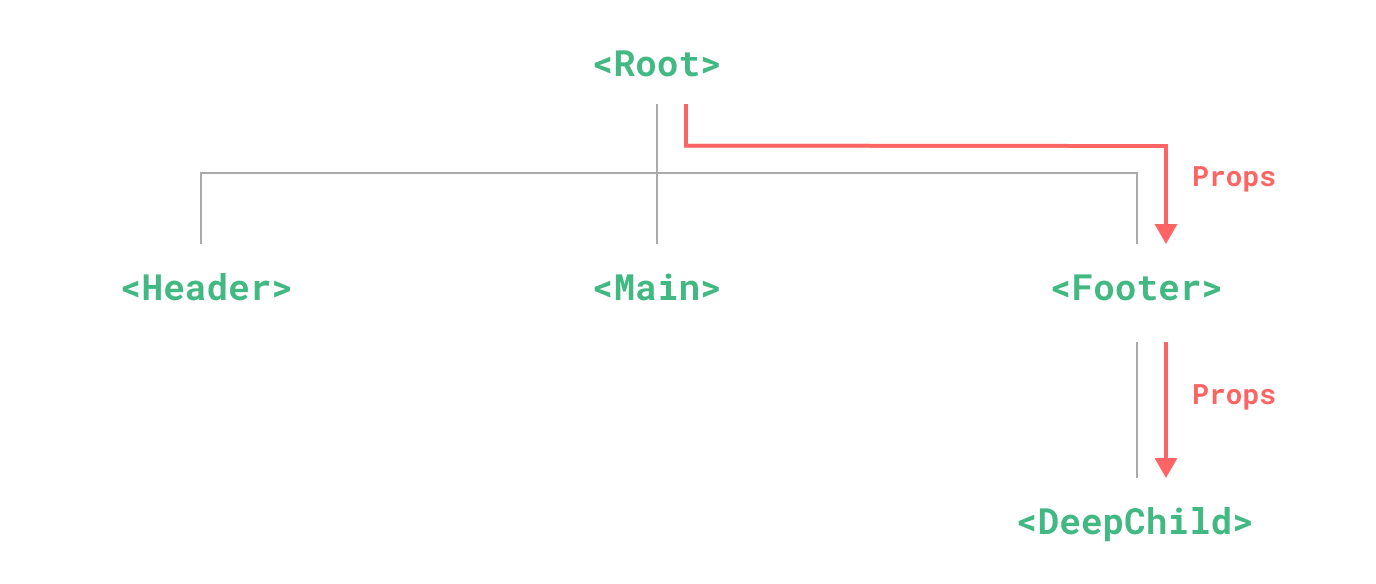
แม้ว่า <Footer> component อาจจะไม่ต้องการใช้ Props เหล่านี้เลย แต่มันต้องประกาศตัวแปร Props เพราะว่ามันต้องส่ง Props ลงไปเรื่อย ๆ เพื่อให้ <DeepChild> สามารถใช้ Props ได้. ถ้าเรามี Component ลึกลงไปอีก เราก็ต้องส่งลงไปเรื่อย ๆ สิ่งนี้เรียกว่า "props drilling” และ มันไม่สนุกเลยกับการทำแบบนี้
เราสามารถแก้ปัญหา props drilling ด้วย provide และ inject. parent component สามารถทำหน้าที่เป็น provider ของ dependency สำหรับ component ที่ซ้อนกันอยู่ทั้งหมด และ component ใด ๆ ที่เป็น component ซ้อน ๆ กันลงไป ไม่ว่าจะอยู่ลึกแค่ไหน ก็สามารถ inject dependency ที่ถูก provide โดย component ใน chain ด้านบนได้
Provide
เราสามารถให้ข้อมูลลงไปที่ component ซ้อน ๆ ลงไปได้ โดยการใช้ provide() function:
<script setup>
import { provide } from 'vue'

provide(/* key */ 'message', /* value */ 'hello!')
</script>
ถ้าเราไม่ใช้ <script setup>, เราสามารถใช้ provide() ภายใน setup() ได้
import { provide } from 'vue'

export default {
  setup() {
    provide(/* key */ 'message', /* value */ 'hello!')
  }
}
provide() จะรับ arguments สองตัว. argument ตัวแรกจะเรียก injection key, ที่สามารถเป็น string หรือเป็น Symbol. injection key จะใช้โดย components ที่อยู่ด้านล่างสามารถรับค่าเข้ามาได้. ภายในหนึ่ง component สามารถเรียกใช้ provide() ได้หลายครั้งได้
second argument จะให้ค่าของตัวแปรนั้น. ค่าตัวแปรสามารถเป็นตัวแปรประเภทไหนก็ได้. รวมถึง state และ ref
import { ref, provide } from 'vue'

const count = ref(0)
provide('key', count)
App-level Provide
นอกจากการ provide ข้อมูลใน component เดียวแล้ว เรายังสามารถ provide ข้อมูลในระดับแอปพลิเคชันได้ด้วย:
import { createApp } from 'vue'

const app = createApp({})

app.provide(/* key */ 'message', /* value */ 'hello!')
Provide ระดับแอปพลิเคชันจะสามารถเข้าถึงได้จากทุก component ที่ถูก render ภายในแอปพลิเคชันนั้น วิธีนี้มีประโยชน์อย่างมากเมื่อเขียน plugins เพราะ plugins มักไม่สามารถ provide ค่าโดยใช้ component ได้
Inject
ในการ inject ข้อมูลโดย component ด้านล่างขึ้นมา, โดยใช้ inject() function
<script setup>
import { inject } from 'vue'

const message = inject('message')
</script>
ถ้าข้อมูลชุดนั้นเป็น ref มันจะ injected โดยที่มันจะเป็นค่าเดิม และ มันจะไม่ unwrapped ข้อมูลโดยอัตโนมัติ. ซึ่งช่วยให้ component ที่ inject ค่านั้นยังคงมีการเชื่อมต่อกับ reactivity ของ component ที่ provide อยู่
และถ้าเราไม่ <script setup>, inject() ควรจะเรียกภายใน setup():
import { inject } from 'vue'

export default {
  setup() {
    const message = inject('message')
    return { message }
  }
}
Injection Default Values
โดยปกติแล้ว inject จะสมมติว่า key ที่ถูก inject มีการ provide อยู่ใน chain ของ parent component หากไม่พบ key ที่ provide จะเกิดคำเตือนในระหว่าง runtime
หากต้องการให้ property ที่ถูก inject ทำงานได้แม้ไม่มี provider สามารถกำหนดค่าเริ่มต้น (default value) ได้ เช่นเดียวกับ props:
// `value` will be "default value"
// if no data matching "message" was provided
const value = inject('message', 'default value')
ในบางกรณี, default value อาจจะต้องการจะสร้าง โดยการเรียกใช้ function หรือ สร้าง class. เพื่อป้องกัน computation ที่ไม่จำเป็น หรือ side effects ในกรณี optional value ไม่ได้ถูกใช้ เราสามารถใช้ factory function สำหรับสร้าง default value
const value = inject('key', () => new ExpensiveClass(), true)
parameter ตัวที่สามจะบอก default value ควรจะถูกปฏิบัติเหมือนกับ factory function
Working with Reactivity
เมื่อใช้ค่า reactive กับ provide / inject ขอแนะนำให้ทำการเปลี่ยนแปลง (mutation) กับ reactive state ภายใน provider component ให้มากที่สุด เพื่อให้การจัดการ state และการเปลี่ยนแปลง (mutations) อยู่ในที่เดียวกัน ช่วยให้ดูแลรักษาได้ง่ายขึ้นในอนาคต
ในบางครั้งที่จำเป็นต้องอัปเดตข้อมูลจาก injector component ขอแนะนำให้ provide ฟังก์ชันสำหรับเปลี่ยนแปลง state
<!-- inside provider component -->
<script setup>
import { provide, ref } from 'vue'

const location = ref('North Pole')

function updateLocation() {
  location.value = 'South Pole'
}

provide('location', {
  location,
  updateLocation
})
</script>
<!-- in injector component -->
<script setup>
import { inject } from 'vue'

const { location, updateLocation } = inject('location')
</script>

<template>
  <button @click="updateLocation">{{ location }}</button>
</template>
สุดท้ายแล้ว, เราสามารถหุ้มค่า provided ด้วย readonly() ได้ ถ้าเราต้องการจำทำให้มั่นใจว่าข้อมูลส่ง provide ไม่สามารถดัดแปลง โดยใช้ injector component ได้
<script setup>
import { ref, provide, readonly } from 'vue'

const count = ref(0)
provide('read-only-count', readonly(count))
</script>
Working with Symbol Keys
จนถึงตอนนี้ เราได้ใช้ string เป็นคีย์สำหรับการ inject ในตัวอย่างต่าง ๆ หากคุณกำลังพัฒนาแอปพลิเคชันขนาดใหญ่ที่มีการ provide dependencies จำนวนมาก หรือกำลังเขียน component ที่จะถูกใช้งานโดย developer คนอื่น แนะนำให้ใช้ Symbol เป็นคีย์สำหรับการ inject เพื่อหลีกเลี่ยงปัญหาการชนกันของคีย์ที่อาจเกิดขึ้น
แนะนำให้ export Symbol ไว้ในไฟล์ที่แยกออกมาเฉพาะ เช่น:
// keys.js
export const myInjectionKey = Symbol()
// in provider component
import { provide } from 'vue'
import { myInjectionKey } from './keys.js'

provide(myInjectionKey, {
  /* data to provide */
})
// in injector component
import { inject } from 'vue'
import { myInjectionKey } from './keys.js'

const injected = inject(myInjectionKey)
Async Components
Basic Usage
ใน applications ขนาดใหญ่ เราสามารถแบ่ง Application ของเราเป็นชิ้นเล็ก ๆ ได้ และ สามารถ load Component จาก server เมื่อเราต้องการได้. ในการทำแบบนั้นได้. Vue มี defineAsyncComponent function:
import { defineAsyncComponent } from 'vue'

const AsyncComp = defineAsyncComponent(() => {
  return new Promise((resolve, reject) => {
    // ...load component from server
    resolve(/* loaded component */)
  })
})
// ... use `AsyncComp` like a normal component
อย่างที่เราเห็น, defineAsyncComponent จะรับ loader function ที่จะ return Promise ออกมา. Promise's resolve callback ควรถูกเรียกเมื่อเราต้องการรับ Component จาก Server คุณสามารถเรียก reject(reason) เพื่อระบุว่า load fail
ES module dynamic import ก็ return Promise เหมือนกัน, ดังนั้นในหลายกรณี เราจะใช้งานร่วมกับ defineAsyncComponent โดยเครื่องมือจัดการบันเดิล (bundlers) เช่น Vite และ webpack ก็รองรับ syntax นี้ (และจะใช้เป็นจุดแยกบันเดิล - bundle split points) ดังนั้นเราสามารถใช้วิธีนี้ในการ import Vue SFCs (Single File Components) ได้
import { defineAsyncComponent } from 'vue'

const AsyncComp = defineAsyncComponent(() =>
  import('./components/MyComponent.vue')
)
AsyncComp ที่ได้จะเป็น component แบบ wrapper ซึ่งจะเรียกใช้ function loader ก็ต่อเมื่อ component นั้นถูก render บนหน้า Page จริง ๆ นอกจากนี้ ยังสามารถส่งต่อ props และ slots ทั้งหมดไปยัง component ภายในได้ ดังนั้นคุณสามารถใช้ async wrapper เพื่อแทนที่ component ดั้งเดิมได้อย่างราบรื่น ในขณะที่ยังคงทำงานแบบ lazy loading อยู่
และกับ Component ธรรมดา, จะ async components สามารถ registered globally โดยใ้ app.component():
app.component('MyComponent', defineAsyncComponent(() =>
  import('./components/MyComponent.vue')
))
โดยสามารถประกาศภายใน parent component ได้
<script setup>
import { defineAsyncComponent } from 'vue'

const AdminPage = defineAsyncComponent(() =>
  import('./components/AdminPageComponent.vue')
)
</script>

<template>
  <AdminPage />
</template>
Loading and Error States
เราไม่สามารถหลีกเลี่ยงการทำงานแบบ Asynchronous ได้ ในขณะที่ load และ error - defineAsyncComponent() สามารถใช้รับมือกับสถานะการเหล่านี้ได้
const AsyncComp = defineAsyncComponent({
  // the loader function
  loader: () => import('./Foo.vue'),

  // A component to use while the async component is loading
  loadingComponent: LoadingComponent,
  // Delay before showing the loading component. Default: 200ms.
  delay: 200,

  // A component to use if the load fails
  errorComponent: ErrorComponent,
  // The error component will be displayed if a timeout is
  // provided and exceeded. Default: Infinity.
  timeout: 3000
})
- หากมีการระบุ loading component จะถูกแสดงก่อนในขณะที่ component ภายในกำลังโหลด โดยค่าเริ่มต้นจะมีการหน่วงเวลา 200ms ก่อนที่ loading component จะถูกแสดงขึ้นมา เนื่องจากในเครือข่ายที่รวดเร็ว การแสดงสถานะ loading ทันทีอาจถูกแทนที่อย่างรวดเร็วเกินไปจนดูเหมือนการกระพริบของหน้าจอ
- หากมีการระบุ error component จะถูกแสดงเมื่อ
Promiseที่ส่งคืนโดย function loader rejected นอกจากนี้ คุณยังสามารถกำหนด timeout เพื่อแสดง error component เมื่อการร้องขอนั้นใช้เวลานานเกินไปได้เช่นกัน
Lazy Hydration
หัวข้อนี้เกี่ยวข้องเฉพาะในกรณีที่คุณใช้ Server-Side Rendering (SSR) เท่านั้น
ใน Vue 3.5+, async components สามารถควบคุมเวลาที่จะทำการ hydrate ได้โดยการกำหนด hydration strategy
- Vue มี hydration strategies ที่เตรียมมาให้ใช้งานในตัว ซึ่งต้อง import ทีละตัว เพื่อให้สามารถ tree-shake (ลบโค้ดที่ไม่ได้ใช้งาน) ได้หากไม่ถูกเรียกใช้งาน
- การออกแบบนี้ ทำให้เป็น low-level เพื่อเพิ่มความยืดหยุ่น และในอนาคตอาจมีการพัฒนา compiler syntax sugar หรือโซลูชันที่สูงกว่านี้ (เช่น Nuxt) เพื่อทำงานบนพื้นฐานนี้ได้
Hydrate on Idle
Hydrates ทาง requestIdleCallback:
import { defineAsyncComponent, hydrateOnIdle } from 'vue'

const AsyncComp = defineAsyncComponent({
  loader: () => import('./Comp.vue'),
  hydrate: hydrateOnIdle(/* optionally pass a max timeout */)
})
Hydrate on Visible
Hydrate เมื่อ element เปลี่ยนมาแสดงผลทาง IntersectionObserver.
import { defineAsyncComponent, hydrateOnVisible } from 'vue'

const AsyncComp = defineAsyncComponent({
  loader: () => import('./Comp.vue'),
  hydrate: hydrateOnVisible()
})
คุณสามารถส่งค่า options object สำหรับ observer ได้ตามต้องการ:
hydrateOnVisible({ rootMargin: '100px' })
Hydrate on Media Query
Hydrates เมื่อ media query ที่กำหนด มีค่าตรงกัน
import { defineAsyncComponent, hydrateOnMediaQuery } from 'vue'

const AsyncComp = defineAsyncComponent({
  loader: () => import('./Comp.vue'),
  hydrate: hydrateOnMediaQuery('(max-width:500px)')
})
Hydrate on Interaction
Hydrates เมื่อ event ที่กำหนดถูก trigger บน Component element - การ trigger hydrate จะถูกทำหใหม่เมื่อการ hydrate เสร็จสิ้นแล้ว
import { defineAsyncComponent, hydrateOnInteraction } from 'vue'

const AsyncComp = defineAsyncComponent({
  loader: () => import('./Comp.vue'),
  hydrate: hydrateOnInteraction('click')
})
สามารถเป็น event หลาย ๆ ตัวได้
hydrateOnInteraction(['wheel', 'mouseover'])
Custom Strategy
import { defineAsyncComponent, type HydrationStrategy } from 'vue'

const myStrategy: HydrationStrategy = (hydrate, forEachElement) => {
  // forEachElement is a helper to iterate through all the root elements
  // in the component's non-hydrated DOM, since the root can be a fragment
  // instead of a single element
  forEachElement(el => {
    // ...
  })
  // call `hydrate` when ready
  hydrate()
  return () => {
    // return a teardown function if needed
  }
}

const AsyncComp = defineAsyncComponent({
  loader: () => import('./Comp.vue'),
  hydrate: myStrategy
})
Using with Suspense
Async components สามารถใช้กับ <Suspense> built-in component ได้
การทำงานร่วมกันระหว่าง <Suspense> และ async components ถูกอธิบายในบท <Suspense>.