Document
Browser environment, specs
ภาษา JavaScript ถูกสร้างมาเพื่อใช้งานกับ web browsers.
ตั้งแต่นั้นเป็นต้นมา ภาษานี้ได้พัฒนาเป็นภาษาที่มีการใช้งานและแพลตฟอร์มมากมาย.
แพลตฟอร์มที่กล่าวถึง อาจเป็น Browser, web-server, host หรือตู้กาแฟอัจฉริยะ ก็สามารถใช้ JavaScript ได้. โดยแพลตฟอร์มแต่ละอัน ก็มีฟังก์ชั่นการใช้งานที่แตกต่างกันไป และ จะถูกกำหนดด้วย ข้อกำหนดของ JavaScript หรือเรียกว่า host environment
โดย host environment ก็จะจัดเตรียมฟังก์ชั่น ที่นอกเหนือจากภาษาของมัน เพื่อใช้สำหรับแพลตฟอร์มต่าง ๆ
เช่น Web browsers ก็จะมีฟังก์ชั่นที่ใช้ควบคุมหน้าเว็บ, Node.js ก็จะมีฟังก์ชั่นสำหรับ Server และอื่น ๆ
และนี่คือมุมมองจากด้านบน เวลาเรามอง JavaScript run ใน Web-browser
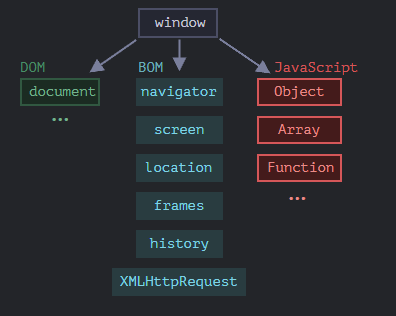
JavaScript จะมี Object ที่เป็นพื้นฐานของทุกอย่าง เรียกว่า window มีหน้าที่หลักอยู่ 2 อย่างคือ
- เป็น Global Object ของ JavaScript
- จะแสดงถึง "browser window" และจะมี
methodเพื่อควบคุมมัน
ตัวอย่างเช่น เราสามารถใช้ฟังก์ชั่น เหมือนการเรียกใช้ method ผ่าน window ได้:
function sayHi() {
	alert("Hello");
}

// global functions are methods of the global object:
window.sayHi();
และเราสามารถใช้ window เพื่อแสดงความสูงของ Web-browser ได้
alert(window.innerHeight); // inner window height
และยังมี method อื่น ๆ อีก ที่เราจะมาสอนกันทีหลัง
DOM (Document Object Model)
Document Object Model หรือ DOM แสดงถึง Content ของหน้าทั้งหมด ออกมาในรูปแบบของ Object ที่สามารถแก้ไขได้
ตัวอย่างเช่น:
// change the background color to red
document.body.style.background = "red";
// change it back after 1 second
setTimeout(() => document.body.style.background = "", 1000);
เราใช้ document.body.style ในการตกแต่งพื้นหลัง แต่ยังมี method หรือ property อีกมาก ที่เราจะค่อยพูดถึงกันในตอนต่อ ๆ ไป
BOM (Browser Object Model)
Browser Object Model (BOM) แสดงถึง Object เพิ่มเติมที่เบราว์เซอร์ (host environment) มอบให้สำหรับการทำงานกับทุกสิ่ง ยกเว้นกับ Document
ตัวอย่างเช่น:
- Object Navigator จะให้ข้อมูลพื้นหลังของ browser และ ระบบปฏิบัติการ (operating system) โดยมีหลาย Properties, แต่มี 2 ตัวที่ใช้กันมาก คือ
navigator.userAgent- เกี่ยวกับ browser ที่ใช้อยู่ และ navigator.platform - บอกเกี่ยวกับ แพลตฟอร์ม (Windows/Linux/Mac etc.) - Object Location อนุญาตให้เราเข้าถึง URL ปัจจุบัน และ redirect ไปที่ URL ใหม่ได้
วิธีที่เราสามารถใช้ Object location ได้:
alert(location.href); // shows current URL
if (confirm("Go to Wikipedia?")) {
  location.href = "https://wikipedia.org"; // redirect the browser to another URL
}
ฟังก์ชั่น alert/confirm/prompt ก็เป็นส่วนหนึ่งของ BOM เหมือนกัน
Summary
พื้นฐานที่เรามี:
DOM specification
อธิบายเกี่ยวกับ โครงสร้างของ Document, การควบคุม และ event https://dom.spec.whatwg.org.
CSSOM specification
อธิบายเกี่ยวกับ stylesheets และ style rules, การควบคุมการตกแต่ง https://www.w3.org/TR/cssom-1/
HTML specification
อธิบายเกี่ยวกับ ภาษา HTML (tags etc) และ BOM (broswser object model) - ฟังก์ชั่นของ broswer
setTimeout, alert, location https://html.spec.whatwg.org. เราสามารถดู properties และ methods
ของ BOM ได้ที่นี่
Walking the DOM
DOM อนุญาตให้เราทำทุกสิ่งกับ element และ Contents ได้,
แต่สิ่งแรกที่เราต้องทำคือ เข้าถึงไปที่ Object DOM
ทุกการ Operations บน DOM เริ่มจาก Object document , ซึ่งเป็นจุดหลักในการเข้าถึงไปที่ DOM
จาก document เราสามารถเข้าถึงได้ทุก Node
นี่คือรูปของ link ที่เชื่อมกันระหว่าง Node:
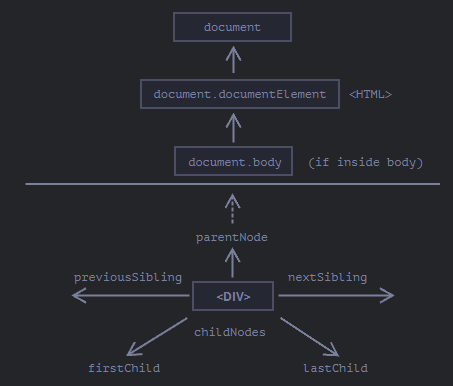
ด้านบน: DocumentElement และ Body
Node บนสุด สามารถใช้ได้ผ่าน Object document :
<html> = document.documentElement
บนสุดของ Node document คือ document.documentElement นั่นคือ DOM node ของ แท็ก <html>
<body> = document.body
DOM Node อีกตัวหนึ่ง ที่ถูกใช้บ่อยคือ <body> เข้าถึงโดย– document.body.
<head> = document.head
แท็ก<head> เข้าถึงโดย document.head.
Children: childNodes, firstChild, lastChild
มีสองคำที่เราจะใช้ต่อจากนี้
- Child nodes (or children) – element ที่เป็นลูกโดยตรง กล่าวอีกแบบหนึ่งพวกมันซ้อนกันอยู่ ตัวอย่างเช่น
<head>และ<body>เป็นลูกขององค์ประกอบ<html> - Descendants – element ทั้งหมดที่ซ้อนอยู่ในองค์ประกอบที่กำหนด รวมถึง children, children ของมันและอื่น ๆ
ตัวอย่างเช่น แท็ก <body> มี children <div> และ<ul> (และข้อความ):
<html>
<body>
  <div>Begin</div>

  <ul>
    <li>
      <b>Information</b>
    </li>
  </ul>
</body>
</html>
และ descendants ของ <body> ไม่เพียงแต่เป็น Children โดยตรงของ <div>, <ul> แต่ยังรวมถึง element ที่ซ้อนกันลึกกว่าด้วย, เช่น <li> (child ของ <ul>) และ<b> (child ของ <li>)
คอลเลกชัน childNodes แสดงรายการ Node ย่อยทั้งหมด รวมถึง Node ข้อความ
ตัวอย่างด้านล่างแสดง children ของ document.body
<html>
<body>
  <div>Begin</div>

  <ul>
    <li>Information</li>
  </ul>

  <div>End</div>

  <script>
    for (let i = 0; i < document.body.childNodes.length; i++) {
      alert( document.body.childNodes[i] ); // Text, DIV, Text, UL, ..., SCRIPT
    }
  </script>
  ...more stuff...
</body>
</html>
Properties firstChild and lastChild
ให้เราเข้าถึง children ของตัวแรกและตัวท้ายได้ พวกมันคือ shorthands. ถ้า Node นั้นมีค่าจริง ดังนั้นมันจะเข้าถึงได้ตลอด
elem.childNodes[0] === elem.firstChild
elem.childNodes[elem.childNodes.length - 1] === elem.lastChild
ฟังก์ชั่นพิเศษ elem.hasChildNodes() เพื่อตรวจสอบว่ามี child nodes อยู่หรือไม่
DOM collections
อย่างที่เราเห็น childNodes เป็นเหมือนกัน Array แต่จริง ๆ แล้วมันไม่ใช่ Array แต่มันเป็น collection เป็น array แบบพิเศษ (iterable object)
มีผลกระทบที่สำคัญสองประการ:
-
เราสามารถใช้
for..ofเพื่อลูบเช็คได้for (let node of document.body.childNodes) {
alert(node); // shows all nodes from the collection
}เพราะว่ามันเป็น iterable
-
Array methods ไม่สามารถใช้งานได้ เพราะว่ามันไม่ใช่ Array
alert(document.body.childNodes.filter); // undefined (there's no filter method!)เพราะเราสามารถใช้
Array.fromเพื่อสร้าง Array ของจริงได้จากคอลเลกชันได้ ถ้าเราต้องการใช้ Array methodsalert( Array.from(document.body.childNodes).filter ); // function
Siblings and the parent
Siblings คือ Node ที่มี children เดียวกัน
ตัวอย่างเช่น, <head> และ <body> เป็น siblings:
<html>
  <head>...</head><body>...</body>
</html>
<body>ให้พูดคือ “ถัดไป” หรือ “ขวา” sibling ของ<head>,<head>ให้พูดคือ “ก่อน” or “ซ้าย” sibling ของ<body>.
sibling ถัดไปจะอยู่ใน property nextSibling และ sibling ก่อนหน้า จะอยู่ใน previousSibling
และ parent จะเรียกเข้าถึงได้โดยใช้ parentNode
ตัวอย่างเช่น:
// parent of <body> is <html>
alert( document.body.parentNode === document.documentElement ); // true

// after <head> goes <body>
alert( document.head.nextSibling ); // HTMLBodyElement

// before <body> goes <head>
alert( document.body.previousSibling ); // HTMLHeadElement
More links: tables
จนถึงตอนนี้เราได้อธิบายคุณสมบัติ navigation ขั้นพื้นฐานแล้ว
elements DOM บางประเภทอาจให้ properties เพิ่มเติมตามประเภทเพื่อความสะดวก
Tables เป็นตัวอย่างที่ดีในเรื่องนี้ :
element <Table> ซัพพอร์ต properties พวกนี้
table.rows– collection ของ elements<tr>ใน table.table.caption/tHead/tFoot– อ้างอิงถึง elements<caption>,<thead>,<tfoot>.table.tBodies– collection ของ element<tbody
<tr>:
tr.cells– collection ของ<td>และ<th>ภายใน element<tr>.tr.sectionRowIndex– ตำแหน่งของ (index)<tr>ภายใน<thead>/<tbody>/<tfoot>.tr.rowIndex– จำนวนของ<tr>ทั้งหมดใน table (รวม table rows ทั้งหมด).
<td> และ<th>:
td.cellIndex– จำนวนทั้งหมดของ<td>และ<th>ภายใน<tr>.
ตัวอย่างการใช้งาน:
<table id="table">
  <tr>
    <td>one</td><td>two</td>
  </tr>
  <tr>
    <td>three</td><td>four</td>
  </tr>
</table>

<script>
  // get td with "two" (first row, second column)
  let td = table.rows[0].cells[1];
  td.style.backgroundColor = "red"; // highlight it
</script>
Summary
ด้วย Node DOM เราสามารถไปที่ neighbors ใกล้เคียงได้โดยใช้ navigation properties
มี 2 ส่วนหลัก ๆ:
- สำหรับ Node ทั้งหมด:
parentNode,childNodes,firstChild,lastChild,previousSibling,nextSibling. - สำหรับ element Node:
parentElement,children,firstElementChild,lastElementChild,previousElementSibling,nextElementSibling.
Searching: getElement, querySelector**
DOM navigation properties ใช้งานได้ดีก็ต่อเมื่อ element อยู่ใกล้ ๆ กัน แต่ถ้าไม่เราจะสามารถเข้าถึง element ตัวนั้นได้อย่างไร
document.getElementById or just id
ถ้า element นั้น มี id attribute เราสามารถใช้ method document.getElementById(id) ไม่สำคัญว่ามันจะอยู่ที่ตรงไหน
ตัวอย่างเช่น:
<div id="elem">
  <div id="elem-content">Element</div>
</div>

<script>
  // get the element
  let elem = document.getElementById('elem');

  // make its background red
  elem.style.background = 'red';
</script>
นอกจากนี้ยังมีตัวแปร global ที่ตั้งชื่อตาม id ที่อ้างอิงถึง element
<div id="elem">
  <div id="elem-content">Element</div>
</div>

<script>
  // elem is a reference to DOM-element with id="elem"
  elem.style.background = 'red';

  // id="elem-content" has a hyphen inside, so it can't be a variable name
  // ...but we can access it using square brackets: window['elem-content']
</script>
แต่ถ้าเราประกาศตัวแปรไว้ด้วยชื่อเดียวกัน มันจะเอาตัวที่ประกาศไว้
<div id="elem"></div>

<script>
  let elem = 5; // now elem is 5, not a reference to <div id="elem">

  alert(elem); // 5
</script>
querySelectorAll
method, elem.querySelectorAll(css) จะรีเทิร์น element ทั้งหมดภายใน elem ที่ macth กับ CSS selector
ตัวอย่าง เรากำลังมองหา <li> ทั้งหมดที่เป็น last children:
<ul>
  <li>The</li>
  <li>test</li>
</ul>
<ul>
  <li>has</li>
  <li>passed</li>
</ul>
<script>
  let elements = document.querySelectorAll('ul > li:last-child');

  for (let elem of elements) {
    alert(elem.innerHTML); // "test", "passed"
  }
</script>
querySelector
elem.querySelector(css) คือค่า element ตัวแรกที่ตรงตามกับ CSS selector
อีกนัยหนึ่ง คือ ผลลัพธ์จะเหมือนกับ elem.querySelectorAll(css)[0], แต่ method นี้จะหา element ทั้งหมดออกมา และเลือกแค่อันเดียว ในขณะที่ elem.querySelector(css) จะแค่ตัวเดียว ดังนั้นการใช้ elem.querySelector(css) จะเร็วกว่า
matches
method ก่อนหน้านี้ใช้หา DOM แต่ elem.matches(css) ไม่ได้หาอะไรเลย แต่ว่าใช้เช็คว่า element นั้น มี CSS-selector ตรงกันหรือไม่ และจะรีเทิร์นค่า true หรือ false มา
ตัวอย่างเช่น:
<a href="http://example.com/file.zip">...</a>
<a href="http://ya.ru">...</a>

<script>
  // can be any collection instead of document.body.children
  for (let elem of document.body.children) {
    if (elem.matches('a[href$="zip"]')) {
      alert("The archive reference: " + elem.href );
    }
  }
</script>
closest
Ancestors ของ element คือ: parent, parent ของ parent, และ ต่อไป
method elem.closest(css) จะมองหา Ancestors ที่ใกล้ที่สุด ที่ตรงกับ CSS-selector. elemก็รวมอยู่ในการ search ด้วย
method closest จะขึ้นไปเรื่อย ๆ และเช็ค parents แต่ละตัว ถ้ามันตรงกับ selector, ancestor จะ return ออกมา
ตัวอย่างเช่น:
<h1>Contents</h1>

<div class="contents">
  <ul class="book">
    <li class="chapter">Chapter 1</li>
    <li class="chapter">Chapter 2</li>
  </ul>
</div>

<script>
  let chapter = document.querySelector('.chapter'); // LI

  alert(chapter.closest('.book')); // UL
  alert(chapter.closest('.contents')); // DIV

  alert(chapter.closest('h1')); // null (because h1 is not an ancestor)
</script>
getElementsBy*
ยังมี methods อื่น ๆ อีก ที่หา nodes โดยการใช้ tag, class, etc.
เช่น:
elem.getElementsByTagName(tag)มองหา element ที่มี tag ที่ให้ไว้ และรีเทิร์น collection ที่ให้ไว้, tag parameter สามารถใช้ star*ได้ เพื่อเลือกแท็กอะไรก็ได้elem.getElementsByClassName(className)จะรีเทิร์น element ที่ให้ตาม CSS classdocument.getElementsByName(name)รีเทิร์น element ที่มี attributenameเดียวกับที่ให้ไป
// get all divs in the document
let divs = document.getElementsByTagName('div');
เรามาหา tag input ภายใน table กันเถอะ
<table id="table">
  <tr>
    <td>Your age:</td>

    <td>
      <label>
        <input type="radio" name="age" value="young" checked> less than 18
      </label>
      <label>
        <input type="radio" name="age" value="mature"> from 18 to 50
      </label>
      <label>
        <input type="radio" name="age" value="senior"> more than 60
      </label>
    </td>
  </tr>
</table>

<script>
  let inputs = table.getElementsByTagName('input');

  for (let input of inputs) {
    alert( input.value + ': ' + input.checked );
  }
</script>
การหา .article element:
<form name="my-form">
  <div class="article">Article</div>
  <div class="long article">Long article</div>
</form>

<script>
  // find by name attribute
  let form = document.getElementsByName('my-form')[0];

  // find by class inside the form
  let articles = form.getElementsByClassName('article');
  alert(articles.length); // 2, found two elements with class "article"
</script>
Live collections
ทุก method ที่เป็น "getElementBy*" จะรีเทิร์น live collection โดย collection ดังกล่าว reflect ถึงสถานะปัจจุบันของ document และ "auto-update" เสมอเมื่อมีการเปลี่ยนแปลง
ในตัวอย่างข้างล่าง จะมี 2 script
- สคริปต์แรก จะการอ้างอิงไปถึง collection
<div>เมื่อเพิ่ม<div>ค่า length ไม่เปลี่ยน - สคริปต์ที่สอง เมื่อรันแล้วเจอ
<div>อีกตัว ค่า length จะเปลี่ยน
<div>First div</div>

<script>
  let divs = document.getElementsByTagName('div');
  alert(divs.length); // 1
</script>

<div>Second div</div>

<script>
  alert(divs.length); // 2
</script>
ในทางตรงกันข้าม querySelectorAll จะคืนค่า static collection เหมือนกัน Array ที่ไม่เปลี่ยนแปลง
<div>First div</div>

<script>
  let divs = document.querySelectorAll('div');
  alert(divs.length); // 1
</script>

<div>Second div</div>

<script>
  alert(divs.length); // 1
</script>
Summary
มี 6 method หลักที่ใช้ค้นหา node ใน DOM
Method
querySelector
querySelectorAll
getElementById
getElementsByName
getElementsByTagName
getElementsByClassName
Searches by…
CSS-selector
CSS-selector
id
name
tag or '*'
class
Can call on an element?
✅
✅
❌
❌
✅
✅
Live?
❌
❌
❌
✅
✅
✅
เรามากล่าวถึง method สุดท้ายกันใช้สำหรับเช็คความสัมพันธ์ child-parent
elemA.contains(elemB)จะรีเทิร์น true ถ้าelemBอยู่ใน elementelemAหรือเมื่อelemA==elemB.
Node properties: type, tag and contents
มาดู Node DOM ในเชิงลึกมากขึ้นกัน ในบทนี้เราจะมาดูกันว่ามันคืออะไรและเรียนรู้ properties ที่ใช้บ่อยที่สุด
DOM node classes
Node DOM ที่แตกต่างกันอาจมี properties ที่แตกต่างกัน ตัวอย่างเช่น Node element ที่สอดคล้องกับแท็ก
<a> มี properties ที่เกี่ยวข้องกับ link เป็นต้น, และอันที่สอดคล้องกับ <input> มี properties ที่เกี่ยวข้องกับ input เป็นต้น
Node DOM แต่ละตัวก็จะมี built-in class อยู่ภายใน
รากของลำดับชั้นทั้งหมดคือ EventTarget ที่สามารถเข้าถึงได้จาก Node
รูปสำหรับคำอธิบาย:
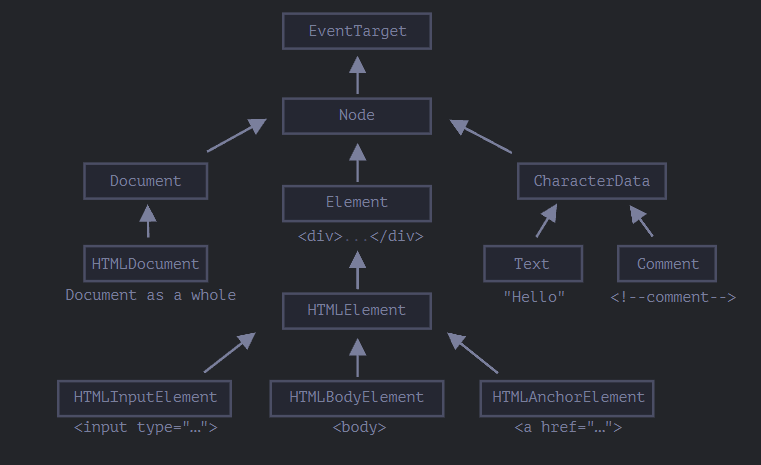
Class หลัก ๆ:
-
EventTarget - เป็น root “abstract” class ของทุกอย่าง
Object ของ Class นี้ไม่ได้ถูกสร้าง มันทำหน้าที่เป็นฐาน ดังนั้น Node DOM ทั้งหมดจึงรองรับสิ่งที่เรียกว่า "Events" เราจะศึกษามันในภายหลัง
-
Node - ก็เป็น “abstract” class เหมือนกัน ทำหน้าที่เป็นฐานสำหรับ Node DOM
มันมีฟังก์ชันการทำงานหลักของมันเช่น
parentNode,nextSibling,childNodesObject ของ Class Node ไม่ได้ถูกสร้างขึ้น แต่มี Class อื่นที่สืบทอดมาจากมัน
-
Document, สำหรับเหตุผลทางประวัติศาสตร์ มันจะเข้าถึงโดยใช้
HTMLDocumentdocumentที่เป็น global Object ก็อยู่ใน Class นี้เหมือนกัน, มันทำหน้าที่ เข้าถึง DOM -
CharacterData – เป็น “abstract” Class, ถูกสืบทอดโดย:
-
Element – เป็นฐานของ DOM elements มันมีหน้าที่ navigate ไปถึง element อื่น ๆ เช่น
nextElementSibling,childrenและ searching method เช่นgetElementsByTagName,querySelector -
สุดท้าย HTMLElement เป็นพื้นฐานของ element ทั้งหมด มันสืบทอดมาจาก element HTML
- HTMLInputElement – class สำหรับ
<input>elements, - HTMLBodyElement – class สำหรับr
<body>elements, - HTMLAnchorElement – class สำหรับ
<a>elements, - …and so on.
- HTMLInputElement – class สำหรับ
มีแท็กอื่นๆ อีกมากมายที่มี class เป็นของตัวเองซึ่งอาจมี properties และ method เฉพาะ ในขณะที่ element บางอย่าง เช่น <span>, <section>, <article> ไม่มี properties เฉพาะใดๆ
ตัวอย่างเช่น, ลองมาพิจารณา DOM object สำหรับ <input> element.
เฉลย มันอยู่กับ class HTMLInputElement .
วิธีที่จะดูชื่อของ DOM node class เราสามารถเรียกใช้ Object ที่มี Constructor property ที่อ้างอิงไปถึง class contructor และ ชื่อของมันคือ constructor.name
alert( document.body.constructor.name ); // HTMLBodyElement
หรือเราสามารถใช้ toString
alert( document.body ); // [object HTMLBodyElement]
หรือเราสามารถใช้ instanceof เพื่อเช็คการสืบทอด
alert( document.body instanceof HTMLBodyElement ); // true
alert( document.body instanceof HTMLElement ); // true
alert( document.body instanceof Element ); // true
alert( document.body instanceof Node ); // true
alert( document.body instanceof EventTarget ); // true
นอกจากนี้เรายังสามารถดู Output ของ element โดยการใช้ console.dir(elem) ใน Browser.
โดย Output ของมันจะมี HTMLElement.prototype, Element.prototype และอื่น ๆ
The “nodeType” property
nodeType property เป็นอีก 1 วิธีที่ ล้าสมัย เพื่อที่จะดึงค่าประเภทของ DOM node
มันเป็นค่าตัวเลข
elem.nodeType == 1สำหรับ element node,elem.nodeType == 3สำหรับ text node,elem.nodeType == 9สำหรับ document Object,- มีค่าอื่น ๆ อีกใน the specification.
ตัวอย่างเช่น:
<body>
  <script>
  let elem = document.body;

  // let's examine: what type of node is in elem?
  alert(elem.nodeType); // 1 => element

  // and its first child is...
  alert(elem.firstChild.nodeType); // 3 => text

  // for the document object, the type is 9
  alert( document.nodeType ); // 9
  </script>
</body>
ใน script สมัยใหม่ เราสามารถใช้ instanceof และ class-based อื่น ๆ ในการหา Node type
เราสามารถทำได้แค่อ่าน Node type และไม่สามารถเปลี่ยนมันได้
Tag: nodeName and tagName
DOM node ที่เราให้ไป เราสามารถอ่าน Tag name ผ่าน nodeName หรือ tagName property ได้
ตัวอย่างเช่น:
alert( document.body.nodeName ); // BODY
alert( document.body.tagName ); // BODY
แล้วมีข้อแตกต่างระหว่าง tagName และ nodeName หรือไม่?
แน่นอนว่ามี ข้อแตกต่างคือ การใช้กับชนิดของ Node
tagNameใช้สำหรับแค่ElementnodenodeNameใช้ได้กับทุก Node- สำหรับ element จะใช้เหมือกับ
tagName - สำหรับ node type อื่น ๆ (text/comment etc.) จะมี string ที่เป็นประเภทของ Node
- สำหรับ element จะใช้เหมือกับ
กล่าวง่าย ๆ คือ tagName สามารถใช้ได้แค่กับ element แต่ nodeName ใช้กับกับ Node ทุกประเภท
ตัวอย่าง:
<body><!-- comment -->

  <script>
    // for comment
    alert( document.body.firstChild.tagName ); // undefined (not an element)
    alert( document.body.firstChild.nodeName ); // #comment

    // for document
    alert( document.tagName ); // undefined (not an element)
    alert( document.nodeName ); // #document
  </script>
</body>
innerHTML: the contents
innerHTML property อนุญาตให้เราเข้าถึง HTML ข้างใน element ได้ โดยออกมาเป็น String
และเราสามารถดัดแปลงแก้ไขมันได้ด้วย ดังนั้นมันจึงเป็นทางที่ค่อนข้างมีประสิทธิภาพในการเปลี่ยน content ของ page
ตัวอย่าง:
<body>
  <p>A paragraph</p>
  <div>A div</div>

  <script>
    alert( document.body.innerHTML ); // read the current contents
    document.body.innerHTML = 'The new BODY!'; // replace it
  </script>

</body>
เราสามารถ ใส่ invalid HTML ได้ browser จะทำการแก้ไขให้
<body>

  <script>
    document.body.innerHTML = '<b>test'; // forgot to close the tag
    alert( document.body.innerHTML ); // <b>test</b> (fixed)
  </script>

</body>
Beware: “innerHTML+=” does a full overwrite
เราสามารถเพิ่ม HTML เข้าไปใน elementได้ โดยใช้ elem.innerHTML+="more html".
chatDiv.innerHTML += "<div>Hello<img src='smile.gif'/> !</div>";
chatDiv.innerHTML += "How goes?";
แต่เราควรระวังในการใช้มันอย่างมาก เพราะว่า สิ่งที่เกิดขึ้นไม่ใช่การเพิ่มเข้าไปแต่เป็นการ overwrite มันทั้งหมด
ในทางเทคนิค สองบรรทัดนี้ทำงานเหมือนกัน
elem.innerHTML += "...";
// is a shorter way to write:
elem.innerHTML = elem.innerHTML + "..."
ในทางกลับกัน innerHTML += ทำแบบนี้
- content อันเก่าถูกลบออก
- innerHTML อันใหม่ ถูกเขียนลงไปแทน (เป็นการต่อข้อมูลกันระหว่าง อันเก่าและอันใหม่)
outerHTML: full HTML of the element
outerHTML property เก็บ HTML ทั้งหมดของ element ไว้ เหมือนกับ innerHTML แต่มันจะรวมตัวเองไปด้วย
<div id="elem">Hello <b>World</b></div>

<script>
  alert(elem.outerHTML); // <div id="elem">Hello <b>World</b></div>
</script>
Beware: ไม่เหมือนกับinnerHTML, เขียน outerHTML ไม่ได้เปลี่ยน element แต่เป็นการแทนที่ใน DOM
<div>Hello, world!</div>

<script>
  let div = document.querySelector('div');

  // replace div.outerHTML with <p>...</p>
  div.outerHTML = '<p>A new element</p>'; // (*)

  // Wow! 'div' is still the same!
  alert(div.outerHTML); // <div>Hello, world!</div> (**)
</script>
ดูแปลกจริงๆ ใช่ไหม?
เราแทนที่ <div> ด้วย <p>A new element</p> เห็นได้ว่า ค่าของ <div> เก่าไม่ได้เปลี่ยน
outerHTML การกำหนดด้านบนไม่ได้แก้ไข element แต่ลบออกจาก DOM และแทรก HTML ใหม่เข้าไป
ดังนั้นสิ่งที่เกิดขึ้นคือ:
divถูกลบออกจาก document- HTML อีกชิ้น ถูกแทนที่
<p>A new element</p>ถูกแทรกเข้ามา divยังคงเป็นค่าเก่าอยู่ และ HTML ใหม่ไม่ได้ถูกบันทึกไปที่ตัวแปรไหนเลย
มันมีโอกาสสูงมากที่จะเกิด Error ขึ้นได้ การแปลง div.outerHTML และทำงานต่อไปกับ div ถ้ามันมี content ใหม่เข้ามา มันได้ สิ่งนี้ถูกต้องสำหรับ innerHTML แต่ไม่ใช่สำหรับ outerHTML
nodeValue/data: text node content
property innerHTML จะสามารถใช้ได้แค่กับ element node
Node type อื่น ๆ เช่น text node ก็จะมี properties ของมันเอง คือ nodeType และ data สองตัวนี้ เมื่อใช้จริงแล้ว มีหน้าที่คล้าย ๆ กัน มันจะมีความแตกต่างแค่เล็กน้อยเท่านั้น ดังนั้นเราจะใช้ data เพราะว่ามันจะสั้นกว่า
ตัวอย่างของการอ่าน text node และ comment:
<body>
  Hello
  <!-- Comment -->
  <script>
    let text = document.body.firstChild;
    alert(text.data); // Hello

    let comment = text.nextSibling;
    alert(comment.data); // Comment
  </script>
</body>
สำหรับ text node เราสามารถจิตนาการได้ ถึงการอ่านค่า หรือ แก้ไข ค่าของ text แต่ทำไม comment ล่ะ
developer บางคนฝังข้อมูลหรือ template เข้าไปใน HTML แบบนี้
<!-- if isAdmin -->
  <div>Welcome, Admin!</div>
<!-- /if -->
ดังนั้น JavaScript สามารถอ่านค่าจาก data property ได้
textContent: pure text
textContent เป็นตัวที่ทำให้เราเข้าถึง ข้อความ ข้างใน element และไม่มี <tag> เข้ามารวม
ตัวอย่างเช่น:
<div id="news">
  <h1>Headline!</h1>
  <p>Martians attack people!</p>
</div>

<script>
  // Headline! Martians attack people!
  alert(news.textContent);
</script>
อย่างที่เราเห็น มีแค่ ข้อความ เท่านั้นถูกรีเทิร์นออกมา และ <tag> ถูกตัดออกทั้งหมด
ในทางปฏิบัติ การอ่านข้อความ ไม่ได้ใช้มากเท่าไหร่
การใช้ textContent มีประโยชน์มากกว่า เพราะว่ามันทำให้เราเขียนได้ปลอดภัยขึ้น:
- การใช้
innerHTMLเป็นการแทนค่า HTML เข้าไปทั้งหมด - การใช้
textContentเป็นการแทนค่า ข้อความ เข้าไป
เปรียบเทียบทั้งสองตัว:
<div id="elem1"></div>
<div id="elem2"></div>

<script>
  let name = prompt("What's your name?", "<b>Winnie-the-Pooh!</b>");

  elem1.innerHTML = name;
  elem2.textContent = name;
</script>
<div>ได้รับ input เข้ามาเป็น HTML ดังนั้นมันจะแปลง<b>ให้เป็น HTML<div>ได้รับ input เข้ามาเป็น ข้อควาาม ดังนั้น output ที่เราจะเห็น จะออกมาเป็น<b>Winnie-the-Pooh!</b>.
The “hidden” property
“hidden” attribute และ DOM property จะเป็นตัวกำหนดว่า element นั้น จะปรากฏหรือไม่
เราสามารถใช้ใน HTML หรือ กำหนดค่ามันใน JavaScript ได้ แบบนี้:
<div>Both divs below are hidden</div>

<div hidden>With the attribute "hidden"</div>

<div id="elem">JavaScript assigned the property "hidden"</div>

<script>
  elem.hidden = true;
</script>
ในทางเทคนิต hidden ทำหน้าที่เหมือนกับ style = "display: none;" แต่มันนสั้นกว่าเวลาเราเขียน
นี่คือ element ที่กระพริบได้:
<div id="elem">A blinking element</div>

<script>
  setInterval(() => elem.hidden = !elem.hidden, 1000);
</script>
More properties
DOM elements ก็มี properties เพิ่มเติมเหมือนกัน ในทางปฏิบัติแล้ว มันขึ้นอยู่กับ Class:
valueคือค่าของ<input>,<select>และ<textarea>(HTMLInputElement,HTMLSelectElement…)hrefใช้กับ แท็ก<a href="..." >(HTMLAnchorElement)
ตัวอย่างเช่น:
Summary
DOM node แต่ละตัว ก็จะมี Class ของมันเอง
DOM node properties หลัก ๆ:
nodeType เราใช้เพื่อดูว่า Node นั้น เป็นประเภทอะไร เช่น ค่า 1 เป็น element Node, 3 สำหรับ text Node
nodeName/tagName สำหรับ element ใช้ tagName สำหรับตัวที่ไม่ใช่ element ใช้ nodeName เพื่ออธิบาย ว่ามันคืออะไร
innerHTML ใช้อ่าน content ของ element สามารถดัดแปลงแก้ไขได้
outerHTML การใช้ outerHTML ในการแทนค่า จะแทนค่าทั้งหมดลงไปเลย
nodeValue/data การใช้ดู content ของ text หรือ comment ซึ่งจะให้ data มากกว่า
textContent ใช้อ่านข้อความข้างใน element จะไม่มี tag เข้ามา, การใช้มัน เป็นการใส่ข้อความเข้าไปใน element, special characters และ tag จะถูกทำให้เป็นเหมือนข้อความ
hidden เมื่อเรากำหนดให้เป็น true จะทำหน้าที่เหหมือนกับ display:none
DOM nodes แต่ละตัว มี properties ต่างกัน ขึ้นอยู่กับว่าอยู่ Class ไหน เช่น <input> element จะ support value ,type ในขณะที่ <a> element จะ support href และอื่น ๆ
Attributes and properties
เมื่อ Browser โหลดหน้าเพจ มันอ่าน HTML และ generates DOM objects ออกมา.
สำหรับ element node นั้น attribute ของ HTML ส่วนใหญ่ จะมาเป็น property ของ DOM Object
ตัวอย่างเช่น <body id="page"> ตัวของ DOM object จะมี body.id = “page”
แต่การจับคู่ของ attribute-property ไม่ใช่การจับคู่แบบ 1 ต่อ 1 ในบทนี้เราจะมาให้ความสนใจกับ หลักการทำงานของมัน และดูว่าเราจะทำงานกับมันได้อย่างไรบ้าง ตอนไหนมันจะเหมือนกัน ตอนไหนมันจะต่างกัน
DOM properties
เราเห็น Built-in DOM properties หลาย ๆ ตัวไปแล้ว แต่ว่า มันไม่มีอะไรมากำหนดว่าให้ใช้ได้แค่ Built-in เรายังสามารถเพิ่ม attribute ของเราเองได้
DOM nodes เป็นเหมือน Object ของ JavaScript ธรรมดาเลย. เราสามารถเปลี่ยนแปลงแก้ไขมันได้
ตัวอย่างเช่น เราจะสร้าง properties ใหม่ใน document.body
 document.body.myData = {
  name: 'Caesar',
  title: 'Imperator'
};

alert(document.body.myData.title); // Imperator
เราสามารถสร้าง method ได้เหมือนกัน
document.body.sayTagName = function() {
  alert(this.tagName);
};

document.body.sayTagName(); // BODY (the value of "this" in the method is document.body)
เราสามารถ แก้ไข Built-in prototypes เช่น Element.prototype และเพิ่ม method เข้าไปใน element ได้
Element.prototype.sayHi = function() {
  alert(`Hello, I'm ${this.tagName}`);
};

document.documentElement.sayHi(); // Hello, I'm HTML
document.body.sayHi(); // Hello, I'm BODY
ดังนั้น DOM properties และ method จะทำตัวเหมือนกับ JavaScript Object ธรรมดาเลย
- มันสาารถมีค่าใดก็ได้
- พวกมันเป็น case-sensitive (เช่น ต้องเขียน
elem.nodeType, ไม่ใช่elem.NoDeTyPe)
HTML attributes
ใน HTML, บาง tag อาจมี attribute อยู่ เมื่อ Browser วิเคราะห์ HTML เพื่อที่จะสร้าง DOM object สำหรับ tag มันจะสร้าง standard attribute และ สร้าง DOM properties ให้กับมัน
ตัวอย่างเช่น
<body id="test" something="non-standard">
  <script>
    alert(document.body.id); // test
    // non-standard attribute does not yield a property
    alert(document.body.something); // undefined
  </script>
</body>
โปรดจำไว้ว่า standard attribute สำหรับ element หนึ่ง อาจจะไม่มีค่าในอีก element หนึ่ง เช่น "type" เป็น standard สำหรับ <input> แต่ไม่มีใน <body>
<body id="body" type="...">
  <input id="input" type="text">
  <script>
    alert(input.type); // text
    alert(body.type); // undefined: DOM property not created, because it's non-standard
  </script>
</body>
ดังนั้น ถ้า attribute นั้น ไม่ใช่ standard attribute แล้ว มันจะไม่ถูกสร้างใน DOM-property สำหรับมัน.
มันมีทางที่จะเข้าถึง attribute ได้หรือไม่. แน่นอน attribute ทุกตัววสามารถเข้าถึงได้ โดยการใช้ method พวกนี้
elem.hasAttribute(name)– ใช้ตรวจสอบว่ามี attribute ที่ตรงกับ name หรือไม่.elem.getAttribute(name)– ใช้ดึงค่าจาก attribute ตามชื่อที่กำหนด.elem.setAttribute(name, value)– กำหนดค่าให้กับ attribute ที่กำหนด.elem.removeAttribute(name)– ลบ attribute.
method พวกนี้ทำหน้าที่เหมือนกับ สิ่งที่เราเขียนลงไปใน HTML เลย
ตัวอย่างในการอ่านข้อมูลที่เป็น non-standard properties:
<body something="non-standard">
  <script>
    alert(document.body.getAttribute('something')); // non-standard
  </script>
</body>
HTML attributes มี features ตามนี้:
- ชื่อของพวกมัน เป็น case-insensitive (
idเหมือนกับID). - ค่าของพวกมันจะเป็น String เสมอ
ตัวอย่างการทำงานกับ attribute
<body>
  <div id="elem" about="Elephant"></div>

  <script>
    alert( elem.getAttribute('About') ); // (1) 'Elephant', reading

    elem.setAttribute('Test', 123); // (2), writing

    alert( elem.outerHTML ); // (3), see if the attribute is in HTML (yes)

    for (let attr of elem.attributes) { // (4) list all
      alert( `${attr.name} = ${attr.value}` );
    }
  </script>
</body>
Please note:
getAttribute('About')- ตัวแรกเป็นตัวพิมพ์ใหญ่ แต่ใน HTML เป็น lowwercase ทั้งหมด แต่มันไม่สำคัญ เพราะ attribute name เป็น case-insensitive- เราสามารถกำหนดอะไรก็ได้ลงไปใน attribute แต่ว่าค่าของมันจะเป็น String ดังนั้นเราจะได้
"123" - attribute ทั้งหมด เราจะสามารถดูได้ใน
outerHTML - collection
attributesเป็น iterable และ attribute ของมันทั้งหมด จะมาในรูปแบบของ Object โดยมี name และ value เป็น properties
Property-attribute synchronization
เมื่อ standard attribute เปลี่ยน มันจะ update โดยอัตโนมัติ ไปที่ property
ในตัวอย่างข้างล่าง id ถูกทำให้เป็น attribute และอย่างที่เห็น property ก็ถูกเปลี่ยนด้วยเช่นกัน
<input>

<script>
  let input = document.querySelector('input');

  // attribute => property
  input.setAttribute('id', 'id');
  alert(input.id); // id (updated)

  // property => attribute
  input.id = 'newId';
  alert(input.getAttribute('id')); // newId (updated)
</script>
แต่ว่า มีข้อยกเว้นกับ input.value มันจะเชื่อมแค่ attribute → property เท่านั้น ดังนั้นการเปลี่ยนค่า ที่ property จะไม่เปลี่ยนค่าของมัน
<input>

<script>
  let input = document.querySelector('input');

  // attribute => property
  input.setAttribute('value', 'text');
  alert(input.value); // text

  // NOT property => attribute
  input.value = 'newValue';
  alert(input.getAttribute('value')); // text (not updated!)
</script>
ในตัวอย่างด้านบน:
- เปลี่ยนค่าของ attribute
valueมันไป update ค่าของ property. - เปลี่ยนที่ property มันไม่ส่งผลไปที่ attribute
DOM properties are typed
DOM properties ไม่ได้เป็น String เสมอไป ตัวอย่างเช่น input.check property (ใช้กับ Checkboxes) เป็น boolean
<input id="input" type="checkbox" checked> checkbox

<script>
  alert(input.getAttribute('checked')); // the attribute value is: empty string
  alert(input.checked); // the property value is: true
</script>
อีกตัวอย่าง. style attribute เป็น string แต่ style properties เป็น Object
<div id="div" style="color:red;font-size:120%">Hello</div>

<script>
  // string
  alert(div.getAttribute('style')); // color:red;font-size:120%

  // object
  alert(div.style); // [object CSSStyleDeclaration]
  alert(div.style.color); // red
</script>
แต่ยังไงก็ตาม ส่วนใหญ่ก็เป็น string อยู่ดี
แม้ว่า DOM property เป็น string แต่ก็อาจเก็บค่าแตกต่างจาก attribute ตัวอย่างเช่น href DOM property จะเป็น URL แบบเต็ม ถึงแม้ attribute จะเก็บแค่ #hash
ตัวอย่างเช่น:
<a id="a" href="#hello">link</a>
<script>
  // attribute
  alert(a.getAttribute('href')); // #hello

  // property
  alert(a.href); // full URL in the form http://site.com/page#hello
</script>
Non-standard attributes, dataset
เมื่อเราเขียน HTML แล้ว เราใช้ standard attribute มากมาย แต่ non-standard attribute ล่ะ
เรามาดูกันว่า มันสำคัญหรือไม่ และใช้เพื่ออะไร
บางที non-standard attributes ใช้เพื่อส่ง custom data จาก HTML ไปที่ JavaScript หรือ “mark” HTML element สำหรับ JavaScipt
<!-- mark the div to show "name" here -->
<div show-info="name"></div>
<!-- and age here -->
<div show-info="age"></div>

<script>
  // the code finds an element with the mark and shows what's requested
  let user = {
    name: "Pete",
    age: 25
  };

  for(let div of document.querySelectorAll('[show-info]')) {
    // insert the corresponding info into the field
    let field = div.getAttribute('show-info');
    div.innerHTML = user[field]; // first Pete into "name", then 25 into "age"
  }
</script>
และพวกมันยังสามารถเพื่อตกแต่ง element ได้อีกด้วย
<style>
  /* styles rely on the custom attribute "order-state" */
  .order[order-state="new"] {
    color: green;
  }

  .order[order-state="pending"] {
    color: blue;
  }

  .order[order-state="canceled"] {
    color: red;
  }
</style>

<div class="order" order-state="new">
  A new order.
</div>

<div class="order" order-state="pending">
  A pending order.
</div>

<div class="order" order-state="canceled">
  A canceled order.
</div>
ทำไมเราถึงควรใช้ attribute แทนการใช้ class เช่น .order-state-new, .order-state-pending, .order-state-canceled ?
เพราะว่า attribute สามารถจัดการได้ง่ายกว่า, state สามารถเปลี่ยนได้ง่าย
// a bit simpler than removing old/adding a new class
div.setAttribute('order-state', 'canceled');
attribute ทั้งหมดที่เริ่มด้วย “data-” สงวนไว้ให้กับ programmer ใช้. พวกมันสามารถใช้ได้ที่ dataset. property
<body data-about="Elephants">
<script>
  alert(document.body.dataset.about); // Elephants
</script>
attribute ที่ใช้หลายคำเช่น data-order-state จะมาเป็น camel-case: dataset.orderState.
ตัวอย่างเช่น:
<style>
  .order[data-order-state="new"] {
    color: green;
  }

  .order[data-order-state="pending"] {
    color: blue;
  }

  .order[data-order-state="canceled"] {
    color: red;
  }
</style>

<div id="order" class="order" data-order-state="new">
  A new order.
</div>

<script>
  // read
  alert(order.dataset.orderState); // new

  // modify
  order.dataset.orderState = "pending"; // (*)
</script>
การใช้ data- attributes เป็นวิธีที่ปลอดภัย สำหรับการส่งค่าไปที่ JavaScript
และการใช้ data- เราไม่ได้ทำได้แค่อ่านมัน เรายังสามารถ custom data-attributes
Summary
- Attributes – คือสิ่งที่เขียนใน HTML
- Properties – คือสิ่งที่อยู่ใน DOM object
type
Name
Properties
สามารถเป็นได้ทุก type
name เป็น case-sensitive
Attributes
เป็น String
name ไม่เป็น case-sensitive
Method ที่ใช้ทำงานร่วมกับ attribute คือ:
elem.hasAttribute(name)– ใช้ตรวจสอบว่ามี attribute ที่ตรงกับ name หรือไม่.elem.getAttribute(name)– ใช้ดึงค่าจาก attribute ตามชื่อที่กำหนด.elem.setAttribute(name, value)– กำหนดค่าให้กับ attribute ที่กำหนด.elem.removeAttribute(name)– ลบ attribute.elem.attributesคืนค่า attribute ทั้งหมดที่มี.
ในหลายสถานการณ์ เรานิยมใช้ DOM properties มากกว่า เราควรใช้ attribute แค่ตอนเมื่อ DOM properties ไม่เหมาะกับสถานการณ์นั้น เราต้องการใช้ attribute จริง ๆ ก็ต่อเมื่อ
- เราต้องการใช้ non-standard attribute
- เราต้องการอ่านค่าที่เราเขียนใน HTML ตัวอย่างเช่น
hrefที่เราพูดถึงไป
Modifying the document
DOM modification เป็นกุญแจสำคัญที่ทำให้สามารถสร้าง page ที่อัปเดตได้ตลอดเวลา
Example: show a message
มาสาธิตโดยใช้ตัวอย่างกัน เราจะเพิ่มข้อความบนหน้าเว็บที่ดูดีกว่าการใช้ alert
ตัวอย่างเช่น:
<style>
.alert {
  padding: 15px;
  border: 1px solid #d6e9c6;
  border-radius: 4px;
  color: #3c763d;
  background-color: #dff0d8;
}
</style>

<div class="alert">
  <strong>Hi there!</strong> You've read an important message.
</div>

นั่นคือการใช้ HTML. ตอนนี้เราสร้าง <div> ตัวเดิม โดยใช้ JavaScript กันเถอะ
Creating an element
ในการสร้าง DOM node เราจะใช้ 2 method ด้วยกัน
document.createElement(tag) สร้าง element โดยการให้ชื่อแท็ก
let div = document.createElement('div');
document.createTextNode(text) สร้าง text node โดยการใส่ข้อความที่ต้องการ
let textNode = document.createTextNode('Here I am');
ส่วนใหญ่เราต้องการสร้าง element node เช่น <div> เพื่อแสดงข้อความ
Creating the message
สร้าง <div> ที่มีข้อความ ใช้ขั้นตอน 3 วิธี:
// 1. Create <div> element
let div = document.createElement('div');

// 2. Set its class to "alert"
div.className = "alert";

// 3. Fill it with the content
div.innerHTML = "<strong>Hi there!</strong> You've read an important message.";
ตอนนี้เราสร้าง Node element แล้ว แต่ว่าเรายังเก็บไว้ในตัวแปร div อยู่ และยังไม่ได้นำไปแสดง แปลว่าเรายังไม่เห็นมัน
Insertion methods
วิธีทำให้ div ขึ้นไปแสดงผลนั้น เราต้องแทรกเข้าไปซักที่ใน document ตัวอย่างเช่น ใส่เข้าไปใน <body> ที่จะอ้างอิงไปถึง document.body และเราสามารถใช้ method append เพิ่มแทรก div เข้าไปได้ document.body.append(div) :
<style>
.alert {
  padding: 15px;
  border: 1px solid #d6e9c6;
  border-radius: 4px;
  color: #3c763d;
  background-color: #dff0d8;
}
</style>

<script>
  let div = document.createElement('div');
  div.className = "alert";
  div.innerHTML = "<strong>Hi there!</strong> You've read an important message.";

  document.body.append(div);
</script>
เราเรียกใช้ append บน document.body แต่เราก็สามารถเรียกใช้ append ได้บน element อื่นเหมือนกัน
เช่น เราต้องการเพิ่มบางอย่างเข้าไปใน <div> ก็เขียนแค่ว่า div.append(anotherElement)
และยังมี method อีกหลายตัวที่ใช้แทรก element เข้าไปได้อีก
node.append(...nodes or strings)– เพิ่มเข้าไปข้างในและอยู่ตรงท้ายของnode,node.prepend(...nodes or strings)– เพิ่มเข้าไปข้างในและอยู่ตรงข้างหน้าของnode,node.before(...nodes or strings)–- เพิ่มไปก่อนnode,node.after(...nodes or strings)–- เพิ่มไปหลังnode,node.replaceWith(...nodes or strings)–- แทนที่nodeกับ Node ที่ให้มา
เรามาดูวิธีใช้กัน
<ol id="ol">
  <li>0</li>
  <li>1</li>
  <li>2</li>
</ol>

<script>
  ol.before('before'); // insert string "before" before <ol>
  ol.after('after'); // insert string "after" after <ol>

  let liFirst = document.createElement('li');
  liFirst.innerHTML = 'prepend';
  ol.prepend(liFirst); // insert liFirst at the beginning of <ol>

  let liLast = document.createElement('li');
  liLast.innerHTML = 'append';
  ol.append(liLast); // insert liLast at the end of <ol>
</script>

ภาพหลักการทำงานของ method
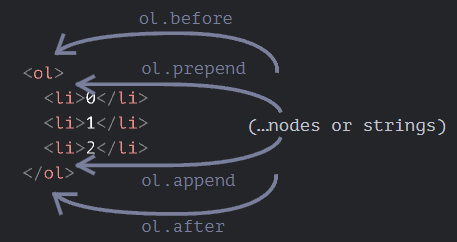
ดังนั้น สุดท้ายแล้วจะให้ผลลัพธ์ใน HTML แบบนี้
before
<ol id="ol">
  <li>prepend</li>
  <li>0</li>
  <li>1</li>
  <li>2</li>
  <li>append</li>
</ol>
after
อย่างที่พูดไป เราสามารถแทรก Node ได้มากกว่า 1 ตัวได้ภายในการเรียกใช้ method ครั้งเดียว
ตัวอย่างเช่น:
<div id="div"></div>
<script>
  div.before('<p>Hello</p>', document.createElement('hr'));
</script>
โปรดจำไว้ว่า มันแทรกข้อความ ไม่ใช่ HTML และด้วย proper escaping ของตัวอักษรดังนั้น โค้ดที่ออกมา หน้าตาจะเป็นแบบนี้
<p>Hello</p>
<hr>
<div id="div"></div>
ในอีกความหมายคือ มันจะดีกว่า ถ้าเราใช้แทรกข้อความ เหมือนที่ elem.textContent ทำ
แต่ถ้าเราต้องการที่จะแทรก HTML เข้าไปล่ะ เราสามารถทำอย่างไรได้บ้าง
insertAdjacentHTML/Text/Element
สำหรับสิ่งนั้น เราสามารถใช้ method อื่น ๆ ได้ elem.insertAdjacentHTML(where, html)
parameter ตัวแรกเป็นคำเฉพาะที่ถูกล็อกมาไว้แล้ว ว่าต้องใช้แค่คำพวกนี้
"beforebegin"– แทรกhtmlไปข้างหน้าของelem,"afterbegin"– แทรกhtmlเข้าไปในelem, ตรงจุดแรก"beforeend"– แทรกhtmlเข้าไปในelem, ตรงจุดสุดท้าย"afterend"– แทรกhtmlไปด้านท้ายของelem.
parameter ตัวที่สอง คือ HTML ที่เป็น string ที่ถูกแทรกเข้าไปในรูปแบบของ HTML
ตัวอย่างเช่น:
<div id="div"></div>
<script>
  div.insertAdjacentHTML('beforebegin', '<p>Hello</p>');
  div.insertAdjacentHTML('afterend', '<p>Bye</p>');
</script>
โค้ด HTML หน้าตาจะเป็นแบบนี้
<p>Hello</p>
<div id="div"></div>
<p>Bye</p>
รูปภาพของการทำงาน
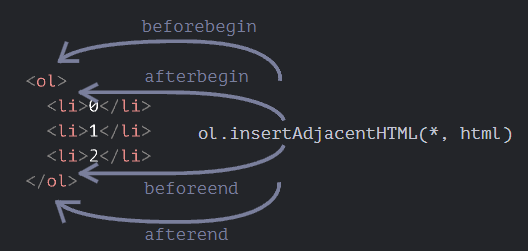
สังเกตได้ว่า รูปภาพนี้ คล้ายกับรูปภาพข้างบน แตกต่างกันที่ว่า มันแทรก HTML เข้าไป
และมันยังมี method ที่คล้ายกันอีก 2 ตัว
elem.insertAdjacentText(where, text)ใช้ syntax เหมือนกัน แต่textจะแทรกเป็น String เข้าไปelem.insertAdjacentElement(where, elem)– ใช้ syntax เหมือนกัน แต่ จะแทรกเป็น element เข้าไป
จริง ๆ แล้วพวกมันมีอยู่เพื่อทำให้ syntax "เหมือนกัน" เป็นหลัก ในทางปฏิบัติแล้ว insertAdjacentHTML จะถูกใช้มากกว่า เพราะว่าสำหรับ text และ element แล้ว เรามี method append/prepend/before/after
ให้ใช้ และสั้นกว่าเมื่อเราใช้
นี่เป็นอีกทางเลือกหนึ่งในการแสดงข้อความ:
<style>
.alert {
  padding: 15px;
  border: 1px solid #d6e9c6;
  border-radius: 4px;
  color: #3c763d;
  background-color: #dff0d8;
}
</style>

<script>
  document.body.insertAdjacentHTML("afterbegin", `<div class="alert">
    <strong>Hi there!</strong> You've read an important message.
  </div>`);
</script>
Node removal
ในการลบ Node เราสามารถใช้ method node.remove() ได้
เรามาลองทำให้ข้อความของเรา หายไปหลังจาก 1 วินาทีกัน
<style>
.alert {
  padding: 15px;
  border: 1px solid #d6e9c6;
  border-radius: 4px;
  color: #3c763d;
  background-color: #dff0d8;
}
</style>

<script>
  let div = document.createElement('div');
  div.className = "alert";
  div.innerHTML = "<strong>Hi there!</strong> You've read an important message.";

  document.body.append(div);
  setTimeout(() => div.remove(), 1000);
</script>
Note: ถ้าเราต้องการที่จะย้าย element ไปที่อีกที่หนึ่ง เราไม่จำเป็นต้องลบมันออกจากอันเก่า
insertion method ทั้งหมดจะทำการลบไปให้อัติโนมัติ
<div id="first">First</div>
<div id="second">Second</div>
<script>
  // no need to call remove
  second.after(first); // take #second and after it insert #first
</script>
Cloning nodes: cloneNode
เราจะเพิ่มข้อความที่เหมือนกันได้อย่างไร
เราสามารถสร้างฟังก์ชั่นและใส่โค้ดเข้าไป แต่เรายังมีทางเลือกอื่นที่จะ Clone div และแก้ไขดัดแปลงมัน(ถ้าต้องการ)
ในกรณีที่เรามี element ที่ใหญ่ นี่อาจเป็นวิธีที่เร็วกว่าและง่ายกว่า
- การเรียกใช้
elem.cloneNode(true)จะสร้าง element ที่หน้าตาเหมือนกันกับelem– ที่มีทั้ง attributes และ element ย่อย. - ถ้าเรียกใช้
elem.cloneNode(false), มันจะ clone element มาโดยไม่มี child element
ตัวอย่างการ clone:
<style>
.alert {
  padding: 15px;
  border: 1px solid #d6e9c6;
  border-radius: 4px;
  color: #3c763d;
  background-color: #dff0d8;
}
</style>

<div class="alert" id="div">
  <strong>Hi there!</strong> You've read an important message.
</div>

<script>
  let div2 = div.cloneNode(true); // clone the message
  div2.querySelector('strong').innerHTML = 'Bye there!'; // change the clone

  div.after(div2); // show the clone after the existing div
</script>
DocumentFragment
DocumentFragment เป็น DOM node แบบพิเศษ ทำหน้าที่หุ้มและส่ง list ของ Node ออกไป
เราสามารถ append ใส่ node ต่าง ๆ เข้าไปได้ แต่เมื่อเรา insert เข้าไปซักที่ content ของมันจะถูก insert เข้าไปแทน
ตัวอย่างเช่น getListContent ทำหน้าที่ generates <li> ออกมา และใส่เข้าไปที่ <ul>
<ul id="ul"></ul>

<script>
function getListContent() {
  let fragment = new DocumentFragment();

  for(let i=1; i<=3; i++) {
    let li = document.createElement('li');
    li.append(i);
    fragment.append(li);
  }

  return fragment;
}

ul.append(getListContent()); // (*)
</script>
ผลลัพธ์โครงสร้างคือ
<ul>
  <li>1</li>
  <li>2</li>
  <li>3</li>
</ul>
DocumentFragment ไม่ค่อยได้ใช้งาน, ทำไมเราต้องใช้ Node ชนิดพิเศษ ในเมื่อเราสามารถ รีเทิร์น Array ของ Node ออกไปได้:
<ul id="ul"></ul>

<script>
function getListContent() {
  let result = [];

  for(let i=1; i<=3; i++) {
    let li = document.createElement('li');
    li.append(i);
    result.push(li);
  }

  return result;
}

ul.append(...getListContent()); // append + "..." operator = friends!
</script>
A word about “document.write”
อีกหนึ่งวิธีที่ค่อนข้างเก่า ในการเพิ่มบางอย่างเข้าไปใน web-page โดยการใช้ document.write
<p>Somewhere in the page...</p>
<script>
  document.write('<b>Hello from JS</b>');
</script>
<p>The end</p>
การใช้ document.write จะสามารถใช้ได้แค่ตอนที่ page กำลัง load อยู่เท่านั้น เช่น:
<p>After one second the contents of this page will be replaced...</p>
<script>
  // document.write after 1 second
  // that's after the page loaded, so it erases the existing content
  setTimeout(() => document.write('<b>...By this.</b>'), 1000);
</script>
Summary
-
Methods ที่ใช้สร้าง Node:
document.createElement(tag)– สร้าง Node จากแท็กที่ให้,document.createTextNode(value)– สร้าง Node ข้อความ,elem.cloneNode(deep)– clones element, ถ้าdeep==trueมันจะ clone child element มาด้วย.
-
แทรกและลบ:
node.append(...nodes or strings)– แทรกเข้าไปที่node, ที่ข้างหลัง,node.prepend(...nodes or strings)– แทรกเข้าไปที่node, ที่ข้างหน้า,node.before(...nodes or strings)–- แทรกไปที่ข้างหน้าnode,node.after(...nodes or strings)–- แทรกไปที่ข้างหลังnode,node.replaceWith(...nodes or strings)–- แทนที่node.node.remove()–- ลบnode.
ข้อความถูกแทรกเข้าไปในรูปของ “text”.
-
html,elem.insertAdjacentHTML(where, html)ตำแหน่งของมันขึ้นอยู่กับwhere:"beforebegin"– แทรกhtmlก่อนelem,"afterbegin"– แทรกhtmlเข้าไปที่elem, ตรงข้างหน้า"beforeend"– แทรกhtmlเข้าไปที่elem, ตรงข้างหลัง"afterend"– แทรกhtmlหลังelem.
Styles and classes
ก่อนที่เราจะไปต่อกับ JavaScript เรามาดูวิธีการทำงานกับ styles and classes นี่คือกฏที่สำคัญ
มันมี 2 วิธีที่เราจะ style ตัว element
- สร้าง class ใน CSS และเพิ่ม:
<div class="..."> - เขียน properties ที่ directly ไปที่
style:<div style="...">.
JavaScript สามารถ modify properties classes และ style ได้
ตัวอย่างเช่น เราสามารถคำนวณ style ได้ ถ้าเราต้องการที่จะคำนวณตำแหน่งของ element จาก JavaScript
let top = /* complex calculations */;
let left = /* complex calculations */;

elem.style.left = left; // e.g '123px', calculated at run-time
elem.style.top = top; // e.g '456px'
className and classList
การเปลี่ยน Class ถูกใช้บ่อยในการเขียน Script
ในสมัยก่อน มีข้อจำกัดอยู่ใน JavaScript เพราะในตอนนั้น "class" เป็น reserved word และไม่สามารถเป็น property ของ Object ได้ แต่ในตอนนี้ข้อจำกัดนั้นไม่มีแล้ว และ "class" property ยังสำคัญมากอีกด้วย
เช่น elem.class
ดังนั้น property "className" ถูกนำเสนอมา: โดย elem.className มีความเกี่ยวข้องกับ attribute "class"
ตัวอย่าง:
<body class="main page">
  <script>
    alert(document.body.className); // main page
  </script>
</body>
ถ้าเรากำหนด elem.className มันจะแทน class ทั้งหมด บางทีเราต้องการแบบนั้น แต่บางทีเราต้องการจะ เพิ่มและลบแค่ class เดียว
ดังนั้นเราจึงมี property อีกตัวสำหรับเหตุการนั้น elem.classList
elem.classList เป็น Object ชนิดพิเศษ และมี method add/remove/toggle ใน classList เดียว
ตัวอย่างเช่น
<body class="main page">
  <script>
    // add a class
    document.body.classList.add('article');

    alert(document.body.className); // main page article
  </script>
</body>
Method ของ classList
elem.classList.add/remove("class")– เพิ่ม/ลบ Classelem.classList.toggle("class")– เพิ่ม Class ถ้ามันไม่มี กลับกันถ้ามันไม่มี มันจะเพิ่ม Class เข้าไปelem.classList.contains("class")– ตรวจสอบ Class ที่ให้ไปtrue/false.
classList เป็น iterable ดังนั้นเราจึงสามารถ loop มัน โดยใช้ for...of แบบนี้
<body class="main page">
  <script>
    for (let name of document.body.classList) {
      alert(name); // main, and then page
    }
  </script>
</body>
Element style
property elem.style เป็น Object ที่เกียวกับการเขียน style attribute เช่น กำหนด elem.style.width="100px" ทำงานเหมือนกัน attribute style
สำหรับ property ที่เป็นหลายคำ จะใช้เป็น camelCase
background-color  => elem.style.backgroundColor
z-index           => elem.style.zIndex
border-left-width => elem.style.borderLeftWidth
ตัวอย่างเช่น
document.body.style.backgroundColor = prompt('background color?', 'green');
Resetting the style property
บางครั้งเราต้องการที่จะกำหนดค่าของ property และลบมันออก
ตัวอย่างเช่น ถ้าเราจะซ่อน element เราสามารถกำหนดelem.style.display = "none".
และหลังจากนั้น เราอาจต้องการที่จะลบ style.display แทนที่เราจะใช้ delete elem.style.display เราควรกำหนดค่ามันให้เป็น String เปล่าจะดีกว่า elem.style.display = ""
// if we run this code, the <body> will blink
document.body.style.display = "none"; // hide

setTimeout(() => document.body.style.display = "", 1000); // back to normal
เรามี method พิเศษ สำหรับการลบ property elem.style.removeProperty('style property') ดังนั้น เราสามารถลบ property ได้ แบบนี้
document.body.style.background = 'red'; //set background to red

setTimeout(() => document.body.style.removeProperty('background'), 1000); // remove background after 1 second
Mind the units
อย่าลืมเติมหน่วยของ CSS
ตัวอย่างเช่น เราไม่ควรกำหนด elem.style.top เป็น 10 แต่ควรจะเป็น 10px แทน ในทางตรงกันข้าม มันอาจจะไม่ทำงาน
<body>
  <script>
    // doesn't work!
    document.body.style.margin = 20;
    alert(document.body.style.margin); // '' (empty string, the assignment is ignored)

    // now add the CSS unit (px) - and it works
    document.body.style.margin = '20px';
    alert(document.body.style.margin); // 20px

    alert(document.body.style.marginTop); // 20px
    alert(document.body.style.marginLeft); // 20px
  </script>
</body>
Computed styles: getComputedStyle
การกำหนด style เป็นเรื่องที่ค่อนข้างง่าย แต่เราจะอ่านค่ามันได้อย่าไร
ตัวอย่างเช่น เราต้องการที่จะรู้ขนาดของ size, margin หรือ สีของ element เราสามารถ จะทำมันได้อย่างไร
style property ทำงานแค่กับ style attribute
ตัวอย่างเช่น proprety style ไม่เห็น margin ที่ถูกกำหนดอยู่ใน tag <style>
<head>
  <style> body { color: red; margin: 5px } </style>
</head>
<body>

  The red text
  <script>
    alert(document.body.style.color); // empty
    alert(document.body.style.marginTop); // empty
  </script>
</body>
แต่ถ้าเราอยากบอกว่า เราต้องการเพิ่ม margin ไป 20px ล่ะ, โดยเราต้องการค่าปัจจุบันของมัน
นี่คือ method สำหรับการดึงค่ามา
getComputedStyle(element, [pseudo])
element
element ที่ต้องการจะอ่านค่า
pseudo
pseudo-element ถ้าเราต้องการจะใช้, ตัวอย่างเช่น ::before. การที่เว้นว่างไว้ หมายถึง element ตัวของมันเอง
ตัวอย่างเช่น:
<head>
  <style> body { color: red; margin: 5px } </style>
</head>
<body>

  <script>
    let computedStyle = getComputedStyle(document.body);

    // now we can read the margin and the color from it

    alert( computedStyle.marginTop ); // 5px
    alert( computedStyle.color ); // rgb(255, 0, 0)
  </script>

</body>
Summary
ในการจัดการกับ Class เราสามารถใช้ 2 DOM properties นี้ได้
className– ค่าที่เป็น string, ใช้งานได้ดี เมื่อจัดการกับ ชื่อ class ทั้งหมดclassList– object นี้มี methodadd/remove/toggle/contains, ใช่เมื่อต้องการจัดการกับ class แค่บางส่วน.
ในการจัดการกับ style
styleproperty เป็น Object ที่เป็น camelCased ใช้เพื่ออ่านหรือเขียน ใช้ได้เหมือนกับ attribute style ใน HTMLstyle.cssTextproperty ใช้จัดการกับ"style"ในขนาดใหญ่ และใส่เป็น string
ในการอ่านค่า resolved (ค่าที่ถูกคำนวณมาแล้ว)
getComputedStyle(elem, [pseudo])คืนค่า style ที่เป็น Object ออกมา สามารถอ่านได้อย่างเดียว
Element size and scrolling
มี properties หลายตัวที่ทำให้เราอ่าน ความกว้าง ความยาวของ element ได้
บ่อยครั้งเราต้องการใช้เมื่อเราต้องการที่จะ เคลื่อนที่ หรือ จัด position element ใน JavaScript
Sample element
เราจะยกตัวอย่างการใช้ property ในการจัด element ที่จะทำต่อไปนี้
<div id="example">
  ...Text...
</div>
<style>
  #example {
    width: 300px;
    height: 200px;
    border: 25px solid #E8C48F;
    padding: 20px;
    overflow: auto;
  }
</style>
elememt ตัวนี้ จะมี border, padding และ scrolling แต่ไม่มี margin เพราะว่ามันไม่ได้เป็นส่วนของ element และมันไม่มี property สำหรับมัน
และ element จะหน้าตาเป็นแบบนี้
Geometry
นี่คือภาพรวมของ geometry properties:
ค่าของ properties พวกนี้เป็นตัวเลขที่อยู่ในหน่วยของ pixels ดังนั้น ค่าเหล่านี้เป็นค่าของ pixel
offsetParent, offsetLeft/Top
properties พวกนี้ไม่ค่อยจะได้ใช้
offsetParent คือ nearest ancestor ที่ broswser ใช้สำหรับการคำนวณพิกัดของ element ขณะที่กำลังเรนเดอร์อยู่
nearest ancestor มีดังนั้น
- การใช้ CSS กำหนด (
positionคือabsolute,relative,fixedหรือsticky), หรือ <td>,<th>, หรือ<table>, หรือ<body>.
Properties offsetLeft/offsetTop เป็นตัวกำหนด พิกัด x/y ที่ยึดตาม offsetParent โดยยึดตามมุมซ้ายบ
ในตัวอย่างข้างล่าง <div> มี <main> เป็น offsetParent และoffsetLeft/offsetTop เลื่อนจาก มุมซ้ายบน ไป 180px
<main style="position: relative" id="main">
  <article>
    <div id="example" style="position: absolute; left: 180px; top: 180px">...</div>
  </article>
</main>
<script>
  alert(example.offsetParent.id); // main
  alert(example.offsetLeft); // 180 (note: a number, not a string "180px")
  alert(example.offsetTop); // 180
</script>
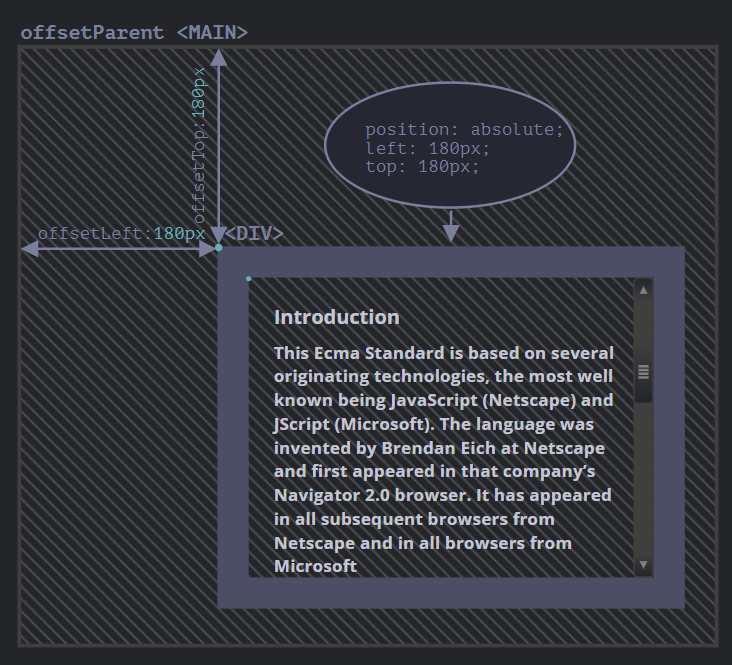
มีหลายครั้ง ที่ offsetParent เป็น null เหตุเกิดจาก:
- element ไม่ถูก show (
display:noneหรือ ไม่ได้อยู่ใน document). offsetParentเป็น<body>และ<html>.- และ element ที่เป็น
position:fixed.
offsetWidth/Height
ไปต่อกันที่ตัว element กันเถอะ
properties สองตัวนี้เป็นตัวที่เป็นสิ่งที่เข้าใจง่าย มันเป็นตัวกำหนด ความยาว/ความกว้าง ภายในของ element พูดง่าย ๆ คือ เป็นขนาดที่รวมกับ borders ด้วย
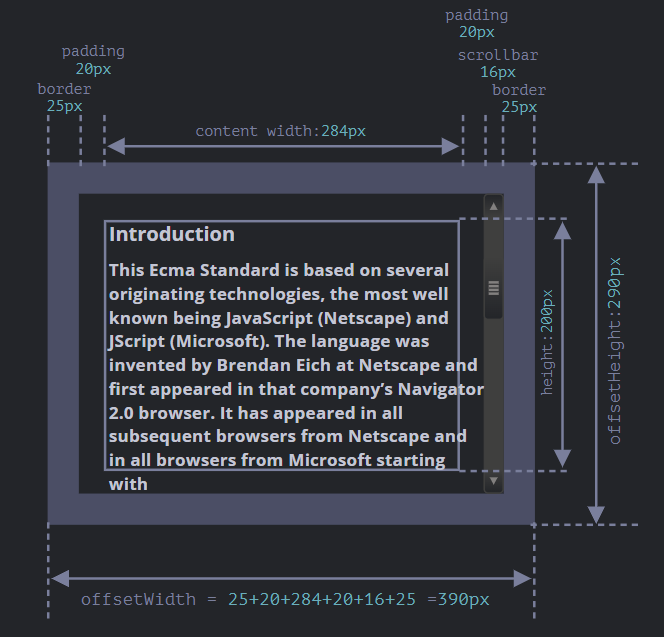
สำหรับ element ที่เรายกตัวอย่าง:
offsetWidth = 390ความกว้างภายนอก คำนวณได้โดย, ความกว้างภายใน (300px) รวมกับ paddings (2 * 20px) และ borders (2 * 25px).offsetHeight = 290– ความสูงภายนอก
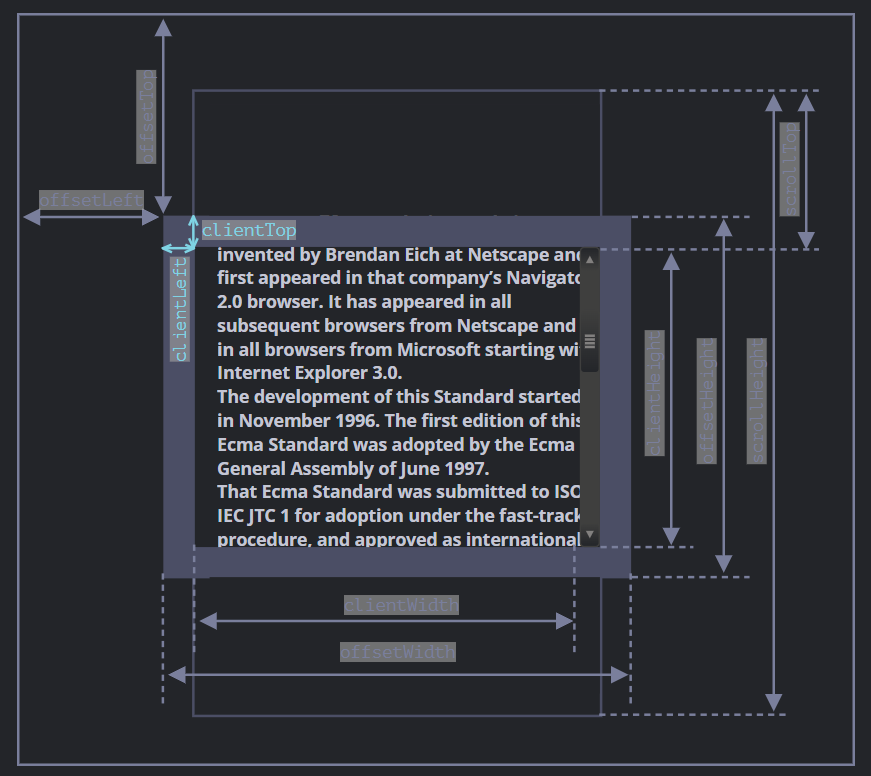
clientTop/Left
ใน element เรามี borders
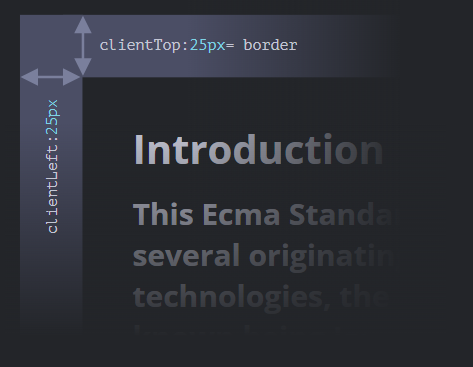
ในการวัดพวกมัน มีอยู่ 2 properties clientTop and clientLeft.
ตัวอย่างเช่น
clientLeft = 25– ความกว้าง border ซ้ายclientTop = 25– ความกว้าง border บน
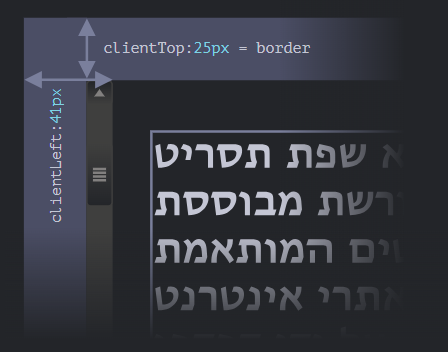
แต่เพื่อความแม่นยำ properties พวกนี้ไม่ใช่การกำหนด borders ของมันโดยตรง แต่เหมือนเป็นการกำหนดพิกัดของมันจากมุมภายนอก
หมายความว่าอย่างไร?
เมื่อ scrollBar มาอยู่ข้างซ้าย ดังนั้น clientLeft จะรวม scrollBar ไปด้วย
เช่น clientLeft จะไม่เป็น 25 แต่จะรวมกัน scrollBar ด้วย 25 + 16 = 41
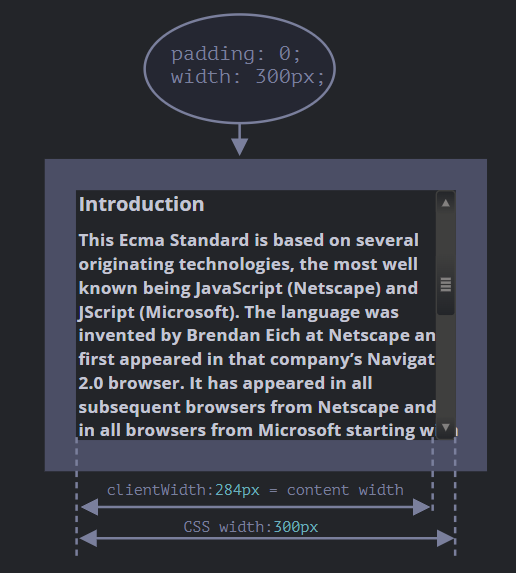
clientWidth/Height
properties นี้จะกำหนดขนาดข้างใน border ซึ่งรวมกับ content width และ padding แต่ไม่รวมกับ scrollBar
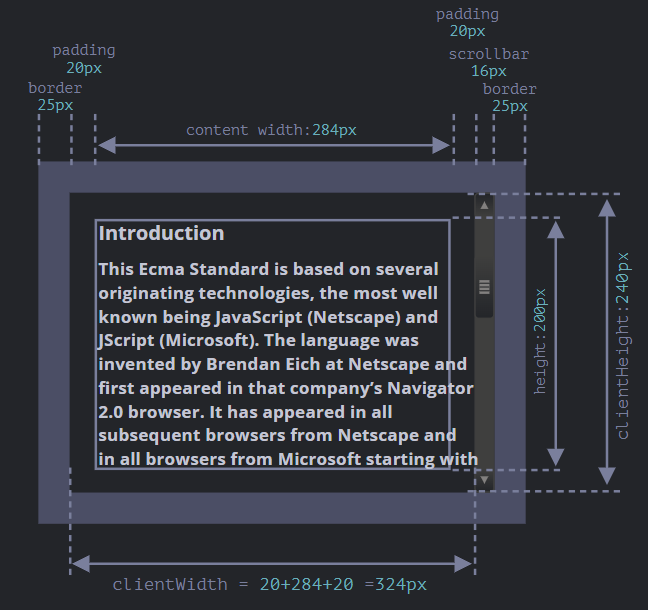
สังเกตได้ว่า clientWidth = 324px
เรามาพิจารณา clientHeight กันก่อน
ในเมื่อแนวตั้ง ไม่มี scrollBar ดังนั้นผลรวมของ clientHeight จะรวมกับ CSS-height 200px รวมกับ padding บนและล่าง เป็น 2 * 20px รวมกันเป็น 240px
ถ้ามันไม่มี padding clientWidth/Height จะรวมกับ scrollBar ด้วย
scrollWidth/Height
properties นี้จะเป็นเหมือน clientWidth/clientHeight แต่มันจะรวมส่วนที่หายไปด้วย (ส่วนที่เกินหน้าจอออกไป)
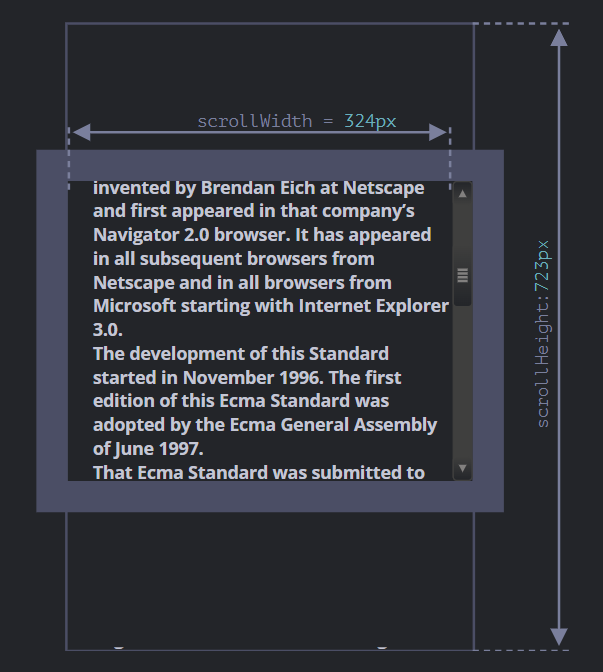
รูปด้านบน
scrollHeight = 723– เป็นความสูงทั้งหมด ที่รวมกับส่วนที่ล้นหน้าจอออกไปด้วย.scrollWidth = 324– เป็นความกว้างทั้งหมด ถ้าเราไม่มี scrollBar ในแนวนอน ดังนั้น ค่ามันจะเท่ากับclientWidth.
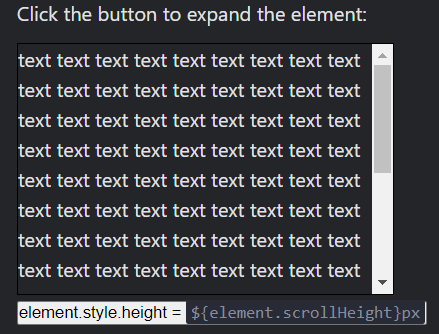
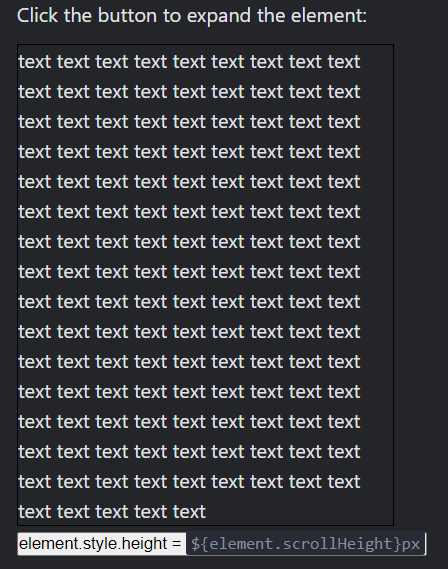
เราสามารถใช้ properties นี้เพื่อขยายความสูง element ออกไปได้
// expand the element to the full content height
element.style.height = `${element.scrollHeight}px`;
ความสูงที่กำหนดจาก CSS:
ความสูงที่กำหนดจาก JavaScript:
scrollLeft/scrollTop
properties scrollLeft/scrollTop คือความกว้าง/สูง ของส่วนที่ล้นจอออกไปด้านบน/ซ้าย
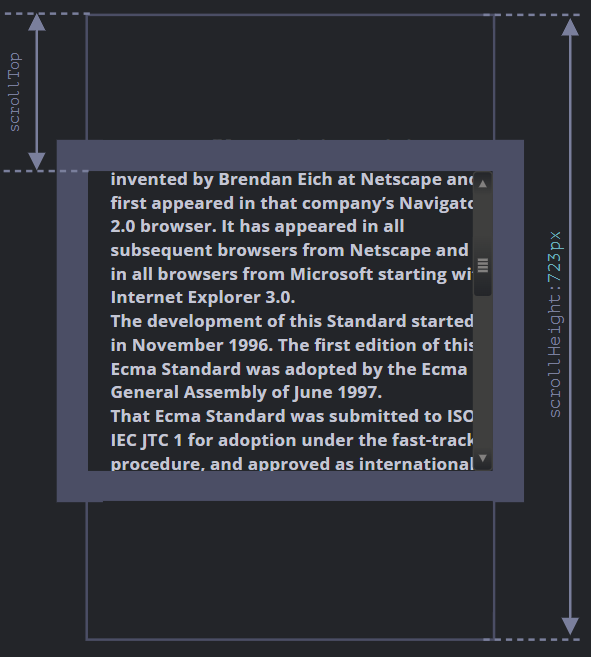
พูดง่าย ๆ คือ scrollTop คือ เราเลื่อนมันไปเท่าไหร่
Summary
element มี geometry properties ตามนี้
offsetParent– คือตัวที่เป็น nearest ancestortd,th,table,body.offsetLeft/offsetTop– พิกัด จะยึดตามมุมซ้ายบนของoffsetParent.offsetWidth/offsetHeight– ความกว้างความสูงภายนอก รวมกับ borderclientLeft/clientTop– ระยะห่างจาก มุมซ้ายบนของภายนอก ไปจนถึงมุมซ้ายบนของภายใน (content + padding).clientWidth/clientHeight– ความสูง/กว้างของ content รวมกับ padding แต่ไม่รวมกับ scrollBarscrollWidth/scrollHeight– ความสูง/กว้างของ content, เหมือนกับclientWidth/clientHeight, แต่รวมกับความสูง/กว้าง ของ element ที่พ้นจอออกไป.scrollLeft/scrollTop– ความสูง/กว้างของ ส่วนที่ถูก scroll ขึ้นไปด้านบน เริ่มจากซ้านบนของ element
properties ทั้งหมดเป็น read-only ยกเว้น scrollLeft/scrollTop ที่ทำให้ browser scroll element ได้
Window sizes and scrolling
เราจะหาความกว้างความสูง ของ หน้าต่าง Browser ได้อย่างไร, เราจะหาความสูงและกว้างของ document ได้อย่างไร แล้วของส่วนที่ถูกเลื่อนไปล่ะ? เราจะเลื่อนหน้า page โดยใช้ JavaScript ได้อย่างไร
สำหรับข้อมูลประเภทนั้น เราสามารถใช้ document.documentElement ที่เกี่ยวข้องกับแท็ก <html> แต่มันยังมี method เพิ่มเติมอยู่อีก
Width/height of the window
ในการที่จะดึงค่าความสูงและกว้างของ Browser ได้ เราสามารถใช้ clientWidht/clientHeight ของ document.documentElement:
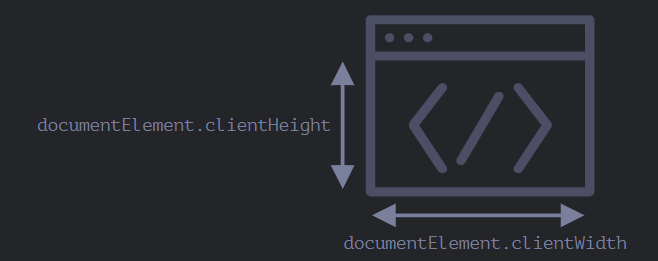
ตัวอย่างเช่น ถ้าเราจะแสดงค่าความสูงของหน้าต่าง Browser
alert(document.documentElement.clientHeight)
Width/height of the document
ในทางทฤษฏีแล้ว รากของ document คือ document.documentElement และมันเป็นตัวที่คลุม content ทั้งหมดไว้ เราสามาถวัดขนาดของมันได้โดยใช้ document.documentElement.scrollWidth/scrollHeight.
เพื่อให้ได้ความสูงของ document ทั้งหมด เราควรใช้ค่าที่สูงสุดของ properties พวกนี้
let scrollHeight = Math.max(
  document.body.scrollHeight, document.documentElement.scrollHeight,
  document.body.offsetHeight, document.documentElement.offsetHeight,
  document.body.clientHeight, document.documentElement.clientHeight
);

alert('Full document height, with scrolled out part: ' + scrollHeight);
ไม่ใช่วิธีที่ดีนัก แต่เป็นปัญหาที่มีมาทั้งแต่นานแล้ว
Get the current scroll
DOM element มีสถานะ current scroll ของมันใน scrollLeft/scrollTop properties
สำหรับ document แล้ว document.documentElement.scrollLeft/scrollTop สามารถใช้ได้ใน ยกเว้นใน browser เวอร์ชั่นเก่า เช่น Safari (bug 5991) ที่เราควรใช้ document.body แทนที่จะเป็น document.documentElement.
แต่โชคดีหน่อย ที่เราไม่จำเป็นต้องเขียนข้อความยาว ๆ พวกนี้ เพราะเราสามมารถใช้ได้ ใน properties พิเศษ window.pageXOffset/pageYOffset
alert('Current scroll from the top: ' + window.pageYOffset);
alert('Current scroll from the left: ' + window.pageXOffset);
พวกนี้เป็น properties read-only
Scrolling: scrollTo, scrollBy, scrollIntoView
สำหรับ element ธรรมดาแล้วเราสามารถใช้ scrollTop/scrollLeft ในการเลื่อน element ได้
เราสามารถทำกับ page ได้เหมือนกัน document.documentElement.scrollTop/scrollLeft ยกเว้นกับ Safari ที่เราต้องใช้ document.body.scrollTop/Left แทน
แต่มีอีกทางหนึ่ง ที่เราจะทำได้เหมือนกัน โดยเราจะใช้ properties พิเศษ window.scrollBy(x,y) และ window.scrollTo(pageX,pageY).
- method
scrollBy(x,y)จะเลื่อนไปตามตำแหน่งที่เรากำหนด. ตัวอย่างเช่น,scrollBy(0,10)จะเลื่อน page ลงไป10px - method
scrollTo(pageX,pageY)เลื่อน page ไปอย่างอิสระ, ซึ่งจะยึดมุมซ้ายบนของ document. เหมือนกับการใช้scrollLeft/scrollTop.
method พวกนี้ใช้งานได้กับทุก Browser
scrollIntoView
เพื่อความสมบูรณ์แบบ เรามาดูอีก method หนึ่งกัน elem.scrollIntoView(top).
ถ้าเราเรียกใช้ elem.scrollIntoView(top) จะทำงาน scroll elem ให้เห็น
- ถ้า
top=true(เป็น default), ดังนั้น page จะเลื่อนelemให้ขึ้นปรากฏที่ด้านบนของหน้าต่าง browser. ส่วนขอบของด้านบน จะชิดกับด้านบนของหน้าต่าง - ถ้า
top=false, ดังนั้น page จะเลื่อนelemให้ขึ้นปรากฏที่ด้านล่างของหน้าต่าง browser.
Forbid the scrolling
บางทีเราต้องการที่จะทำให้ document ไม่สามารถเลื่อนได้ ตัวอย่างเช่น เรามีข้อความเด้งขึ้นมาหน้า page และเราต้องการใช้ user ทำการโต้ตอบกับข้อความนั้น เราจึงทำให้ document ไม่สามารถเลื่อนได้
วิธีที่ทำให้ document ไม่สามารถเลื่อนได้ เราสามารถใช้ document.body.style.overflow = "hidden" ได้ เพื่อทำให้ page ไม่สามารถที่จะเลื่อนได้
document.body.style.overflow = ‘hidden’ใช้เพื่อทำให้ไม่สามารถเลื่อนได้document.body.style.overflow = ‘’ใช้เพื่อทำให้เลื่อนได้อีกรอบ
Summary
Geometry:
-
ความกว้างความสูง ของ document ที่สามารถมองเห็นได้
document.documentElement.clientWidth/clientHeight -
ความกว้างความสูง ของ document ทั้งหมด
let scrollHeight = Math.max(
  document.body.scrollHeight, document.documentElement.scrollHeight,
  document.body.offsetHeight, document.documentElement.offsetHeight,
  document.body.clientHeight, document.documentElement.clientHeight
);
Scrolling:
- ในการอ่าน current scroll
window.pageYOffset/pageXOffset. - ในการเปลี่ยน current scroll
window.scrollTo(pageX,pageY)– เราสามารถกำหนดได้แบบ absolute,window.scrollBy(x,y)– จะเลื่อนลง/ขึ้นตามตำแหน่งปัจจุบัน,elem.scrollIntoView(top)– เลื่อนเพื่อให้elemมองเห็นได้ (จัดตำแหน่ง top/bottom ของหน้าต่าง Browser).
Coordinates
ในการเคลื่อนย้าย element เราควรคุ้นเคยกับระบบพิกัด
method ส่วนใหญ่ใน JavaScript สามารถทำงานได้กับ 2 ระบบพิกัด
- ยึดตามหน้าต่าง Browser - คล้ายกับ
position:fixedคำนวนจากมุมซ้ายบนของหน้าต่าง- เราจะแสดงพิกัดเหล่านี้เป็นค่า
clientX/clientY
- เราจะแสดงพิกัดเหล่านี้เป็นค่า
- ยึกตาม document - คล้ายกับ
position:absoluteใน document root, คำนวนจากมุมซ้ายบนของ document- เราจะแสดงพิกัดเหล่านี้เป็น
pageX/pageY
- เราจะแสดงพิกัดเหล่านี้เป็น
เมื่อเลื่อน page ไปจนบนสุด ระยะจากบนซ้ายของ window จะมีค่าเท่ากับ ระยะจากบนซ้านของ document หมายความว่าค่าระยะจะเท่ากัน แต่หลังจากเราเลื่อน page ลงไปแล้ว ค่าที่ยึดยึดตามหน้าต่าง Browser (clientX/clientY) จะเปลี่ยน แต่ค่าที่ยึดตาม document (pageX/pageY) จะไม่เปลี่ยน
รูปภาพต่อไปนี้เป็นค่าระยะของ clientX/clientY และ pageX/pageY ของก่อนเลื่อนและหลังเลื่อน
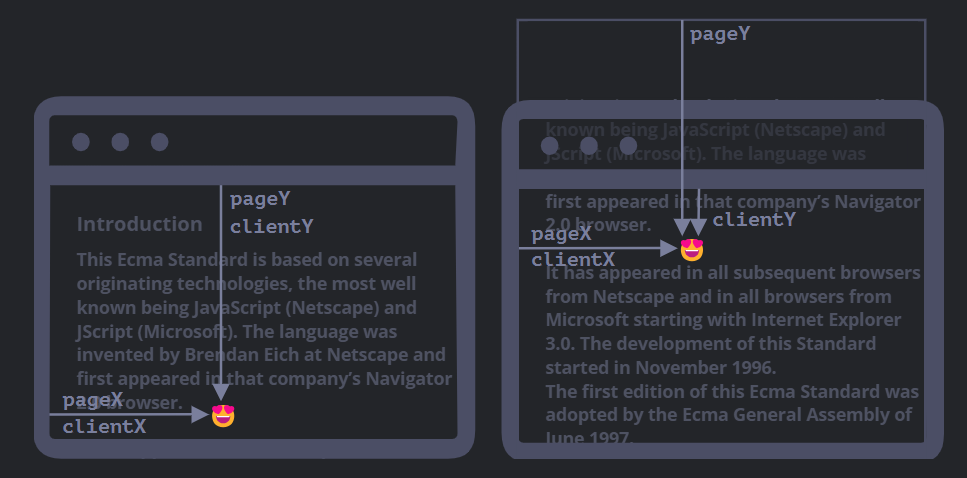
เมื่อเราเลื่อน:
pageY– ค่าระยะที่ยึดกับ document จะมีค่าเท่าเดิม มันนับค่าซึ่งยึดจากด้านบนของ documentclientY– พิกัดที่ยึดตามหน้าต่าง Browser จะมีค่าที่เปลี่ยนแปลงไป เพราะว่ามันเข้าไปใกล้ส่วนด้านบนของ หน้าต่าง Browser
Element coordinates: getBoundingClientRect
method elem.getBoundingClientRect() จะคืนค่าพิกัดของสำหรับสี่เหลี่ยมธรรมดา ที่ครอบคลุมไว้ elem ออกมาเป็น Object ของ Built-in Class DOMRect .
properties หลักของ DOMRect :
x/y– พิกัด x/y ของสี่เหลี่ยม ยึดตามหน้าต่าง Browser,width/height– ความกว้างความสูงของสี่เหลี่ยม (ค่าสามารถติดลบได้).
properties เพิ่มเติม:
top/bottom– ค่าพิกัดแกน Y ของขอบสี่เหลี่ยมleft/right– ค่าพิกัดแกน X ของขอบสี่เหลี่ยม
รูปภาพของ elem.getBoundingClientRect() output:
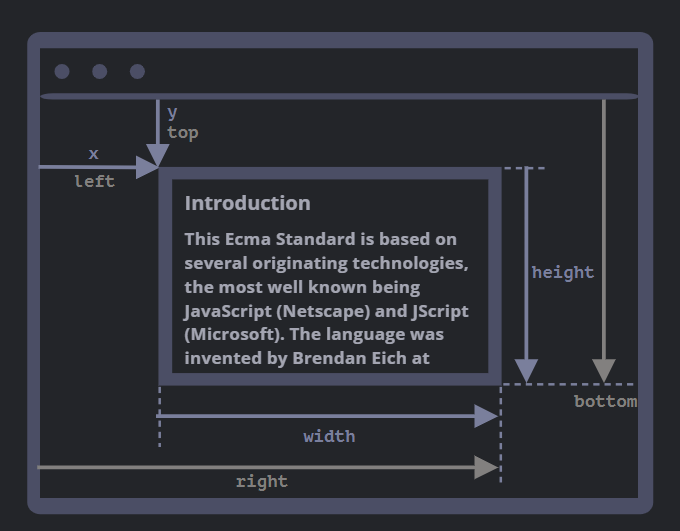
อย่างที่เห็น, x/y และ width/height ถูกอธิบายด้วย. โดยสูตรการคำนวณคือ:
left = xtop = yright = x + widthbottom = y + height
จำไว้ว่า
- ค่าพิกัดสามารถเป็นทศนิยมได้, เช่น
10.5. นั่นปกติ, เพราะว่า Browser ใช้เศษส่วนในการคำนวณ. - ค่าพิกัดสามารถเป็นค่าติดลบได้. ตัวอย่างเช่น เราเลื่อน
elemขึ้นไปอยู่เหนือหน้าต่าง Browser และเมื่อเราใช้elem.getBoundingClientRect().topค่าจะเป็นค่าติดลบ
elementFromPoint(x, y)
ในการเรียกใช้ document.elementFromPoint(x, y) จะคืนค่า ที่ใกล้ที่สุดตามพิกัดที่กำหนดให้
let elem = document.elementFromPoint(x, y);
ตัวอย่างโค้ดข้างล่าง คือ จะเปลี่ยนสี element ที่อยู่ตรงกลางจอ
let centerX = document.documentElement.clientWidth / 2;
let centerY = document.documentElement.clientHeight / 2;

let elem = document.elementFromPoint(centerX, centerY);

elem.style.background = "red";
alert(elem.tagName);
ยึดตามหน้าต่าง Browser, element จะเปลี่ยนไปตามที่เราเลื่อน
Using for “fixed” positioning
หลาย ๆ ครั้งเราต้องการพิกัดที่ต้องการเพื่อทำการจัดตำแหน่งบางอย่าง
ในการโชว์ซักอย่างใกล้ element ที่เราต้องการเราสามารถใช้ getBoundingClientRect ในการดึงค่าพิกัด และใช้ CSS ในการจัดตำแหน่งได้
ตัวอย่างเช่น function createMessageUnder(elem, html) ใช้เพื่อโชว์ข้อความข้างล่าง element
let elem = document.getElementById("coords-show-mark");

function createMessageUnder(elem, html) {
  // create message element
  let message = document.createElement('div');
  // better to use a css class for the style here
  message.style.cssText = "position:fixed; color: red";

  // assign coordinates, don't forget "px"!
  let coords = elem.getBoundingClientRect();

  message.style.left = coords.left + "px";
  message.style.top = coords.bottom + "px";

  message.innerHTML = html;

  return message;
}

// Usage:
// add it for 5 seconds in the document
let message = createMessageUnder(elem, 'Hello, world!');
document.body.append(message);
setTimeout(() => message.remove(), 5000);
Summary
ทุกจดใน page มีพิกัดของมัน
- พิกัดที่ยึดกับหน้าต่าง Browser –
elem.getBoundingClientRect(). - พิกัดที่ยึดกับหน้าต่าง document –
elem.getBoundingClientRect()รวมกับ current page scroll
ระบบพิกัดทั้งสองอย่าง มีทั้งข้อดีและข้อเสีย; มีหลายครั้งที่เราต้องการจะใช้อย่างอื่น, ซึ่งสามารถใช้ CSS กำหนดได้ position absolute and fixed